|
text by Vicki Sign up to get Mother Daughter Projects updates in your email!
This post is sponsored by Surebonder.
It's rare, but sometimes a project idea comes together just as the idea was imagined. This little mini ladder "tree" was that kind of project!
I find a lot of inspiration from the products and materials we use. When tasked with the question, "How can I use this," the ideas just seem to flow. That was the case when we were contacted by Surebonder to try out their hot glue gun and adhesive products for this post. Actually, what really intrigued me while going through their catalogue of products on their website, were the various adhesives they offer. I, perhaps like many of you, thought glue sticks were kind of like "one size fits all." Well, when I discovered the Wood Stik product, it got me to thinking about making a woodworking project with nothing but glue, rather than nails and screws. One thing led to another and we decided to make a "nail free" mini version of our ladder, alternative Christmas tree. If you've ever wanted to take a step into working with wood, this is the perfect beginner project. Take a look at how our mini tree came together! You can also check out our project on the Surebonder blog here.
2 Comments
text by Vicki Sign up to get Mother Daughter Projects updates in your email!
This post is sponsored by Quikrete.
With a few readily available materials, we are going to show you how to give your phone a 'hand!' Ha, couldn't resist the pun! We are making a 'hand' stand for your phone. With this stand, your phone is always, 'handy!' (Promise, that's the last one!)
Take a look at the video or read on for the tutorial.
text by Vicki Sign up to get Mother Daughter Projects updates in your email!
This post is sponsored by The Home Depot.
Around this time of year, it's become a tradition to come up with an alternative Christmas tree idea. This year is no exception!
The inspiration for this year's tree is from a visit to Epcot at Walt Disney World. Steph took the boat ride in the Land Pavilion and saw their version of a ladder tree, which became the model for ours. Take a look at how it came together!
text by Vicki Sign up to get Mother Daughter Projects updates in your email!
This post is sponsored by Quikrete.
It's October and that means it's time to decorate for fall and Halloween. One of our favorite materials to use for outdoor Halloween decorating is concrete. It's easy to work with and holds up well to hot, rainy Florida weather. It's very DIY friendly.
You may remember in 2016, we created concrete pumpkins that could be used as a flower pot or candy or candle holders. That's an easy project for any beginner. Take a look at that video if you want to create your own pumpkin. Now on to this year's concrete project. If you're like us, you may celebrate Halloween away from your home. If you're not home, you can just leave a bowl of candy at the door, but there is the very high likelihood that someone will pick it up and dump the entire contents into their bag. Well, with this project, that will be a little difficult! We're making a concrete candy bowl that can double as October fall decor. Take a look. As always, watching the video is great place to start.
text by Vicki Sign up to get Mother Daughter Projects updates in your email!
This post is sponsored by The Home Depot.
Since we've recently completed some rather large and on-going projects, we were ready for a little simple DIY. Recently our friend, Chris, gifted us a beautiful piece of 30 year old redwood. We thought it would make a great rustic tray or shelf, both simple and fast to complete projects.
The shelf idea won out since we found the perfect place for it. We decided on a rustic shelf with industrial elements that would fit in well with the decor in Steph's bedroom. Take a look at the video to see how it all came together or read on for the tutorial.
text by Vicki Sign up to get Mother Daughter Projects updates in your email!
This post is sponsored by The Home Depot.
Cleaning out the garage has been really hard for me. As a collector of stuff, sometimes I find it hard to let go. I commented to Steph during the huge purge of the garage that I really appreciated her not judging those things I wanted to keep. She didn't offer judgement on those things but simply put them aside in the "keep" pile. She was extremely kind and compassionate!
text by Vicki Sign up to get Mother Daughter Projects updates in your email!
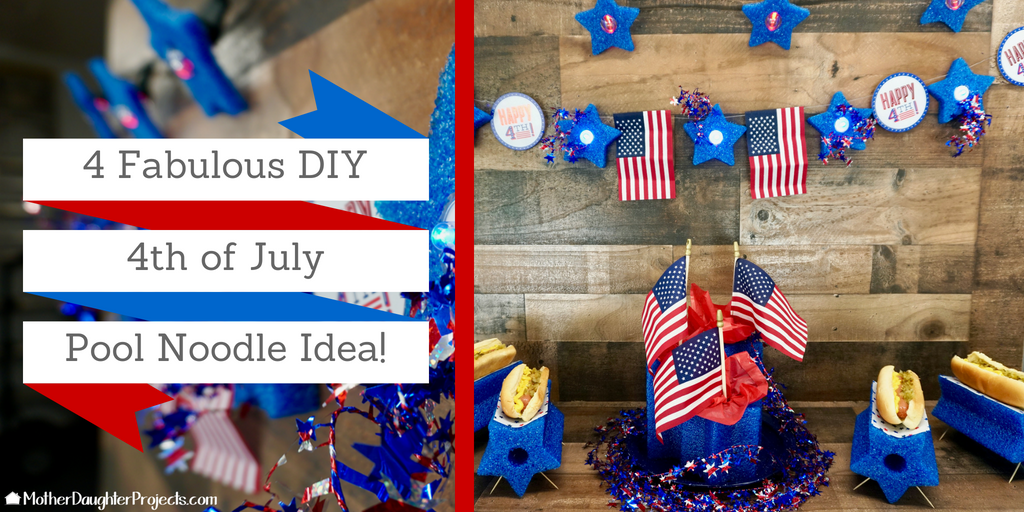
When we saw these blue star shaped pool noodles at Target we knew right away we had to DIY something with them! With July 4th right around the corner, the stars would be perfect for a red, white, and blue patriotic theme!
We came up with four very easy to make ideas using varies slices of the pool noodle.
Take a look at what we came up and then add your suggestions in the comments.
text by Vicki Sign up to get Mother Daughter Projects updates in your email!
We have been using the recipe service, Hello Fresh (#notsponsored), for about 8 months now. Since we work from home, the service gives us the option to have a fresh, healthy lunch in around 30 minutes rather than having to go out or to rely on sandwiches or reheated leftovers. We’ve worked it out that one of us takes a break to cook while the other continues to work. Since I don’t like to clean up the kitchen, I usually opt to do the cooking!
Hello Fresh comes with most everything you need to cook a meal including very well thought out and organized step-by-step instructions. A full color picture of the dish is on the front and the steps, complete with pictures, are on the other side. The size of the instruction card is a little on the large side. We’ve dealt with this minor inconvenience by propping it up where we cook, but really were looking for a more elegant solution. I follow the blog, My Repurposed Life, and when I found this post it became the inspiration for this project! text by Vicki Sign up to get Mother Daughter Projects updates in your email! Dixie Belle paint is Florida based, as are we, and they recently reached out to us to try their products. Since I was not familiar with their inventory, I took a bit of time to check out what they had as well as watch a few videos.
In my exploring, I found a product called Slick Stick. It was an 'Aha' moment! Back in 1991 when Steph was in kindergarten, I found some bedroom furniture through the newspaper classified ad. That was a time way before Facebook Marketplace and Craigslist! Used furniture was a little harder to source back then. Anyway, she used it for a long time and even moved the desk to her new house in 2013. The desk is long gone, but I still had the dressers and hutch pieces at my house. I had been very reluctant to get rid of them since they are so well built. I always thought I'd do something with them, but was stymied because the tops were Formica (plastic laminate) with plastic edging. I never knew what would work on these to allow me to paint. Back to that 'Aha' moment--the Slick Stick would work and I finally could paint and reuse the furniture! text by Vicki Sign up to get Mother Daughter Projects updates in your email!  Are you ready for a home decor project that is so simple it doesn't really need a tutorial?! This metal pipe and string light statement light fixture will do nicely!
In December, we picked up this string of lights in Ikea's clearance section. They were marketed as Christmas lights, but we thought they were classic enough to use any time of the year. There are lots of these kinds of lights on the market so you shouldn't have to wait until Ikea has a sale to get a set. text by Vicki Sign up to get Mother Daughter Projects updates in your email! Recently, with Steph’s help and the help of a few volunteers, we planned and hosted a craft night for women at my church. A search of Pinterest and a picture on Facebook provided the inspiration for our Valentine’s Day craft. I’ll provide some tips at the end of the post for planning a craft night for a group.
Every time we go to a local restaurant here in Tallahassee Florida, I notice something. I always notice the really large canvas artwork they have on the wall and the very simple frame around it. I quickly determined a way to mimic the look with simple materials from the hardware store. Well, two weeks ago, I made a piece of artwork and thought, hey, I have the perfect frame idea for that! Take a look at how it all came together for under $10.
text by Vicki Sign up to get Mother Daughter Projects updates in your email! The A-frame 2X4 Christmas tree we made for 2017 was designed to come apart and fold for easy storage. With the exception of the concrete base, the tree came apart and easily stored as expected. Because of the weight and size of the base, we knew we didn’t want to try to store it, but wanted a way to use it throughout the year making storage unnecessary.
We designed a PVC (plumbing pipe) stand that utilizes the base to serve as a garden flag holder! People, at least in the south, enjoy displaying and changing out garden flags to match the season. Although the base is heavy, it’s not so heavy that it can’t be moved around to where you want it. You could even pop it into the car and reassemble it at your next tailgate and hang your team colors from it!
text by Vicki Sign up to get Mother Daughter Projects updates in your email!
This post is sponsored by The Home Depot as a part of The Home Depot’s ProSpective Campaign. THD provided the Dremel tools used in this project.
Steph has been using the same coffee table/bench since her college days. We bought the faux leather clad bench for her dorm room from Target back in the day. It held up so well that when she moved to her home four years ago it moved with her to serve as her coffee table. It was starting to look a little ragged so she really needed to retire it but didn’t want to give up the storage it provided.
She came up with an idea to make a coffee table starting with a bookcase. She had specific requirements for it including portability (it needed to be on wheels) and it needed to have covered storage. text by Vicki Sign up to get Mother Daughter Projects updates in your email! Until recently, there were no hard surfaces near Steph's couch to set snacks and beverages. We had seen this idea for a flexible hard surface on Pinterest and decided to give it a try!
Be sure to watch the video, it's really short, but it gives you the entire run down on how to make one. It can be customized to whatever size you need.
text by Vicki Sign up to get Mother Daughter Projects updates in your email!
This post is sponsored by The Home Depot as a part of The Home Depot’s ProSpective Campaign. THD provided the Diablo Hole Saw used in this post.
We've designed and created alternative Christmas trees for the last couple of years as we like the look and the creative challenge. We set out to create something new for Steph's house. I don't remember if Steph had an idea, but if she did, I ignored it and lobbied for MY idea.
A few years ago I saw a basic wood tree in a mall window display. It had shelves for merchandise but it was basically a tall skinny wood triangle. We decided to create our own version of the display tree. Ours would have no shelves and would be supported by a concrete base. I really liked the concrete bases we made for Steph's nightstand and thought it would be a great idea to hold the tree up. Also, we designed the tree so that it could easily be taken apart for storage. Take a look at how it all came together!
text by Vicki Sign up to get Mother Daughter Projects updates in your email!
This post sponsored by Diablo Tools.
In April 2017, we were introduced to a new product that just blew us away! Of all the tools and accessories that we saw at the event, this was the one that had us wanting to try it ourselves. That product was sandpaper from Diablo called SandNet.
I guess what surprised us the most was Diablo took a very low tech product--sandpaper--tweaked it and vastly improved the life and function of it. Who knew sandpaper could be improved?! We were thrilled when Diablo asked us to partner with them to demonstrate SandNet. It was easy to say yes as SandNet has truly become our 'go to' sandpaper of choice. We needed the perfect project that would showcase it's ability to be more efficient and last longer than what most of us are used to using. A recent yard sale find of a piece of live edge cedar proved to be the perfect piece of wood. We decided to make a sofa table for Steph's house with it. Read on to see how we put the table together!
text by Vicki Sign up to get Mother Daughter Projects updates in your email!
This month we were challenged by some of our blogger friends to create a gift that could be completed in 30 minutes or left. (Links to the other participants can be found at the end of the post.) The "Half-Hour Holiday Challenge" really had me thinking about how to make something simple enough to be completed in a short amount of time but still be useful and gift worthy.
As an attender at the Haven blogging conference, we were given several sheets of M-D Decorative Aluminum Panels. They have many different styles but when we saw the one below, with it's symmetrical design, we thought it could be used to cover a mason jar and cut to fit the center ring to serve as a "frog" for making a simple flower arrangement for gift giving.
text by Vicki Sign up to get Mother Daughter Projects updates in your email!
It's no secret that we like to work with concrete! It's such a forgiving, creative material. I was doing a little concrete project Pinterest research and came across a concrete garden orb. I really liked the look, but I thought the idea could be adapted to make a creepy mummy decoration for Halloween. Also, I had a huge supply of soft, cotton cording/piping from a yard sale that I thought would be the perfect material to use.
text by Vicki Sign up to get Mother Daughter Projects updates in your email!
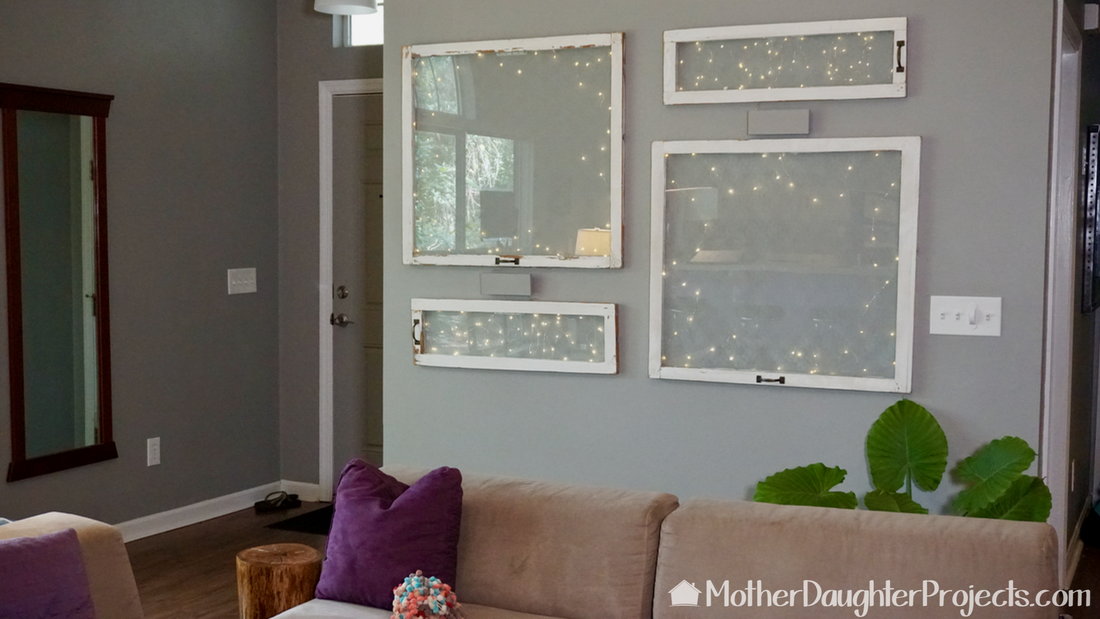
If you know me, you are aware that I brake for trash. One Saturday morning as I traveled to yard sales, I spotted an aquarium in a trash pile. I quickly braked to pick it up. I didn't notice at first, but sitting with the aquarium were four large vintage windows with the glass intact. I thought, "what the heck, they might be usable for something", so into the Honda they went.
That was also the yard sale day that I found several pieces of oak tongue and groove flooring, a large mantle size piece of cedar and a live edge piece of cypress (all for the bargain price of $15). My car was quite full by the time I loaded it all up. I wasted no time dropping off the aquarium for my grandkids (I had been tasked with finding one and what's better than finding a free one!?) and then took the rest to Steph's house. I'm never sure how she will react to my "finds," but she liked the windows and decided they'd make a great decor for a blank wall in her house!
text by Vicki Sign up to get Mother Daughter Projects updates in your email!
This post is sponsored by The Home Depot as a part of The Home Depot’s ProSpective Campaign. THD provided the Ridgid Compressor used in this post.
Almost any tutorial on dining room chair reupholstering has you finished in an afternoon--"it's simple, try it," the tutorial assures! Well, I found, reupholstering mid century dining room chairs with a seat and a back is no simple, afternoon project!
A little background. I've been searching for a mid century dining room chairs and table for some time now. I had a "farmhouse" style table by Ethan Allen that was serving me well, but it really wasn't my style. Less than a year ago, I found a local Craigslist post for a mid century table and chairs--no picture was included. I was intrigued and messaged the seller for a pic. The seller responded promptly and sent me a picture of the table and chairs of my dreams! I quickly called and set up an appointment to go see them. I went with cash in hand and the largest vehicle we own in the hopes that it would also be perfect in person and I could take it home!
text by Vicki Sign up to get Mother Daughter Projects updates in your email!
This post is sponsored by The Home Depot as a part of The Home Depot’s ProSpective Campaign.
text by Steph Sign up to get Mother Daughter Projects updates in your email!
We just finished a large clamp and cement book holder. We love the look but also wanted to try a tiny version with a wood base. It seemed like it would be the perfect place to hold our business cards!
text by Steph Sign up to get Mother Daughter Projects updates in your email!
A few weeks ago I was watching a TV show on Netflix and in the background of a scene I saw a neat book holder made out of a c-clamp and live edge wood. I couldn't get a good picture of it, because it was just in the background, but hat cool design stuck with me. I told mom my idea and that I wanted to make one! The only problem was, how would we cut an opening for the clamp in a piece of wood? I thought up some ideas, but I realized an even easier way would be to cast the clamp in concrete! Seemed like a very easy DIY version so I went to making. (I did try a tiny wood version, you can find that here).
text by Vicki Sign up to get Mother Daughter Projects updates in your email!
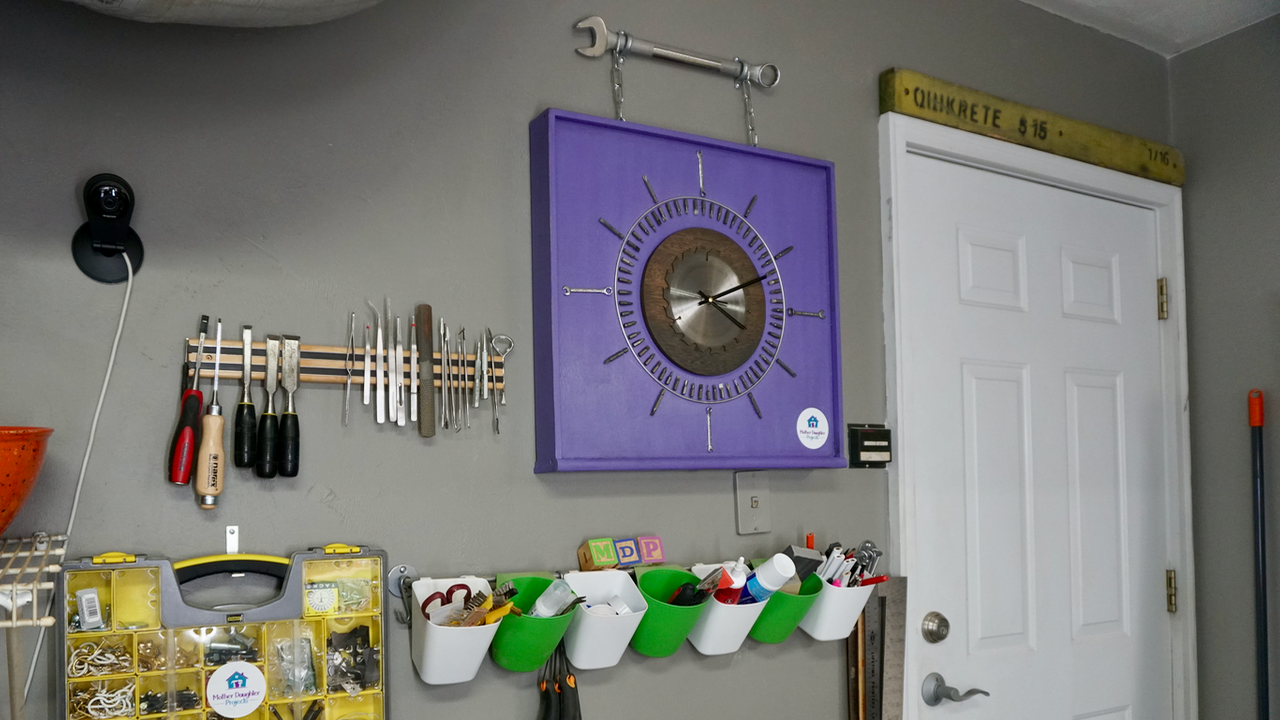
It's no secret, I tend to collect and save what most people label as "junk!" It frustrates Steph but every once in a while that hoard comes in handy.
This "use what you have" clock project is an example of that. I have to tell on myself. We got a nice set of drill bits and drivers and Steph threw the old ones in the trash. I saw them and promptly fished them out, much to her dismay! She rolled her eyes and wanted to know what I was going to do with them. See those little bits up there in the picture, the seconds' markings on the clock? Those are the "fished out of the trash" bits! (After seeing the finished product, Steph apologized for rolling her eyes!) |

Mother Daughter Projects
|
