|
text by Vicki Sign up to get Mother Daughter Projects updates in your email!
Both Steph and I really like our app supported smart home devices. I only have a few--some Hue lights and my Ecobee smart thermostat. Some smart devices must be hardwired, like the thermostat, but many others can be retrofitted into existing fixtures, like using smart bulbs in current lamps and overhead lighting.
Some things, like lamps that use speciality bulbs that don't have a smart bulb equivalent, can be made to operate as a smart device with simple adaptations like the switchmate that turns switches into smart ones and using smart plugs in outlets to control whatever is plugged into it. The best thing, is nothing is hardwired--it's simply plug and go! Watch the video above to learn all about smart plugs!
0 Comments
text by Vicki Sign up to get Mother Daughter Projects updates in your email!
After a storm here in Tallahassee in September 2016, we picked up a bunch of cut up logs from the neighbor across from my house. The logs have been drying all this time in Steph’s garage and are now ready for projects. We’ve already used two in a previous project.
The most interesting of the salvaged stumps was the one with a hole partially through it. We knew it would make some kind of cool project and thought a lamp would be interesting to try.
text by Vicki Sign up to get Mother Daughter Projects updates in your email!
This post is sponsored by The Home Depot as a part of The Home Depot’s ProSpective Campaign.
We here at Mother Daughter Projects like technology, so the new Tick from Milwaukee is something we've been wanting to try out. The Tick is an app based, bluetooth enabled device that helps you keep track of your stuff!
Here's what you need to know:

We came across this neat product called SnapPower, which adds a USB port to an outlet cover. This seemed like a great solution for a bedroom, kitchen, or anywhere you need to charge your phone, tablet, camera, and more!
Before we discovered this product, the only way to add a USB was to completely remove the existing outlet and wire in a new USB compatible one. This one requires no wiring! We ordered one on Amazon to give it a try. It really is a fast way to add some tech to your home!
text by Vicki Sign up to get Mother Daughter Projects updates in your email!
You know when you’re all comfy and cozy in bed; the last thing you want to do, is get up and walk down the hall to adjust the temperature at the thermostat! Here in Florida the weather varies--a lot! Sometimes it’s too cold, sometimes too warm and it varies the most when you’re trying to get comfortable at night. The solution to my on-going temperature problems are as close as my phone!

A few months ago I (Steph) bought an Amazon Tap to try out. I like that it's a portable speaker that I can take around my house- especially in the garage when working on projects.
I was really blown away by the great sound quality and the number of features it has. Check out the video above to see our favorite features of Amazon Tap (and see how to add hands-free voice control at the bottom of this post)!
text by Steph Sign up to get Mother Daughter Projects updates in your email!
We love adding smart products to our homes to make life easier. When I moved into my house 3 years ago, I was looking for a product that would simply turn on a light switch for me. I didn't want to rewire or get a smart bulb, I just wanted a device to physically move the switch for me. I even drew up my own ideas on how it would work.
Well, a few months ago I found the product does exist! It's called Switchmate, and it in fact, it simply turns a light switch on and off. It does it using bluetooth and the setup couldn't be simpler. Check out 5 ways to use Switchmate in your home today!
We have previously posted on how we installed smart lights at my house. I was so pleased with the first set of Hue smart lights, installed above my kitchen cabinets, that I immediately asked Steph to get additional smart bulbs for me. I put those smart bulbs into lamps in my living room and bedroom. They are set to come on and off automatically at night.
The next Hue product I got was the Hue Go. This smart light functions as a plug in or on a rechargable battery with a run time of three hours. What I like about this light is it can be used without having to be connected to wi-fi and the portability feature. It also can be programmed and controlled via the Hue app on my phone. Since I already have the Hue Bridge installed it was a snap to set up. With the app, I can use the light as a modern alarm clock. With the Hue Go set in this mode, I can be awoken with light that increasingly get brighter over a set period of time. It mimics the rising sun. It's much more pleasant to be awoken this way rather than the blare of a piercing alarm! Since I'm not a morning person, this works well for me. 
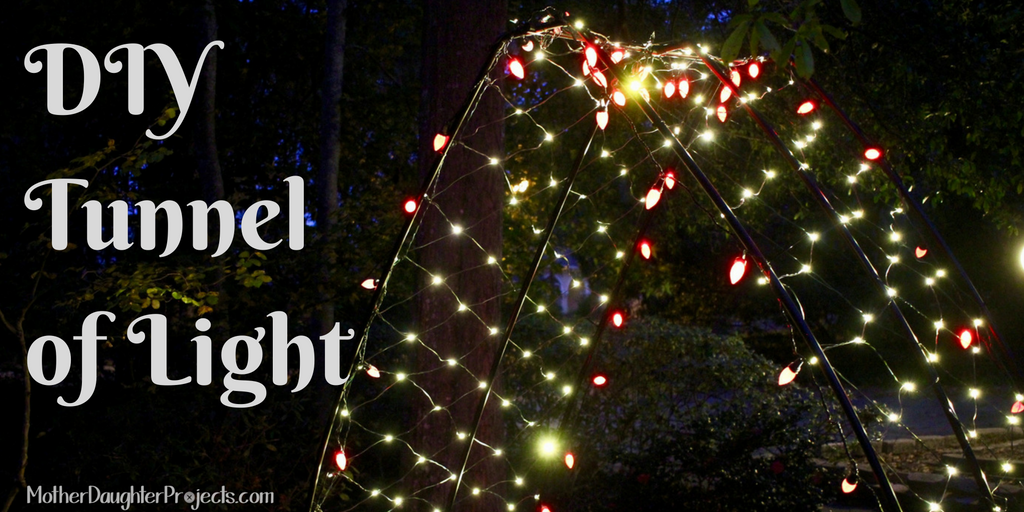
For the past few years, I’ve (Vicki) strung lights in the tree above the sidewalk to my front door. The branches are now too tall to comfortable reach so I needed a new way to have lights over the sidewalk.
We decided to use PVC pipe to construct a structure on which to secure lights. We first used PVC pipe when we made a “tent” for grandson Tyler’s bunk bed. That’s where we learned it was pretty bendy in the smaller diameters so we thought it would be the perfect material to use. It must be noted that our final design was our second try at a PVC arch. That’s the cool thing about designing a DIY project. Sometimes it works out in the original design, sometimes it's necessary to develop a plan B! In designing the arch, it had to meet a couple of criteria: materials must be readily available and it must be collapsible for storage, so parts could not be permanently glued.
text by Vicki Sign up to get Mother Daughter Projects updates in your email!
When it comes to December decorating, we like simple and quick! This project meets those two requirements. In this DIY we are making a star with string lights using screws driven into a fence in which the lights are wrapped into a star shape. We are using App Lights from Home Depot, but any lights will work. If you use App Lights, this is a decoration can stay up year round as you can change the color to match the season or holiday.

Continuing our series on home automation, we focus on thermostats. Replacing a traditional thermostat with a smart one gives you a couple of advantage.
Installing a smart thermostat is a doable DIY for homeowners. Do your research to determine which brand is right for you. A good hint is to check to see if the company is committed to keeping their software and app up to date.
Steph has been adding to her home automation collection ever since purchasing her house in 2013. I just got my first smart device this summer. I’m a little slower, maybe even reluctant, to add automation to my way of doing things mainly due to lack of knowledge about what is available and what exactly I need.
Steph, being more technically minded than myself, installed a very handy USB port on her kitchen counter shortly after moving into her house. Despite remodeling a few years ago, I didn’t see the need to have one installed.
Well, fast forward four years and I now see the need to have one! In this video, we install a USB outlet at my kitchen counter. With an installed USB port all I need now is the USB cable to charge my phone. I love that the port is at counter top height rather than the normal electrical outlet height. Not really a problem for me now, but as I age, it could be.
One of the things I had my electrician add when I remodeled my house in 2012 was to put an outlet above the kitchen cabinets in anticipation of adding lights at some point. A while back Steph and I saw these Philips Hue lights (shown below) on sale at Home Depot and we picked them up for my kitchen. I knew I wanted remote control lights and these smart lights fit the bill.
The hardest thing about installing these lights was dragging the 10" tall ladder from Steph's house and brining it into my house! Check out the simple install for these lights in the video above.
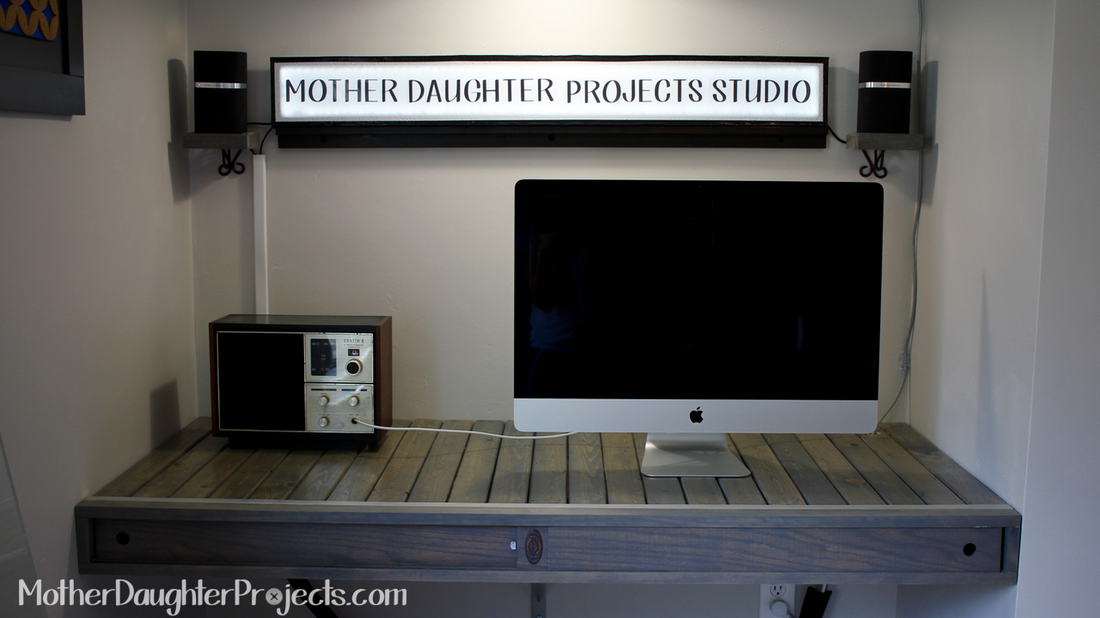
To complete the floating desk nook we added a lightbox art piece and holders for the computer speakers. Both were made from recycled materials with some purchased parts. Take a look at how we took a metal frame from a deconstructed desk and turned it into a lightbox.
Mom volunteers at a thrift store and she grabbed this find before anyone else! She took it home where I spotted it and took it to my house to see what I could make. After some thought, I realized it would be a great spot to put my computer hard drives and dock. The front would look like a radio and the back could be open (for ventilation) and hide some of my tech gear. I’m working on a new office desk so this radio came along at the perfect time.
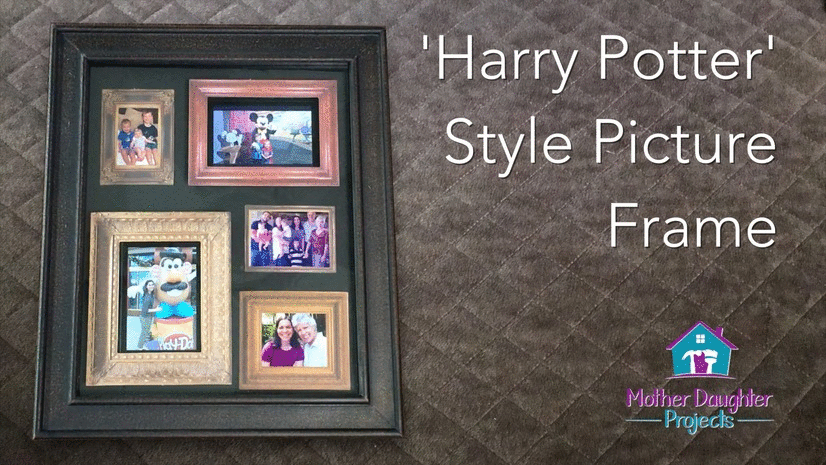
I've been a fan of Harry Potter since high school. Love the books, love the movies, love the theme park! I also love Apple and all my devices. I have kept all my old mobile devices through the years in hope that I could use them again one day for something. I found that something! I used my first and second generation iPod touches for this project (I have a few old iPhone's waiting for a project too).
As a Harry Potter fan, I know this is not exactly like the Harry Potter pictures. The people actually move in Wizarding World pictures but old iPods don't work with live photos- so if you were to use new tech in this project you could probably be truer to HP pictures. Watch the video below to see how it came together!
In a related video, we showed how to install a TV antenna to watch TV for free. In this video, we are going to cover how to schedule/record live TV.
In this video we setup an indoor HD antenna to watch free-to-air network channels. No cable subscription needed. Check out dtv.gov/maps to see what channels you can get in your area.
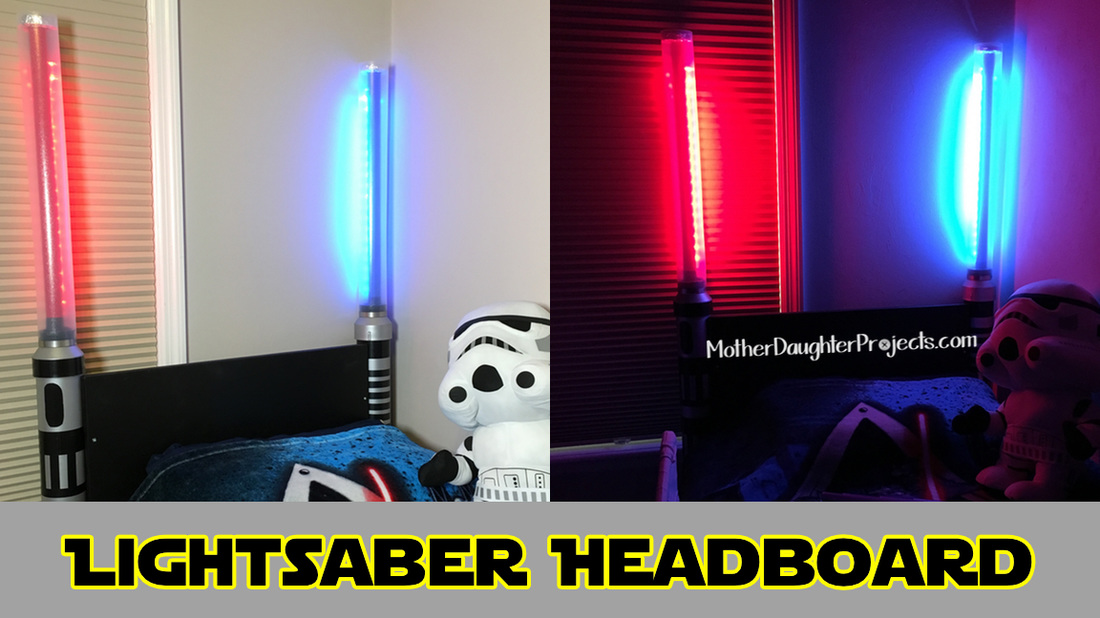
Steph and our nephews/grandsons are big Star Wars fans! The idea for this project came to Steph one day while we were driving in the car. She saw a pile of newspaper end rolls and tried to think of DIY projects they could be used in. She came up with a lightsaber headboard of course! Making this special, unique gift for our nephews/grandsons motivated us to move forward! We started figuring out the plans together (and ultimately didn't use the end rolls, as PVC worked better).
Check out the video below to see how this project came together! 
Watch our step-by-step instruction video on how to build the Lego Apple Watch Stand/Charger.
Also check out our project on Instructables.
I pre-ordered the Apple Watch Sport and was thrilled when I found out it would arrive on launch day! The moment my watch arrived I called Mom over to help me unbox and set it up!
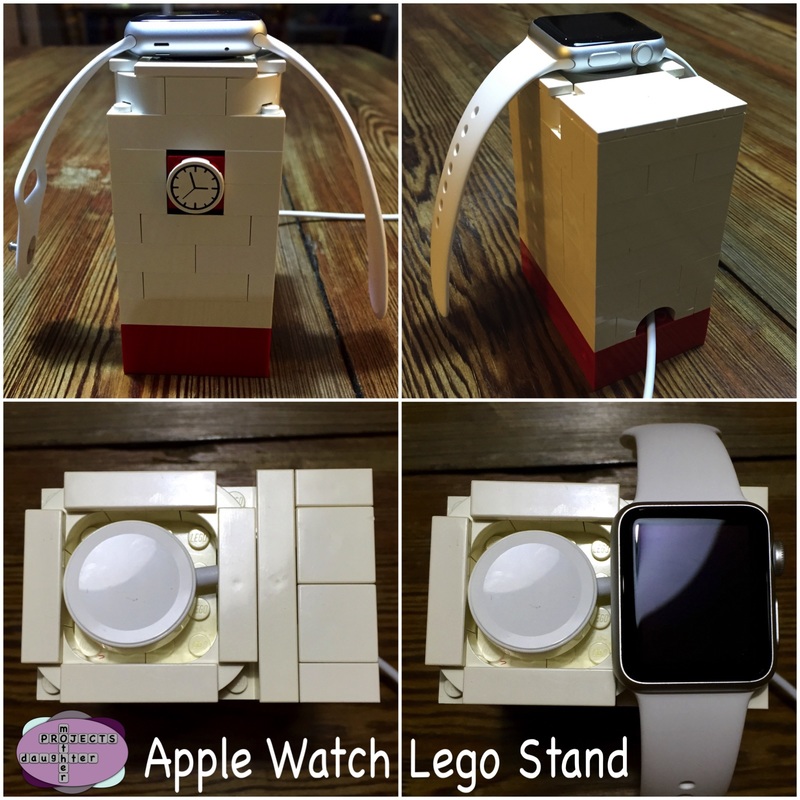
Tutorial on building the Lego Apple Watch Dock coming soon.
|

Mother Daughter Projects
|