Mother Daughter Projects

  • Blog
  • About
    • Contact
    • Privacy Policy
  • Tools
    • Tool Tuesday
  • Maintenance
  • Improvement
  • Decor
  • Tech
  • Blog
  • About
    • Contact
    • Privacy Policy
  • Tools
    • Tool Tuesday
  • Maintenance
  • Improvement
  • Decor
  • Tech

DIY for Homeowners

Fix for a Tipping Dresser in Kids Room

5/27/2015

2 Comments

 
Kid Safety. MotherDaughterProjects.com
The addition of shims & L brackets makes these dressers safer for kids.
Recently Vicki purchased & made over a couple of used dressers for use in the grandsons’ room. The two-year-old doing what two-year-olds do quickly figured out how to open the drawers & almost had one of the dressers fall on him. A quick fix was needed to secure these falling hazards. 

There are commercially available furniture straps to prevent tipping/falling, but a search of four stores including the big box hardware stores revealed nothing available. These needed to be secured now & there was no time to order online. 

Here's link to a post about furniture safety from Ikea.
This is our fix:

Materials/Tools:
  • Wood or composite shims
  • L-brackets (aka corner brace)
  • Screws—we used Walldog screws for the drywall & the screws that came in the RubberMaid FastTrack package for the studs
  • Small 3/4” wood screws were used in the dresser top
  • Drill/bits
  • Magnetic Stud finder (order online—it’s the best one around--see demonstration)
Kid Safety. MotherDaughterProjects.com
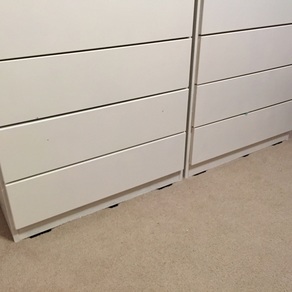
Shims under the dressers--firsts step in making these safer from tipping.
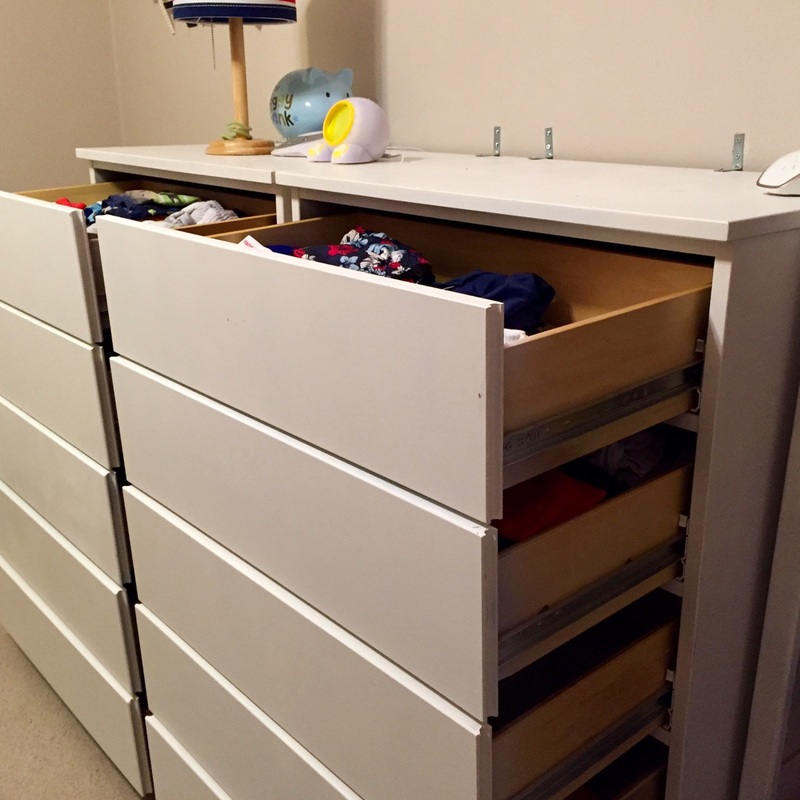
We started by placing three sets of shims under each dresser making the front a bit higher than the back. This helped the dresser to tip less easily but with these dressers securing to the wall was absolutely necessary.

We tried to secure the L-bracket to wall studs where we could. We used two L-brackets per dresser. A bracket on each dresser was secured to a stud & the other through the dry wall with a Walldog screw. We drilled holes first for all the screw placement including the top of the dressers. If these were heirloom dressers, we would have found a less obvious place to place the L-bracket on the dresser, but these are not & right now it’s all about safety.

We tested the brackets by opening all the drawers to see if more work was needed. The dressers held in place well!
Kid Safety. MotherDaughterProjects.com
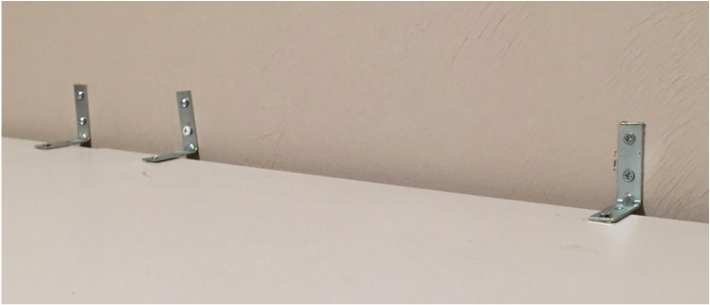
L brackets in place.
2 Comments
PurpleButterfly link
12/15/2016 06:33:02 am

I had the same problem with my daughters.
The following is my "out-of-sight" solution..
Please forgive my lack of proper names for materials.

1) At the top of the back of the chest,
Screw one of those metal "eyelets" on each
side.
2) At the bottom of the chest,
Screw one of those metal "eyelets" into the
baseboard of the wall.
3) Tie thin, but sturdy, wire vertically between
the two "eyelets" leaving no slack in the
wire.

This solution eliminates the search for studs,
Is sturdier than attaching to dry wall,
& is hidden from sight.

It worked great for me,
Especially since I had twins who competed with each other to see who could climb the highest.

Reply
Steph
12/15/2016 11:04:14 am

Great idea! Thanks for sharing.

Reply


Leave a Reply.

    MotherDaughterProjects.com

    Mother Daughter Projects
    ​
    Steph & Vicki

    We're homeowners sharing our DIY adventures as we learn to maintain, improve, decorate, and ​use tech in our homes.
    Share your projects with us here:  
    ​#trylearnshare
    MotherDaughterProjects.com
Mother Daughter Projects, LLC ∙ est. 2015 ∙ Tallahassee, FL by Vicki & Steph ∙ Privacy Policy