|
text by Steph Sign up to get Mother Daughter Projects updates in your email!
I went to see the movie Wonder Woman a few weeks ago with my family. I didn't know much about the superhero going in, so the first time I saw the glowing rope I didn't know what it was, but it looked cool! Wonder Woman has this glowing yellow/gold rope that is called a magic lasso or lasso of truth. The first time I saw it in the movie, I thought it looked like el wire. Electroluminescent wire (el wire) produces 360 degrees of light and is often used in costumes. I have been wanting to use it in a DIY project. During the movie I came up with an idea of making a lamp out of it- inspired by the Wonder Woman film!
0 Comments
text by Vicki Sign up to get Mother Daughter Projects updates in your email!
Steph had an idea to create a lamp that was totally made of concrete which included the lamp shade. It was an interesting idea but I couldn't quite grasp the concept. Actually, it wasn't until the lamp was finished and I saw how it was put together that I had the "ahh ha" moment!
With Steph's idea in her head, we set out to find suitable molds for the base and lamp. Target had everything we needed. We picked up a few styles of water in various sizes of bottles for the base and found two flower pots in different sizes that would be perfect in which to cast the shade. A trip to The Home Depot was all we needed to fill the remainder of our materials list!
text by Vicki Sign up to get Mother Daughter Projects updates in your email!
Steph's been wanting to make another concrete project and came up with an idea for using copper pipe to make a holder for pens/markers for her desk. As you know, her desk is very rustic industrial looking so a concrete and copper pipe holder is a perfect addition to her desk.
By the way, copper pipe ended up being way easier to cut than either of us realized!
text by Vicki Sign up to get Mother Daughter Projects updates in your email!
This post is sponsored by The Home Depot as a part of The Home Depot’s ProSpective Campaign.
We travel to New York City every couple of years and do our best to see as many Broadway shows as possible while we're there (our personal best is 9 on one trip!). Steph has been very good about saving a Playbill as a souvenir from each show. We now have quite a collection! Steph wanted a way to organize and display the Playbills and came up with the idea for the DIY Memory Keeper box. This could be adapted for many types of collections.
text by Vicki Sign up to get Mother Daughter Projects updates in your email!
This post is sponsored by The Home Depot as a part of The Home Depot’s ProSpective Campaign.
There's nothing like natural elements to make your home decor feel warm and welcoming! You can add those elements with flowers, greenery, a water feature, or natural wood furniture and accessories like these end tables made from tree stumps.
text by Vicki Sign up to get Mother Daughter Projects updates in your email!
Recently, we were asked by Kreg to create a sponsored Mother’s Day project for BuildSomething.com. Being that we are Mother Daughter Projects, what better team to ask than us?! We have purchased and used a number of Kreg products over the years, and jumped at the chance to add a project to Build Something!
Check out the tutorial for how to transfer pictures to wood below!
text by Vicki Sign up to get Mother Daughter Projects updates in your email!
Ever had one of those projects that seemed to take a long time to finish? This little Starbucks’ decor inspired table was that kind of project for us!
Many months ago we saw a little side table at our neighborhood Starbucks that we thought we could DIY. The Starbucks table had a metal base with a wood top--very industrial looking.
text by Vicki Sign up to get Mother Daughter Projects updates in your email!
During a recent trip to our local Ace Hardware, we discovered they had mini bags of Quikrete mortar mix. Well, we had to buy it, cause you know, “everything in mini form” is totally cute!
Now, what to do with our little mini bag? While in Target’s home accessory aisle, we happened upon a marble and wood decor piece which gave both of us the same idea- at the same time. A concrete and wood door stop! Once home we found a beautiful scrap of wood that would become the base and on another Ace trip we found the perfect hardware to use as a handle.
text by Vicki Sign up to get Mother Daughter Projects updates in your email!
For a recent live demonstration of power tools, we made two versions of a wood tray. A pallet version you can see here and this version using purchased lumber.
text by Vicki Sign up to get Mother Daughter Projects updates in your email!
If you've followed us for some time, you know that we like our pallets! We have utilized pallet wood in a number of projects including shelves, a coffee station, sign and now we add a pallet wood tray to our inventory of posts!
For a presentation of Power Tools 101 this spring at the Tallahassee French Country Market, we created this tray out of pallet wood. We used the build to demonstrate how to use various power tools in real time. As far as pallet projects go, this is more straight forward than most. We used a pallet we found at a motorcycle shop. It ended up being the exact width we needed for our tray so no trimming of the boards, with the exception of the end boards was needed!
text by Steph Sign up to get Mother Daughter Projects updates in your email!
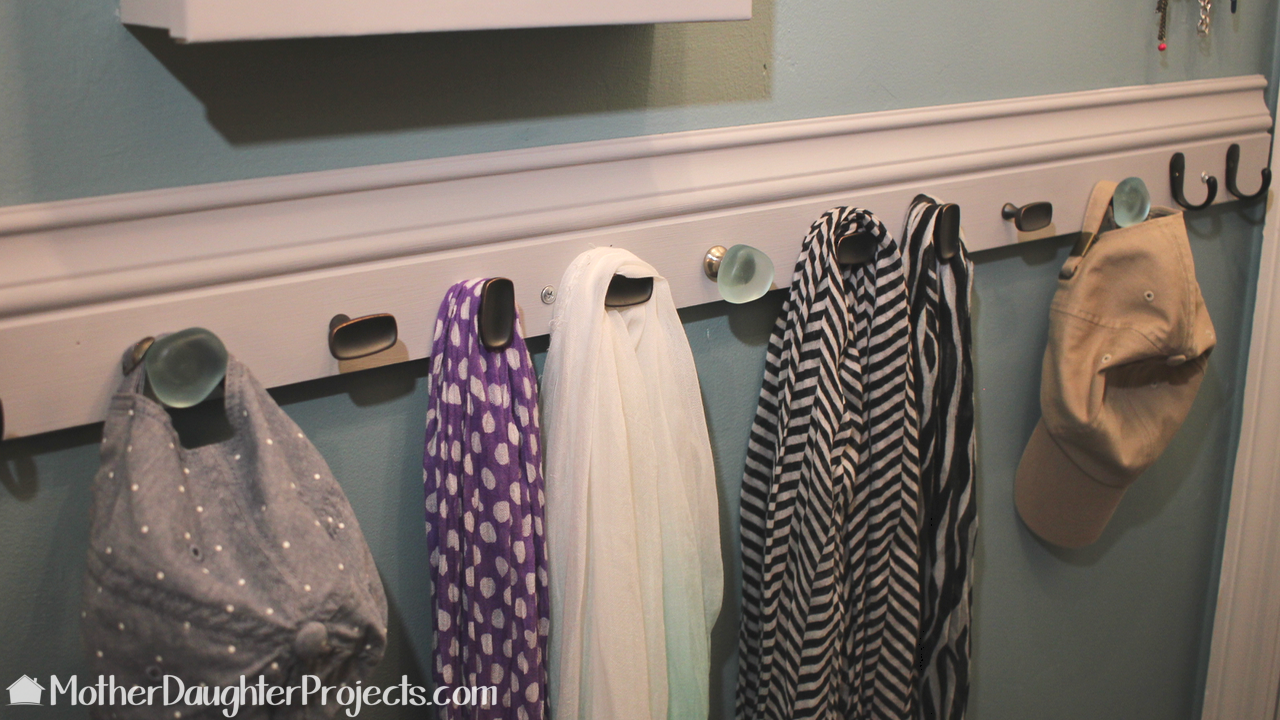
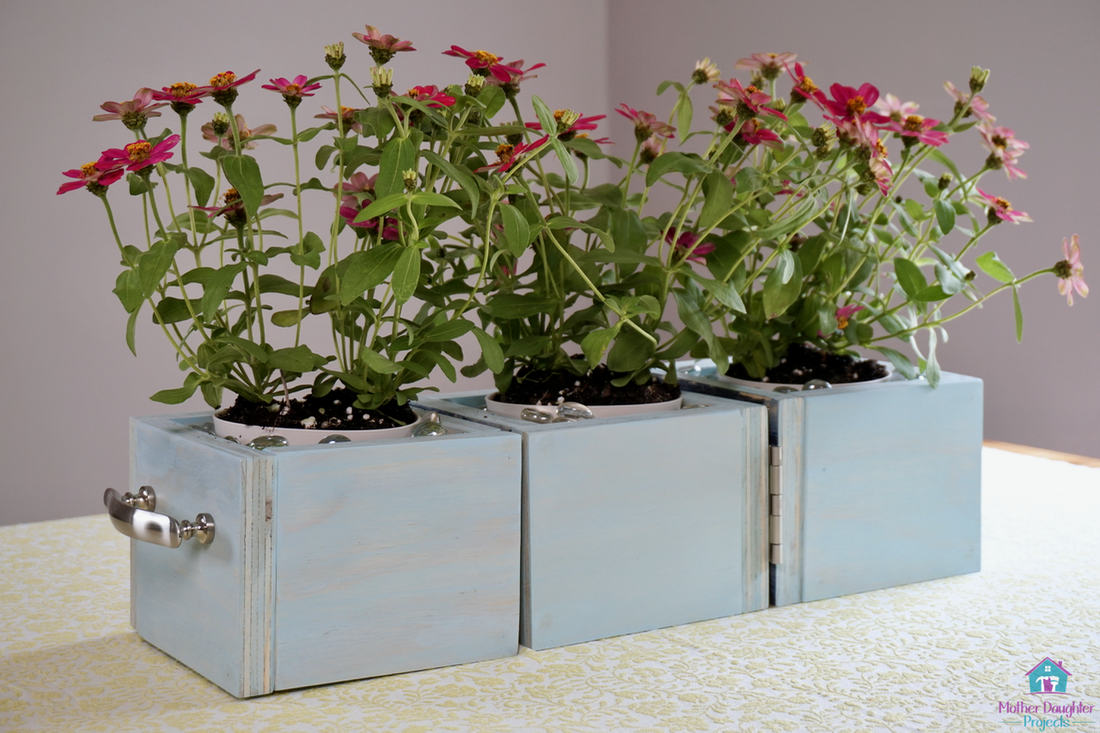
We just finished a makeover of my walk-in closet. While working on it, I realized I needed a place to store scarves and hats. I checked the store for solutions but couldn't find the right thing at an affordable price. We decided to DIY something! Check out how we made this organizer with spare cabinet knobs.
text by Vicki Sign up to get Mother Daughter Projects updates in your email!
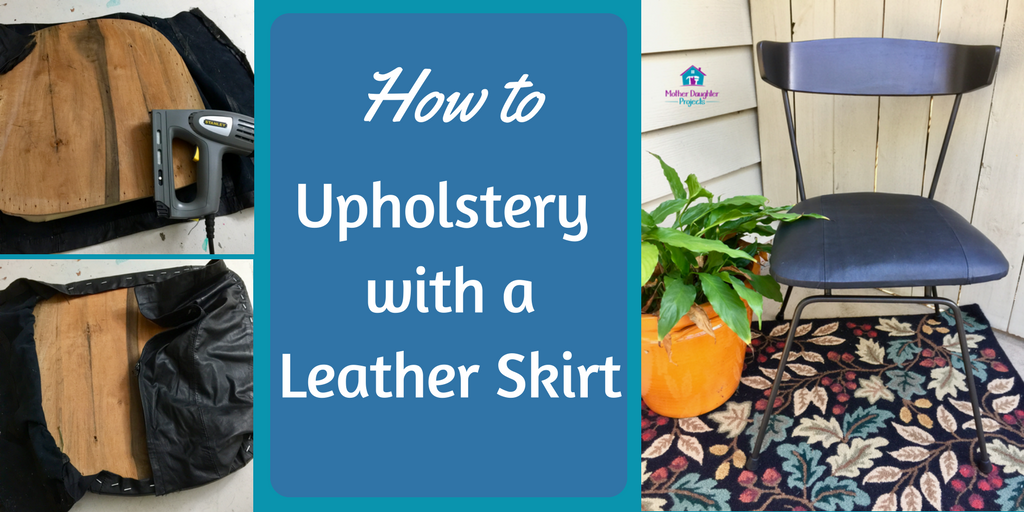
Most Saturday mornings I’m off to yard sales in search of treasures to upcycle. I often come across chairs and really have to restrain myself from buying more—that’s because I have a dozen or more currently stored in my garage!
This week, one of those chairs got a long-awaited makeover. This wrought iron, mid-century chair was purchased for the whopping sum of $1.00. It was structurally sound but needed work on the veneer, new upholstery, and new feet.
text by Vicki Sign up to get Mother Daughter Projects updates in your email!
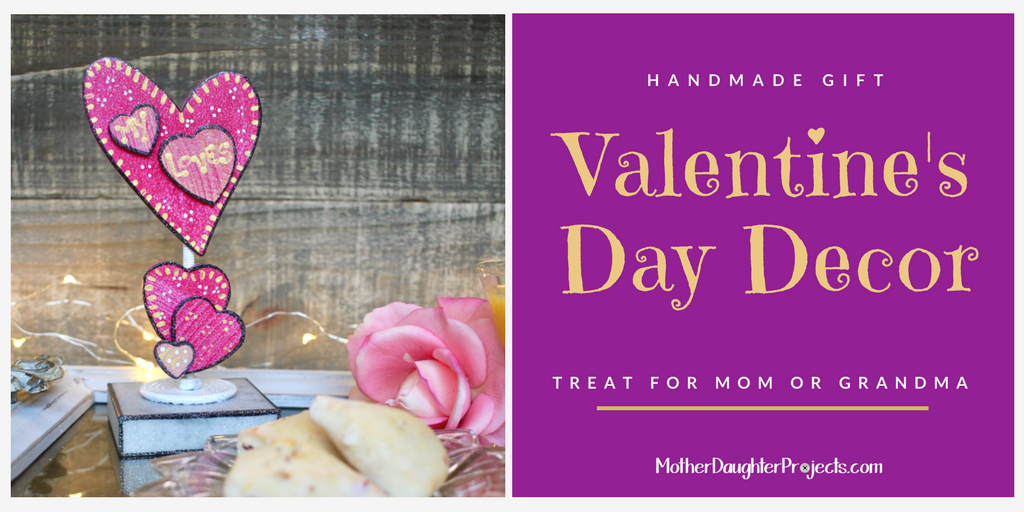
We received a Valentine's Day DIY Project Kit of Testors products today and couldn't wait to get started! Since I'm the crafter of the team, I shared a few ideas with Steph, and we agreed on a decor piece.
We were tasked with using a selection of the products in the box to decorate the included wood hearts. Along with the wood hearts, we used parts from an old trophy as the base of the project. We decided to make a decor piece that could be used as a special addition to a Valentine's Day breakfast for a mom or grandma. In our piece, "My Loves" refers to my three grandchildren which are represented by the three hearts below the larger heart.
text by Vicki Sign up to get Mother Daughter Projects updates in your email!
text by Vicki Sign up to get Mother Daughter Projects updates in your email!
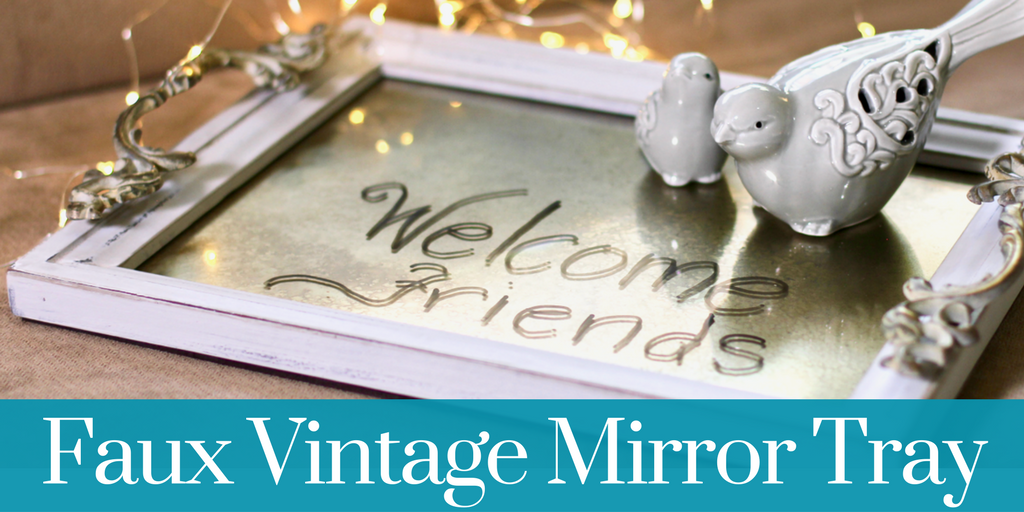
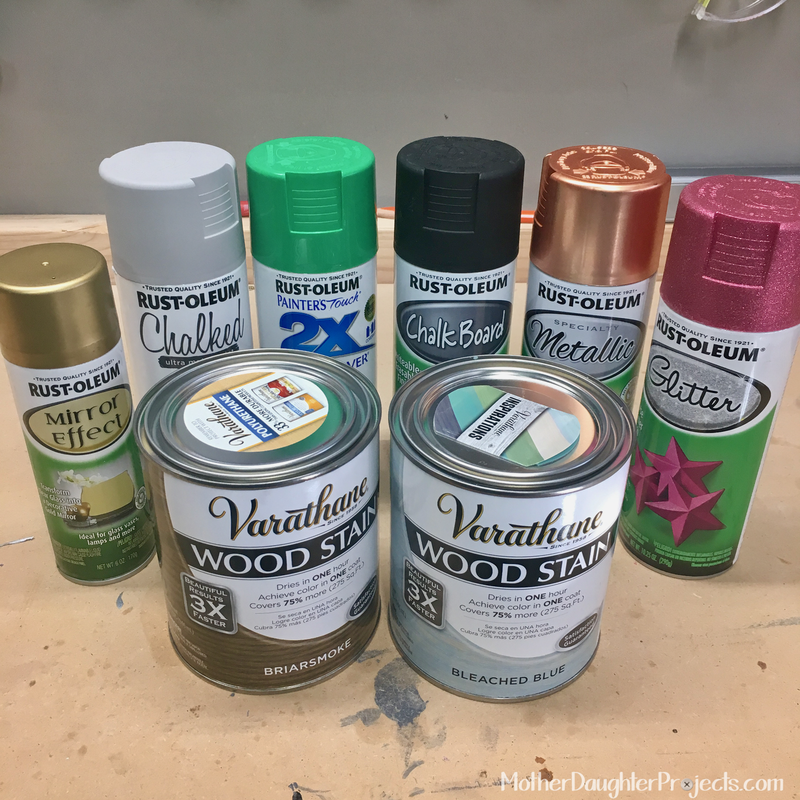
Recently we were challenged by Rust-Oleum to create an upcycle project using a variety of paint products that they sent to us. We created two upcycle projects for the challenge--one to enter into a blogger contest and this one just for fun!
The goal was to upcycle something from "found" objects. For the tray we used an old vintage frame, backing from an old desk, and a pair of vintage drawer pulls. Take a look at how it all came together.  We are participating in a Handmade Holiday Gift Series with fellow bloggers. As usual, when faced with a challenge, we each had our own ideas of what to do. We barely considered Vicki's idea because Steph's idea was perfect!
Our gift idea is a take off of all those Pinterest worthy "mix in a mason jar" ideas. We decided instead of a food mix we'd make up a DIY concrete kit in a bag! We have enjoyed learning how to use concrete this year, but realized there is not an easy, simple way to experience using concrete without having to buy a huge bag of concrete. Putting together a concrete kit, with everything your gift recipient will need to make three candleholders, allows you to give the gift of creativity to all your DIY friends.
text by Steph Sign up to get Mother Daughter Projects updates in your email!
Looking for a little different Christmas tree this year? Check out this tree made using wood dowels and Perrier bottles! How-to video above.
A year ago on vacation at Walt Disney World, we spotted a really neat piece of art at the Epcot Food and Wine festival. We took pictures and thought it would make a great DIY project one day. That day has come! I used this as inspiration for the Christmas tree version I made. 
One of my favorite ways to create is by using “what I have” on hand—stuff that is in my stash of raw materials, odds and ends, including lamps in all state of disrepair. When Steph challenged me to create an unconventional Christmas tree, I headed to this stash to see what I could come up with. I was intrigued by the idea of transforming the “bones” of a lamp into a multi-level tree complete with wiring to make it a functional lamp as well.
I decided to use wood platters and other circular wood objects as my layers with assorted lamp base parts as dividers between the layers. I also used a metal tray when I realized I needed a larger base and found I could drill through it easily enough. 
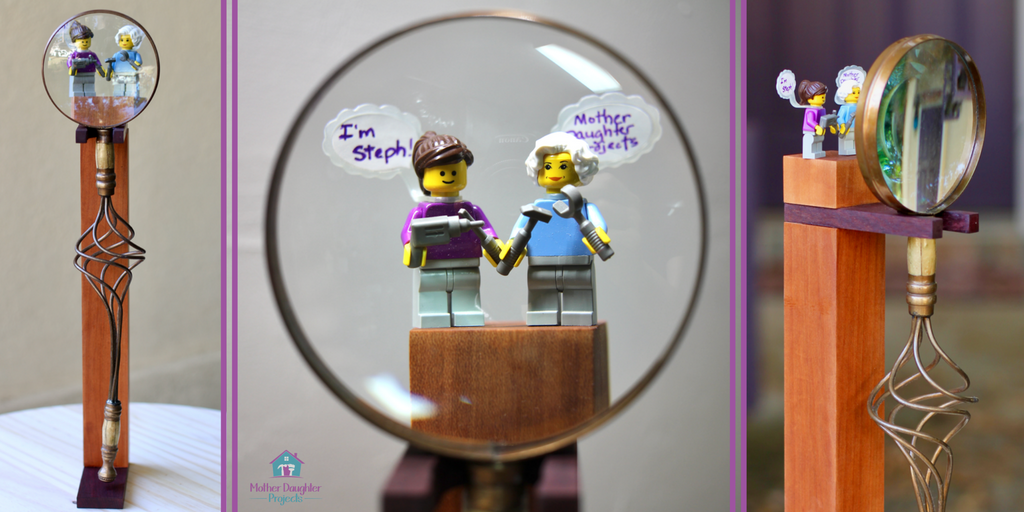
A few weeks ago Mom found this neat magnifying glass at a thrift store. I (Steph) really like the look of it and have been trying to find a way to use it at my house. I thought the best way to display it was to make a wooden stand. I got the idea one night and the next morning decided to see what I could come up with!
text by Steph Sign up to get Mother Daughter Projects updates in your email!
I've been a Gilmore girls fan since season one. When I heard that it was coming back I was so excited! My first thought, I have to watch each episode again in preparation for the new show. My second thought, we have to make a DIY project in honor of Gilmore girls!
With the new show being called "Gilmore girls: A Year in the Life," we knew our DIY had to incorporate the seasons in some way. Who doesn't want a little Gilmore girls all year round?! So grab some coffee and a mallomar and enjoy "Gilmore girls: A Seasonal DIY Tablescape."  We had so much fun making concrete pumpkins for Halloween that we decided to try another concrete fall decor project. This time we wanted to try out a new product, RapidSet, which we learned about from a Home Depot Pro. It's a very strong cement (concrete being cement + sand and rocks). It's very smooth and can be removed from a mold in 1 hour.

Having just discovered how fun and easy it is to work with concrete, Steph thought a plastic pumpkin would make a great concrete mold.The advantage for those of us living in warm to hot autumn weather is a concrete pumpkin will not rot and can be left out all October. Win!
All of these pumpkins start with a mold made from a $1 plastic pumpkin. Seems like these are in every big box store you go into these days! We picked up three (purple of course). 

This summer we discovered "bunch o balloons” (self-filling water balloons), and boy are they a bunch of fun! The nephews/grands enjoyed many water balloon fights with them!
We discovered once the balloons were gone, we were left with plastic water hose fittings which looked like they’d make an awesome DIY fountain. Check out the video above to see the fountain come together!
We were so pleased with our first concrete project that we decided to make more! Concrete really lends itself to creative expression.
The same weekend I found the silicone bundt pan we used in the concrete lamp, I also found these vintage 1971 statues. At .50 cents for the pair, I knew they were coming home with me as I thought they might lend themselves to a concrete makeover of some sort. |

Mother Daughter Projects
|