|
text by Vicki Sign up to get Mother Daughter Projects updates in your email!
We want to thank The Home Depot for sponsoring this post. THD provided us with product and compensation. The opinions we have shared about the products are our own.
We are excited to share that we have a post on The Home Depot Blog! Last month, we were asked to submit some paint ideas in three categories. We suggested a project that we've been wanting or rather needing to do, and that's the one they chose!
So what did they choose for us to complete in one of the rainiest, hottest months in Florida? Painting the outside of Steph's house, of course! We were up for the challenge, but we didn't expect the biggest challenge of the project to be working around the weather! After accepting The Home Depot's offer and getting the color approved by Steph's homeowner's association, we then studied the long-term weather forecast to look for the optimal time to paint. It turned out the next 2 1/2 days were going to be the best chance as rain was expected for 10 straight days after that! Long story short--we got it done! The key to the success of this project was using the Wagner Flexio 970 paint sprayer. We were a little wary of using a sprayer since the two times we've used a sprayer were dismal failures. We didn't have high hopes for this experience--we were so wrong! It worked like a charm and made us realize how difficult it would have been to paint the stucco house without it.
0 Comments
text by Vicki Sign up to get Mother Daughter Projects updates in your email!
This post is sponsored by The Home Depot as a part of The Home Depot’s ProSpective Campaign.
Confused about drills and impact drivers? Brushed vs brushless? In this video we break down some of these terms and help you to understand why, as a homeowner, you need both the drill/driver and impact driver in your basic tool box.
I moved into my first home in November 1978. By the next month I knew I needed a drill and asked for one for Christmas. My dad gave me a corded Craftsman drill that used a chuck key in order to change out bits. Well, a lot has changed in almost 40 years since I got my first drill! One thing has not changed: a drill is probably one of the first tools every new homeowner determines they need. What has changed is everything else! Tools are now cordless, there are brands that didn't exist back in the day, and no longer are you at the mercy of having to find the elusive chuck key to change bits! Steph has many memories of me exclaiming "where's the chuck key!" This alone is reason enough to buy a new drill, which now, by the way, is official referred to as a drill/driver.
text by Vicki Sign up to get Mother Daughter Projects updates in your email!
This post is sponsored by The Home Depot as a part of The Home Depot’s ProSpective Campaign.
As part of The Home Depot ProSpective campaign, we have gotten to review a lot of cool new tools and accessories. This giant tool box was the first accessory to land on Steph's doorstep!
Previous to the arrival of the mobile workbench, we thought Steph's garage setup was pretty good. We've done a lot of projects in there to organize the space. Well, enter the mobile workcenter. Game Changer! It's given us another entire way to help organize and work in the garage.
text by Vicki Sign up to get Mother Daughter Projects updates in your email!
This post is sponsored by The Home Depot as a part of The Home Depot’s ProSpective Campaign.
As part of The Home Depot ProSpective campaign, we have been sent some pretty incredible tools to review and use--things that we'd never, ever in a million years thought we "needed!" Well, the Bosch 3/4"x18" SDS-Plus Speed Clean Carbide Dust Extraction Bit and Bosch SDS-Plus Rotary Hammer are two of those tools!
This specialized bit is part of Bosch's pro line and complies with new OSHA (Occupational Safety and Health Administration) guidelines for silica dust containment. Dust containment, to protect our lungs against dangerous airborne particles, is certainly a concern on a commercial job site but it something we as home DIYers should pay attention to. This drill bit may not be something we'll use on a regular basis, but just learning about it and the reason it was designed has heightened our awareness of dust borne dangers. I think sometimes when we DIY we get lax in protecting our eyes, lungs, ears, etc. Safety should always be a priority as a DIYer in every project we undertake.
text by Vicki Sign up to get Mother Daughter Projects updates in your email!
This post is sponsored by The Home Depot as a part of The Home Depot’s ProSpective Campaign.
One of the first power tools we purchased when Steph moved into her house was a miter saw. It was purchased used from a friend who had kept it in "like new" condition so we were confident that it was functioning well and safely.
Part of our tool shipment for the ProSpective Home Depot campaign was a Milwaukee cordless miter saw. We happened to have a chance to try one out last fall at a pro event at our local Home Depot so we were familiar with it. We liked it then, and our opinion hasn't changed since we've been using it at Steph's house! At some point, if you decide you want to continue your woodworking skills, you will want a miter saw. It's a very versatile saw and one that we use more than any other saw in our tool inventory.
text by Vicki Sign up to get Mother Daughter Projects updates in your email!
This post is sponsored by The Home Depot as a part of The Home Depot’s ProSpective Campaign.
Before you ever plug in a power tool, you need to consider and use appropriate safety gear and procedures. Our #1 goal at Mother Daughter Projects is to prevent accidents in our workplace. We do that by understanding how our tools work, using the correct tool for the job, and wearing safety gear.
text by Vicki Sign up to get Mother Daughter Projects updates in your email!
One piece of furniture Steph wanted for her house when she moved in was a farmhouse table. At the time, neither of us had the skills to make one. She found a shop north of Tallahassee and had one custom made of old barn wood with metal legs. The lumber the owner showed us along with the metal legs seemed like a perfect combination. The order was place; payment was made.
text by Steph Sign up to get Mother Daughter Projects updates in your email!
About six months ago we discovered a local sawmill where they had live edge wood at a great price. We found a really neat piece that we thought would make a great hanging table. The wood has been sitting in my bedroom (where the finished table will be placed) since that time. This gave ample time for the wood to dry out and acclimate to the space. The time came to make the table and this how we did it.

Although this is not a sponsored post, we were given concrete from Quikrete. It was delivered right to the garage! Now we want all the heavy things delivered.
Our bench entry for the Instagram Builder’s Challenge deviated from Ana White’s plan (everyone in the challenge had to use her plan) in that we used concrete for the bench seat rather than wood. We’ve used concrete before, but not in this large a project. We initially planned on doing one large piece of concrete, but changed to casting three separate pieces. The change was to accommodate my (Vicki) inability to lift or bend due to cataract surgery recovery during the bench build. We decided that Steph would be able to carry one piece at a time without needing extra help. I think even if I had not been recovering from surgery, we would have come to the conclusion that three smaller pieces rather than one was much more DIY friendly. We really enjoying using concrete. It’s a versatile and creative product plus you don't know how something is going to turn out so you always have that surprise to look forward to!
text by Vicki Sign up to get Mother Daughter Projects updates in your email!
Steph has a pretty private backyard, but there's one spot where she can clearly see her neighbors. She has been wanting to create some kind of privacy “fence” to block the view. Months ago, we decided we would do a bench with a tall back to create the privacy she needed. That’s where we stalled on the project!
Our incentive to get working on the project came when we saw that the annual Instagram Builder’s Challenge project plan was an Ana White bench. Perfect! We needed a bench, and were all in to challenge ourselves to complete the bench in the three week time limit. We decided to customize her basic plan with a tall lattice back and a concrete seat rather than wood in the original plan. 
Mother Daughter Projects was conceived from an off-handed comment from me (Vicki) during the rescreening of Steph’s porch two years ago. The screening of the porch was one of the last large home repair projects that needed to be completed after Steph closed on her house. Because she had been burned by the installers of her carpet and vinyl planking flooring, she was reluctant to hire this out. She did the research and decided it was a project we could tackle ourselves.
Two years later, we are happy to report that all is holding tight even through a couple of high winds storms here in Tallahassee, FL over that period of time. In the video above, we share a couple of updates on the screening project. Check it out!
text by Steph Sign up to get Mother Daughter Projects updates in your email!
Recently we finished my walk-in closet makeover. With that complete, I wanted to turn my old closet into a full storage closet. When I moved in, all my closets had that wire type shelving (which I really don't like). I ripped it all out and planned to make build-in wood shelves. Well, it's time to make that happen! Read below to see how to used three materials to make each of these shelves!
text by Vicki Sign up to get Mother Daughter Projects updates in your email!
Like many homeowners, Steph had those plastic decorative panels on the outside of her garage windows. She never liked them, so when we recently made some changes to her garage door, one of those changes was to muscle those out and toss them in the garbage.
She liked the look of the open windows, but this being Florida, she didn't like the overabundance of light and heat the windows now let in! I know, Florida problems ? The solution came in the form of painter's tape and frosted glass spray! Here's what we did to reduce the amount of heat and light coming in and add a little update to the windows. 
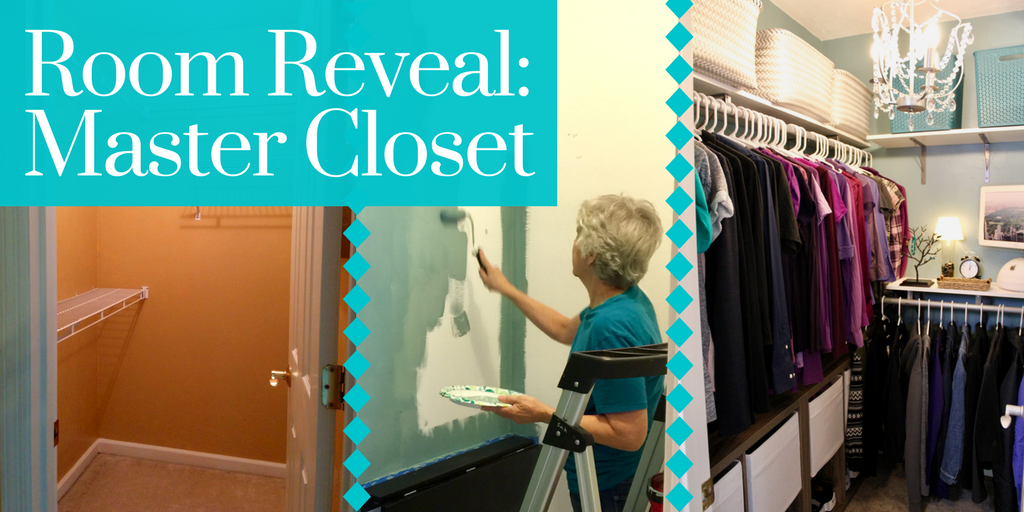
When I moved into my (Steph) house 4 years ago, the master bedroom had a closet in the hallway and a second, walk-in closet. I thought the hallway closet was adequate and the walk-in would be a great room for storage and an audio recording booth (I know, nerdy and not really on most peoples' 'must' list- but it was on mine).
Now that I have made a recording booth in my office closet, I was ready to make the walk-in closet- well, a closet! Follow the journey below...
text by Steph Sign up to get Mother Daughter Projects updates in your email!
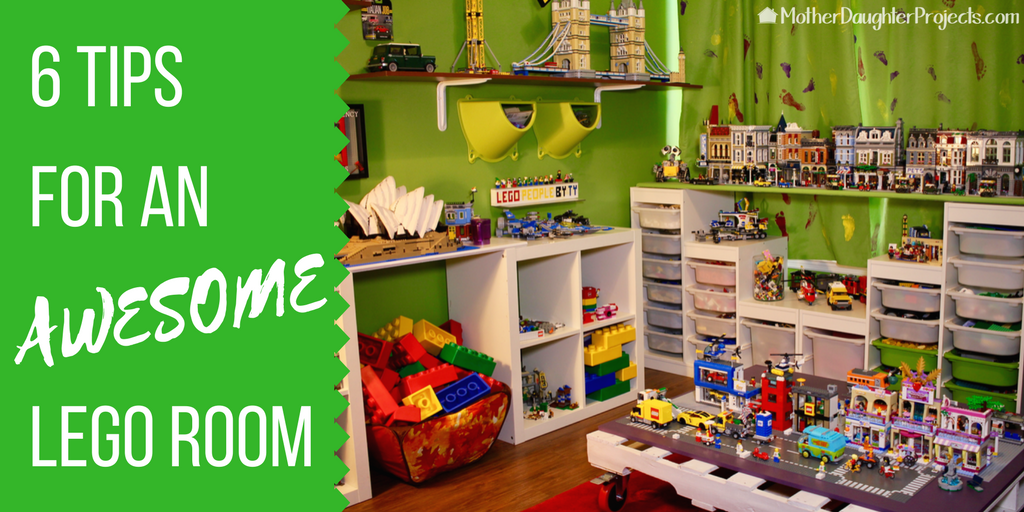
I have loved Lego most of my life. In high school, when my brother went into the military, I got to take over his room. This meant I had a bedroom, bathroom, and extra room all to myself! I went to decorating them in my style and the bathroom got a Lego makeover. Since that time, I've wanted to expand on that theme and make a whole Lego room! I told myself- "one day when I get my own house I will have a room just for my Lego collection!"
No one thought I would really do it (even me) but in 2013 I bought my first house- and there it was- a room for my Lego collection! I guess I could have made it a guest room or office- but I had another room for that. I went to work right away at creating the ultimate adult lego room! (What makes it adult? Maybe that it’s more organized than a kid's room typically would be :)
text by Vicki Sign up to get Mother Daughter Projects updates in your email!
Sometimes the DIY projects you put off the longest can end up having the greatest impact and leaves you wondering why you put it off so long! The outside of Steph’s garage was one of those ‘back burner’ projects that never seemed to make it to the top of the list. But with the amazing weather we are having this February, now was the perfect time to tackle three small projects to update the curb appeal of her house.

We received two of these Moen hooks in a SWAG bags at a conference. The unique design of these hooks is the Press & Mark feature which is built-in. One of the most frustrating things about hanging bathroom hooks is trying to get the bracket and screws lined up correctly; the Press & Mark feature eliminates this frustration.
This hook has an ink stamp on the back side that leaves marks on the wall so you know where to drill the holes for the bracket. After installing one, we can say it's as easy as advertised! This was such a breeze to install and made this a fast DIY. text by Vicki Sign up to get Mother Daughter Projects updates in your email! 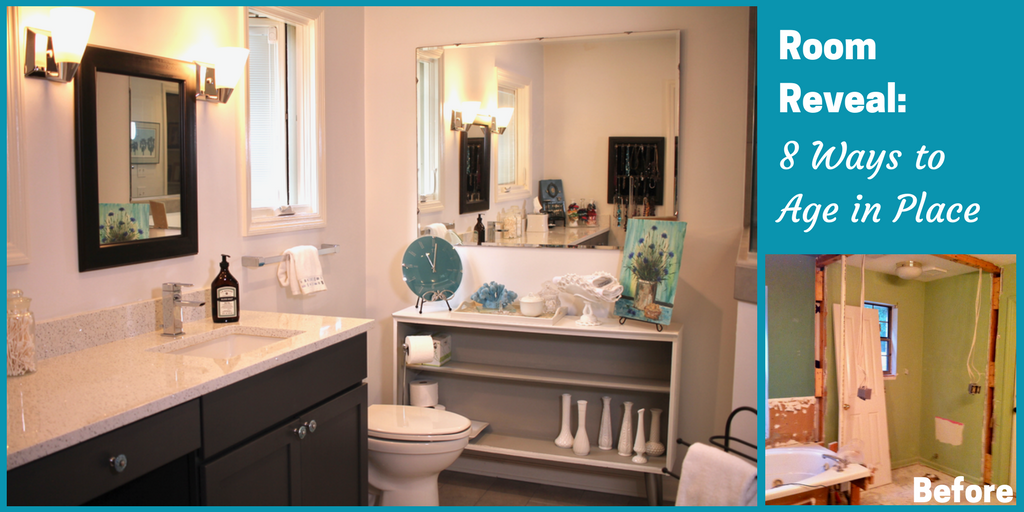 In 2012, my husband and I were considering moving from our current home to one where we could more comfortably “age in place.” The Center for Disease Control defines aging in place as "the ability to live in one's own home and community safely, independently, and comfortably, regardless of age, income, or ability level.” We felt that in our current home with its sunken living room, inaccessible bathrooms, poorly laid out kitchen design, and other features, did not lend itself to us being able to stay in our home for the long run. We looked at several houses for sale, but decided, given the location of our home and the fact that most all the homes we looked at would also need updating, we decided to invest in a significant renovation of our home.
text by Steph Sign up to get Mother Daughter Projects updates in your email!
As my collection of nails, screws, and extra parts expand, I realized it was time for some new organization. I've been storing these items in a plastic compartment storage container, but it’s getting cumbersome to use and I want to be able to see everything clearly and easily.
I found a few different ideas online and decided to combine a few. My goal was to use what I have and not to have to buy a lot of extra materials. Check out the video above to see how I added a shelf with some magnetic storage to my garage!
text by Vicki Sign up to get Mother Daughter Projects updates in your email!
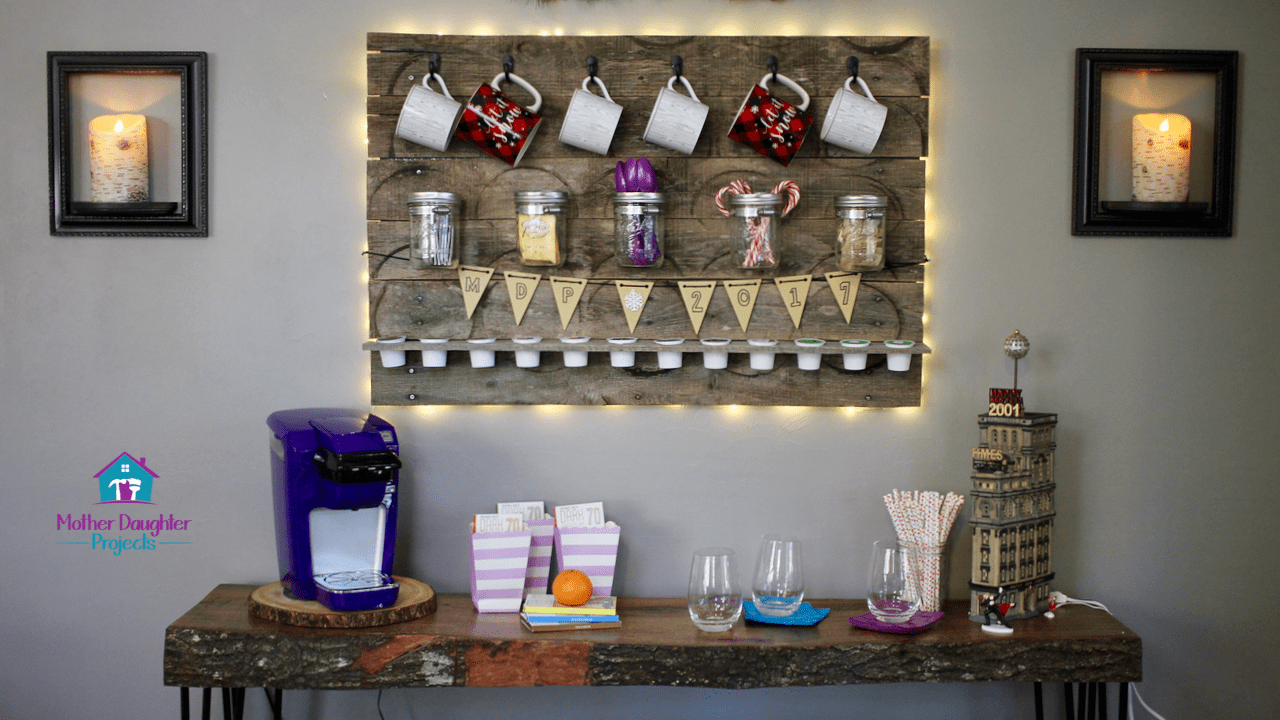
With the addition of our new live edge buffet table, the space above was needing some refreshing. We installed a coffee/tea drink station and then decided we needed new candle sconces. Steph has had traditional candles and sconces in these spaces, but we decided to utlilzed her new Luminara battery powered candles and create sometimes new for the space.
text by Vicki Sign up to get Mother Daughter Projects updates in your email!
Previously, we've shown you how to deconstruct a pallet, in this post we share an idea of what to make with those pallet boards. It's important to point out that working with pallets is not for those who like right angles and nice straight edges--pallet lumber is definitely neither, but that is what people like about it. Pallets are usually free, pretty plentiful, and offer up a good amount of usable lumber. Embrace the imperfections that come along with using pallet wood.
If pallet wood is not your thing, then feel free to substitute purchased lumber in the same approximate size. Finish it with a weathered affect and you've got the rustic look without the imprecision!
text by Vicki Sign up to get Mother Daughter Projects updates in your email!
We've been wanting to work with a piece of live edge wood, but hadn't found the right piece of wood at a good price. On a recent trip through Suwannee County in North Florida, we happened upon a small family operated saw mill right by the side of the road. Just like we brake for pallets, we also brake for beautiful live edge wood sold at the side of the road!
We brought home a slab, 9 1/2 feet long by about 4 inches thick plus a large oval piece. The prices were really, really good! We were able to get it into the Honda pilot without having to have it cut. It was a tight fit with three adults and all our luggage in the car, but we did it. 
We continue to do more and more wood products, which means we have an excess of wood that needs to be stored. We've been using an A-frame rack from Rockler which worked well, but we have outgrown it. We found this metal wood rack at Rockler and decided to give it a try.
Watch the video to see how this wood rack was installed.
text by Steph Sign up to get Mother Daughter Projects updates in your email!
Projects involving pallets seem to be everywhere these days. And why not? Pallets are free, have a great rustic look, and can be used in many different ways.
Well, the first time we fished a pallet out of the trash, we realized we had no idea how to take it apart. After some research, we found that a sawzall, or reciprocating saw would do the trick! We bought one and found out it is the perfect tool for this task! We made a video to show you how this process works. 
I (Steph) have been making these fire starters for a few years now because they work so well in my backyard firepit. They use simple materials that I would normally trash or recycle, so this is a great way to "use what you have" and recycle materials in a new way!
|

Mother Daughter Projects
|
