|
text by Vicki Sign up to get Mother Daughter Projects updates in your email!
This post is sponsored by The Home Depot.
Our #garagemakeover project was designed out of necessity. When we were in the planning stages of the garage makeover, I said I wanted a way to store the grandkid's toy car. I needed it out of the way, but accessible. Toy cars are notoriously difficult to store efficiently!
The car storage started out as a simple box with a little open storage on top. I had envisioned it sitting next to our large shelving unit right beside the door. Well, as things do, the project evolved into something totally different and way more functional!
0 Comments
text by Vicki Sign up to get Mother Daughter Projects updates in your email!
After painting, the next step in the #garagemakeover was the installation of the Wall Control Metal Pegboard wall. I have been looking forward to having this pegboard in the garage after installing and using a mini setup in my utility hallway.
I am, by nature, highly disorganized and tend not to put things back where they belong. That results in me being frustrated by not being able to find what I need when I need it! I can't even express the joy I find in being able to find what I need on the utility wall pegboard! Bonus, now that everything has a place that I can see, I find myself consistently putting things back. That's why I was so looking forward to seeing the pegboard go up in the garage. I was itching to get everything in place so I could start using it! Many thanks to the family owned company, Wall Control, for providing all the pegboard panels and accessories for our project. Wall Control is made in the USA, right up the road from us in Georgia. Take a look at our Wall Control installation:
text by Vicki Sign up to get Mother Daughter Projects updates in your email!
This post is sponsored by The Home Depot.
Never in my life did I ever imagine myself building a wall, but here in my sixties, I've just helped build one! It's very gratifying to have researched how to build a wall, participate in the planning and building and then to see that the finished wall is strong, plumb, and in NO danger of falling over! Yes!
Let me back up a bit to tell you why we built a wall. As you may, or may not know, we are in the process of giving my garage a complete makeover. It started as a cluttered mess usable only for storage of more clutter. We are slowly making it over into a space where we can work as well as store things. That's where the wall build comes in. We wanted part of the garage to be a storage space, and since most storage spaces are not very attractive, we wanted to be able to "wall off" the area so we wouldn't have to look at all the stored stuff while we work. Now, if you're a professional reading this, you may be shaking your head at why we built our wall the way we did. I will explain as the tutorial progresses, but know that our design choices were made based on our skill and strength level, as well as the tools we own. Let's get started. You can start with the video or head down to the tutorial. As always, the video will show you exactly what we did!
text by Vicki Sign up to get Mother Daughter Projects updates in your email!
This post is sponsored by The Home Depot.
We always knew some kind of garage floor treatment was going to be a big part of the #garagemakeover project. We have only had experience with a paint-on metallic look epoxy product so we knew we didn't want to tackle that again. Plus, we did not have the luxury of taking everything out of the garage for the amount of time it would take to prep and apply a painted or epoxy coating.
I researched various options relying heavily on the website allgaragefloors.com which has a wealth of great information and reviews of various kinds of flooring options. I ultimately settled on G-Floor vinyl flooring as the best option for my garage. It needed very minimal prep and was ready to use as soon as it was positioned onto the floor.
text by Vicki Sign up to get Mother Daughter Projects updates in your email!
This post is sponsored by The Home Depot.
The most important thing I wanted in my garage makeover was good lighting! I've been in my house for 20 years now and the lighting in the garage has always been terrible. The two overhead lights didn't give complete light coverage so there were lots of dark corners. It was a chore to work in there.
Steph did a lot of research to determine what fixtures would be best to give wall to wall light coverage. She found these LED lights that only needed to be plugged in and not hard wired. Plus, up to 9 could be daisy chained together to work together.
text by Vicki Sign up to get Mother Daughter Projects updates in your email!
This post is sponsored by The Home Depot.
A long overdue makeover of my garage is well underway. We've partnered with The Home Depot to transform my garage from useless and full of clutter to an organized workspace that will also have room to park my car! Along the way we will be sharing videos about each step of the process. In the videos and posts we will share the tools, supplies, and products we are using.
In this video, we are sharing some of the painting tips we have learned from our many DIY painting projects. Please add your own tips in the comments so we can learn from each other!
text by Vicki Sign up to get Mother Daughter Projects updates in your email
A simple trip to The Home Depot to buy spackling had us standing in the aisle a lot longer than we expected. We fully expected to quickly pick up our standard DAP DryDex with the pink lid and be on our way. However, the red lid variety caught our eye and we paused to take in this different and very lightweight product.
We were intrigued enough that we ended up buying both varieties to try them in a side-by-side comparison.  text by Vicki Sign up to get Mother Daughter Projects updates in your email! This past summer we were introduced to a new type of fan by Stile. We thought it would be a perfect fit for the studio at Steph's house. The space is small and the existing fan overwhelms the space. Also, it doesn't provide much overall light at all.
Over the Easter weekend, Steph decided on a whim to go buy the fan and install it with a little help from Andrew, Steph's nephew, my grandson! 
text by Vicki Sign up to get Mother Daughter Projects updates in your email!
This post is sponsored by The Home Depot as a part of The Home Depot’s ProSpective Campaign. THD provided the DeWalt Compressor used in this post.
One of our new tools is the DeWalt Cordless Compressor. Rather than just review the tool, we wanted to show you a real life project on how you can use it. Our favorite use for a compressor is for upholstering with a pneumatic stapler. Using this type of stapler takes all the effort out of upholstering. I find it very difficult to use a standard manual upholstery stapler. The electric ones I've used have not been able to drive the staples in completely.
A pneumatic stapler with a compressor saves your hands and efficiently drives the staples into the fabric down into the wood. This is the only method I'd use to upholster now and in the future! We were very impressed with the new DeWalt Cordless Compressor. It filled quickly with air, it was as easy as turning a knob to set the output force, and refilled quickly. It is loud, but not any louder than others we've used. Hearing protection is a must as far as we are concerned. The project we decided to make is a folding screen. I decided on this after I observed my yoga ball and mat are always in plain sight when not in use. I thought with a screen, I could place these in a corner with the screen in front and not have to look at them during the week! Bonus, I found a piece of mid-century looking vinyl for the screen that has jumpstarted the redecorating of my bedroom. With the success of the organization of our craft closet with Wall Control and other pre-made components, we were eager to organize another small space as soon as possible. We found that few tools are needed to install the panels and only a little skill with a drill is needed making this a project that is doable for many DIYers.
We contacted Wall Control, the family owned and operated business making metal pegboard, to see if they'd like to provide product for our next project. As well as being family owned, the pegboards and accessories are made right up the road from us in Georgia! Family owned and "made in the USA!" We love that. We decided to add a Wall Control Laundry Value Kit to Steph's laundry room. This room is very tiny making it a good candidate for wall hung storage and organization. Take a look at the video to see how it came together. And, yes, it probably only took 20 minutes or so to install the panels!
text by Vicki Sign up to get Mother Daughter Projects updates in your email!
This post is sponsored by The Home Depot as a part of The Home Depot’s ProSpective Campaign. THD provided the Makita Saw, Ridgid Sander and Husky Wrenches used in this post.
We have a growing need for paint and battery storage so we decided to build a storage unit to house them. You're probably wondering why we chose to put these two things together. Well, both paint including stains and rechargeable batteries are best stored in a controlled environment. Here in Florida, storing those thing in the garage means they are subjected to extreme changes in temperature. Neither paint or rechargeable batteries lasts as long if not stored properly.
text by Vicki Sign up to get Mother Daughter Projects updates in your email! If you have sidewalks or driveways of a certain age you have these--wood expansion joints! These are important as they allow the concrete to expand and contract without cracking. Unfortunately, time and the elements take their toll on them. Eventually they rot and break and should be replaced.
There are a number of reasons to replace them. Having a strong solid expansion joint helps with the following:
There are at least three methods to replace the wood expansion joints. Each has its pros and cons but we settled on flexible vinyl gaskets due because it was very homeowner friendly, required no special tools or drying time.
text by Steph Sign up to get Mother Daughter Projects updates in your email!
This post is sponsored by The Home Depot as a part of The Home Depot’s ProSpective Campaign. 
A while back I turned my office closet into an audio recording booth. It's been great to have the mic setup and ready to go when I need to record narration for our videos. Even with the recording setup I still had a little space left in the closet for storage. I've been storing plastic bins on the side, one on top of the other.
It worked for a while, but I got tired of having to move each bin, especially when I need to get to the bottom one. I decided to build some simple shelves to hold the bins and keep them out of the way when recording. Here’s the plan I came up with. I made three shelves, but I might add one more in the future.
text by Vicki Sign up to get Mother Daughter Projects updates in your email!
This post is sponsored by our favorite, The Home Depot!
There is nothing more frustrating when crafting or making than knowing you have what you need, but you can’t find it! I read a quote once that stated “if you can’t find it, you don’t own it!” I think of that often when I can’t find something and have to buy again in order to start or finish a project.
Although we have lots of craft/maker supplies for Mother Daughter Projects stored at Steph’s house, they were becoming more and more inaccessible due to lack of organized storage. Over Christmas Steph decided she had had enough of the mess and started to digitally put together an idea to install an organizational system into the closet in her Lego room. The closet we are working with is 86" wide x 96" tall x 23" deep. Seeing that everything we wanted to use was from The Home Depot, we reached out to them to see if they wanted to partner with us on the project. We felt it had universal appeal to others like us who wanted to buy and install pre-made components to get the job done fast! We are calling this a semi-DIY because we are not actually building anything. With the exception of cutting a few pieces of closet rod, all the other components are ready to be installed and come with all their parts to get the install done. Please watch the video above to see how it came together, and get more details below! 
text by Vicki Sign up to get Mother Daughter Projects updates in your email!
This post is sponsored by The Home Depot as a part of The Home Depot’s ProSpective Campaign. THD provided the Paslode brad nailer used in this post.
A gift from a friend of eight old worn card catalogue drawer fronts inspired this project. Another friend suggested we make shelves with them, so that’s what we did! The floating shelves were not initially designed to have a secret storage space, but towards the end of the build we realized we had the perfect opportunity to build in a secret compartment. Ours will hold a secret stash of candy!
text by Vicki Sign up to get Mother Daughter Projects updates in your email!
This post is sponsored by The Home Depot as a part of The Home Depot’s ProSpective Campaign. THD provided the mechanics tool set and inspection scope used in this post.
When Steph moved into her home four years ago she needed some display shelves for her growing collection of Lego sets. We put up a couple of pre-made shelves using white brackets. They solved the storage problem but were not attractive by any stretch of the imagination. Fast forward a few years; Steph was ready for something a little more stylish to replace them!
The step-like design stretches 9 feet long against the wall and is 3 feet high and provides lots of storage for small and large Lego sets. text by Vicki Sign up to get Mother Daughter Projects updates in your email! This post is sponsored by Bayshore Mailbox Company. There are some things in your home that you don’t notice that need attention until one day you look, really look, and see what a mess it really is. Steph’s mailbox was one of those things. The dirt, rust, and dangling mailbox door had all become ‘white noise’ that hadn’t been obvious until June when we painted the outside of the house. After that it was quite apparent that the mailbox was looking really sad and needed a little help.
She has one of those metal boxes that is securely imbedded into a concrete/brick mailbox. She started searching for a way to replace it and happened upon the family owned, Florida based BayShore mailbox company. What makes their product unique is you retrofit the existing mailbox so you don’t have to remove the old one. She was intrigued and reached out to the company to see if we could partner with them to showcase their unique and very easy DIY product for homeowners.
text by Vicki Sign up to get Mother Daughter Projects updates in your email!
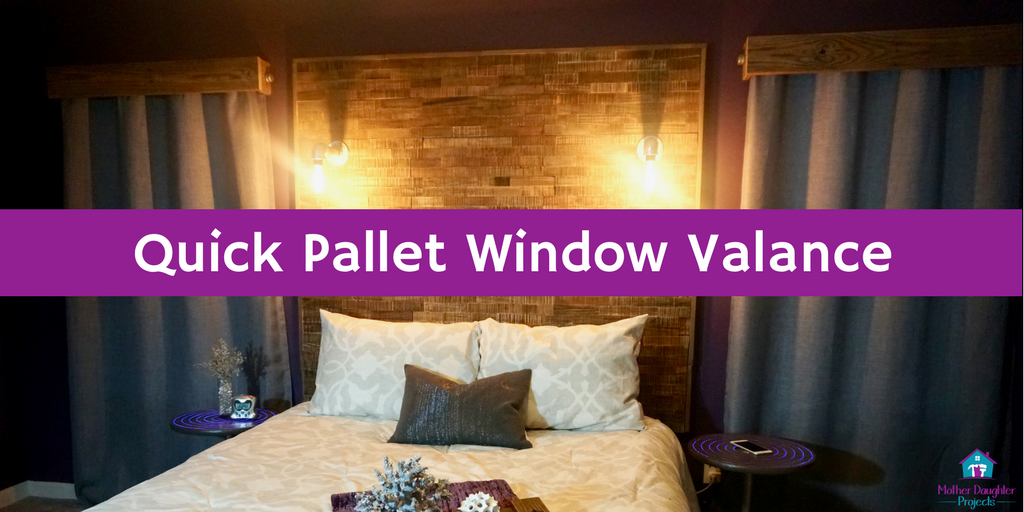
After we finished the pallet peel and stick headboard, Steph surveyed her room and thought, "it just doesn't look finished! I know what it needs, curtains!" She shared her idea and I was on board. After thinking about it overnight, I came up with an idea using wood dowels and metal pipe caps.
She started working on the project with her ideas and mine and it came together as planned! Also, a few weeks prior, we were given a sample of Eclipse Block Out panels to try out. When we got them we didn't know where we were going to use them, but realized the color and length would be perfect for her bedroom!
text by Vicki Sign up to get Mother Daughter Projects updates in your email!
At a conference this past summer we were introduced to a new product from the Aspect Tile Company--a peel and stick pallet tile! We were already familiar with their peel and stick stone tile as we had used it to tile Steph's kitchen backsplash. That was a really successful project so we knew working with the new wood tile would produce good results as well.
Each workshop attendee got 30 sq ft of the tile of their choice- and we had to go with the wood! We tossed around several ideas as to what to do with the wood tile but ultimately decided to make a headboard for Steph's bed. The tile can be stuck to the wall, but we wanted to be able to remove the headboard when she decides to move, so we built a frame on which to attach the tile.
text by Vicki Sign up to get Mother Daughter Projects updates in your email!
This post is sponsored by The Home Depot as a part of The Home Depot’s ProSpective Campaign.
Steph's kitchen has been a work in progress since she bought her house. The kitchen was really in need of updating as nothing had been done to it since it was built. Actually, it was pretty overwhelming to go through the list of what needed to be done.
When she first moved in, we did the bare minimum before we ran out of steam to do anything else. We cleaned everything, took down the wallpaper and painted, put down new flooring, and swapped out the 90's gold handles for sleeker silver ones. We labeled the cabinets and drawers in anticipation of taking them down and painting, but that project never got started! Four years later, a partnership with The Home Depot and Liberty Hardware, gave us the push we needed to complete the long overdue projects!
text by Vicki Sign up to get Mother Daughter Projects updates in your email.
This post is sponsored by our favorite, The Home Depot! 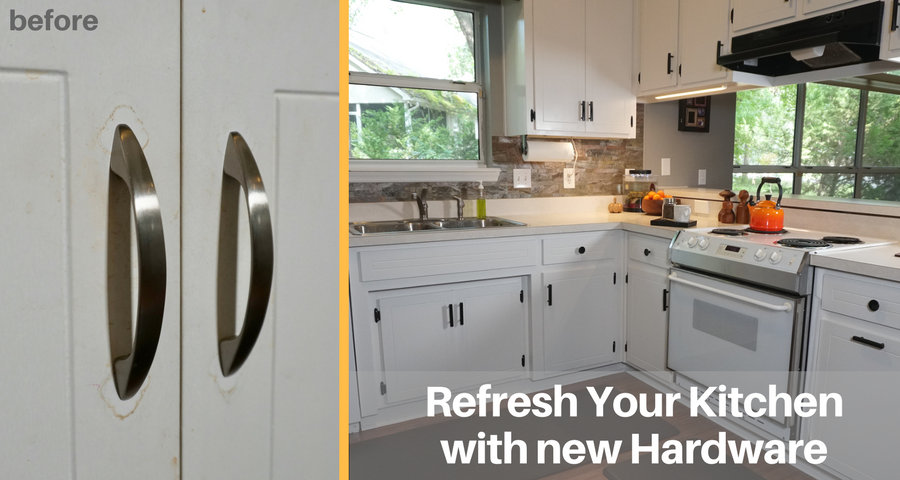
Liberty Hardware introduced a new collection of modern knobs and pulls in a variety of finishes at The Home Depot. They asked a group of bloggers, including us, to choose new handles and knobs and showcase them in our own kitchens. Steph's kitchen hardware needed updating so we jumped at the chance to participate!
We've done a couple of projects in Steph's kitchen including changing out the cabinet and drawer hardware when she first moved in. We swapped out 90's gold and white handles for sleeker, simpler, silver ones. Unfortunately, that hardware never matched the cabinet hinges which were still the gold color! And now, fast forward four years after that first change of hardware. Thanks to the motivation from The Home Depot and Liberty Hardware it was now time to change out the hardware correctly for a more cohesive look!
This post is sponsored by The Home Depot as a part of The Home Depot’s ProSpective Campaign. THD provided the DeWalt Brad Nailer used in this post.
We often come up with project ideas independently of each other, and then need to convince the other of the merits of the project. Sometimes we just don't get the others' vision until the project has almost fully come together. This was one of those projects!
I (Vicki) had an idea for a landing/drop zone that I wanted for my back door. I use that entryway most often and needed to have a place to organize my stuff that comes and goes out of my house. As hard as I tried, I just couldn't get Steph to understand or see my vision for the drop zone utilizing a record cabinet as the foundation piece. It was only when the molding was tacked into place that she had that "ah ha" moment! This is truly an upcycle project as it utilizes materials from three different pieces of furniture. None of the pieces of furniture were in good shape so I had no hesitation in utilizing the different parts.
text by Vicki Sign up to get Mother Daughter Projects updates in your email!
This post is sponsored by The Home Depot as a part of The Home Depot’s ProSpective Campaign. THD provided the Milwaukee Penlight and Husky Diamond Tip Screwdrivers used in this post. 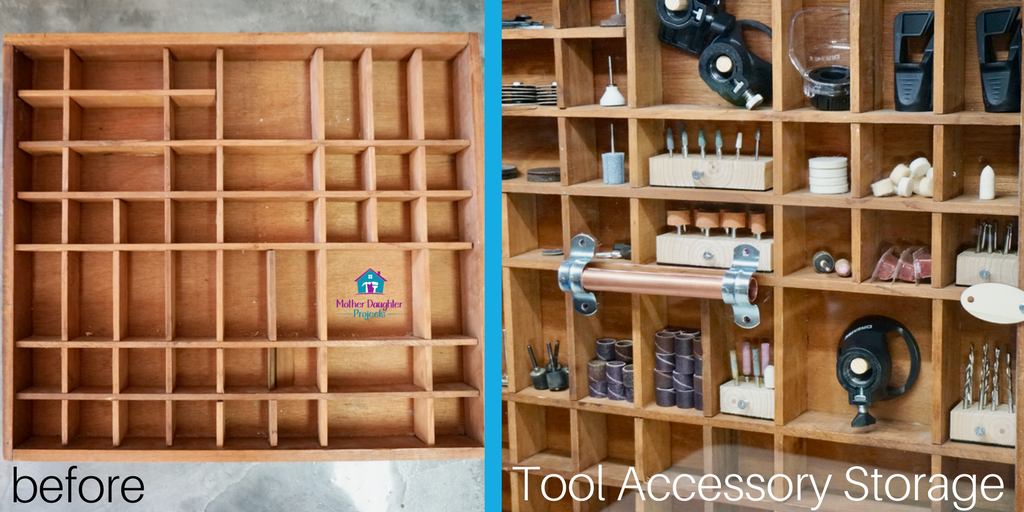
We have been using our Dremel for more and more applications, but have been frustrated on many occasions because we couldn't find the accessory we needed. Steph decided once and for all she was going to get all the accessories organized in a way to make them visible and accessible. I found a reproduction printer's tray from a yard sale, for next to nothing, a few months ago. Steph has been trying to think up a project for it and she found it with this!
text by Vicki Sign up to get Mother Daughter Projects updates in your email!
This post is sponsored by The Home Depot as a part of The Home Depot’s ProSpective Campaign.
In September 2016, we here in Tallahassee Florida had our first direct hit from a hurricane in over 30 years. Needless to say, there were a lot of downed and damaged trees from the storm. Lucky, we received no damage but my neighbor across the street wasn't so lucky. They had a tree come down and a few days later a really large pile of cut up logs appeared curbside.
Steph and I took the opportunity to check out the pile and decided a few of them would make great DIY projects. We enlisted the help of my husband and his Honda Pilot to move the logs to her house. (Well, we got all but one log moved to Steph's--the last one is still in my driveway--too heavy to move! So classy!) We've already used three of them in projects. We made two log tables (see the post here) and a LED light table from the hollow log (see that post here). 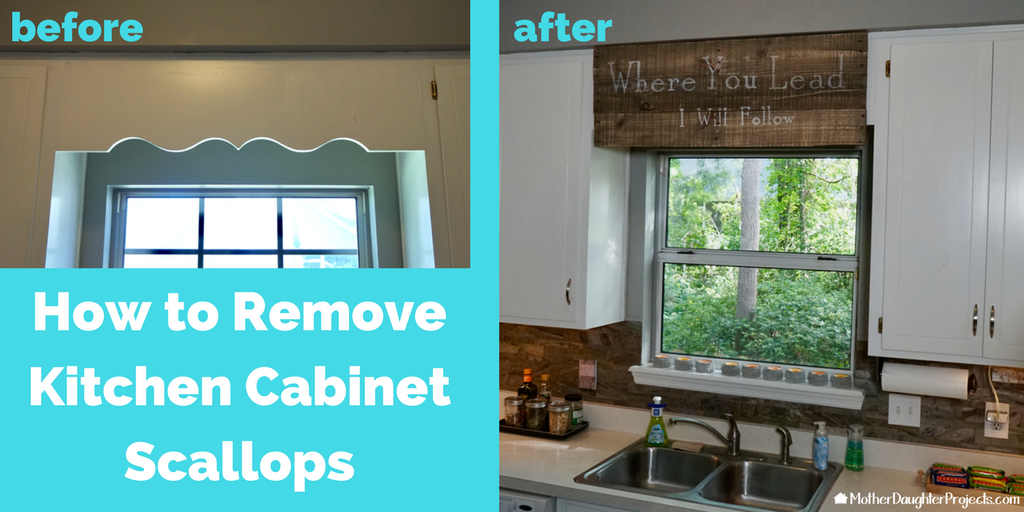
Many kitchens of a certain age and cabinet style often feature a scalloped piece of trim over the sink. It's a decorative piece that Steph did not want in her kitchen, but did not want to remove or replace the board. How then to disguise the dated piece? Cover with a removable pallet wood sign, of course!
Materials: |

Mother Daughter Projects
|
