|
text by Vicki Sign up to get Mother Daughter Projects updates in your email!
Steph’s kitchen has been in need of a backsplash since she moved into her house three years ago. During the refresh of her newly purchased house, we chose a stone tile but soon returned our sample as our energy and enthusiasm for tacking a tile project waned. It just seemed too daunting to deal with adhesive, grout, and cutting tile with a wet saw.
30 Comments

We’ve had lots of fun sharing and building our tiny barn doors over the last few months, but have really wanted to try our hand at building and installing a full-size door.
I’ve (Vicki) been wanting to replace the door to my laundry room because it opens into the room making the space feel and function smaller than it really is. I thought a sliding door would free up the space. Thanks to CrownBolt, who sells products exclusively in Home Depot under the Everbilt label, we were able to finally get this project underway.
There's a lot of new lighting going on at my house these days. First it was the smart strips lights above my cabinets, and then smart bulbs in three of my lamps (no more old-school light timers at my house) and now, new LED bulbs for my living room.
As part of the remodel of my house in 2012, I requested lots (and I mean lots) of overhead lighting to be installed. One of the purposes of the remodel was to make our space into a home where my husband and I could “age in place.” Making our home accessible as we age did not mean we had to sacrifice design and style. Most people don't realize the house has handicap accessible features, they just see modern design and comfort.
It's finished! We start with this statement because this was the build that almost did us in!
We love this quote because it clearly was written to describe this project: "It always seems impossible until it's done." - Nelson Mandela This project really tested our motto: Try, Learn, Share—we learned so much by trying something that was totally new to us and sticking with it so that we could share our experiences and trials. Let’s back up. When Steph decided to turn her guest room into a office/studio, it was apparent she needed a new desk. There is a great nook in the room that just cried out for a built in, floating desk. Research on the web showed it was a completely do-able project, so we thought, why not? We can do this. Steph came up with a plan and even built a little scale model. In hindsight, we apparently needed just a little more design and engineering work on the plan. We don't necessarily encourage you to use our step by step tutorial but encourage you to study our procedure as a way to education yourself on how to and how not to do things if you decide to build your own floating desk. We are so happy we tried this, we learned so much from it, and are excited to share!

The floating desk is not the only new DIY project in the MDP studio. We added a few other pieces to bring additional functionality and fun to the space.

The recent completion of the floating desk (see post here) requires its own “What We Learned” post about using a router. Using a router was new to us, thus we had quite the learning curve!
The desk was an original idea using sliding doors to conceal the keyboard tray and adjacent drawer space. We needed to rout grooves in which the twin doors would slide. Seemed simple enough at the time!
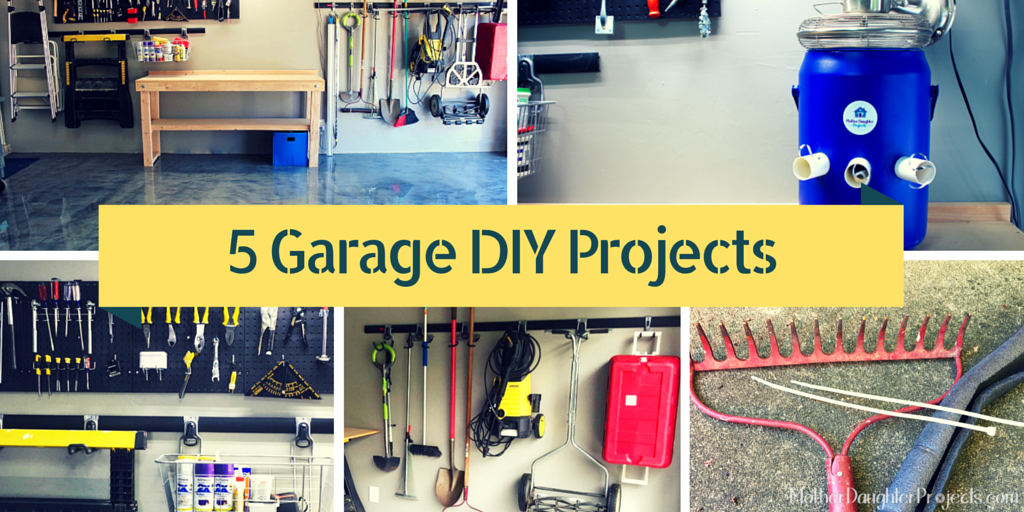
When we stopped to look over our completed projects, we realized that many involve the garage! Granted they are all in Steph’s garage (how did that happen) but that’s another story! Here’s a roundup of our favorite DIY projects for the garage.
Like us, you’ve probably had this project pinned for some time. Anyone who has ever worked in a hot garage, in summer, in Florida knows that even a tiny hint of cold air is welcome relief! I wanted to try the project but didn’t want to go to the expense and effort of ordering the needed styrofoam bucket liner that the project required.
I was on the lookout for something that would eliminate the need for the liner. As luck would have it, I found this insulated vertical drink cooler that would be perfect for only $2 at a yard sale. I already had the needed plastic tubing, fan, and hole saw cutter so the expense for this project was minimal!
Not too very long ago, I (Vicki) was talking with my 88 year old dad who asked me about a new product by Rust-Oleum. He had been surfing the web and had come across it. He asked if I had ever heard of it. I had not but told him I'd check into it.
Just the very next week on Creator's Studio the very product he was asking about was introduced to the community. The first one hundred people to sign up got a free sample. We are always good with free so we signed up to try it! A few weeks later the product showed up and we got started. Take a look to see what we freshened up with ReColor. Watch the video above! Here is a link to the product on Amazon.com.
Steph has been looking for some shelves in her office to hold supplies. We haven't used pipe or pallet wood before in a project so we thought shelves would be a great way to try both materials and get some cool shelves!
Watch the video above to see how this project came together.
I had a pipe leak in my bedroom, and the plumber had to cut two holes in the wall to find where the leak. I installed an access panel where the leaking pipes were found (you can watch that project here, and I repaired the drywall where the leak was not found.
The plumber did a great job cutting into the drywall. He cut out a big enough square so that there were two studs available to reattach the drywall piece back in place. If he had cut the drywall smaller, I would not have been able to attach the drywall to the studs. Please watch the video to see how I used the original drywall piece to repair the hole in the wall.
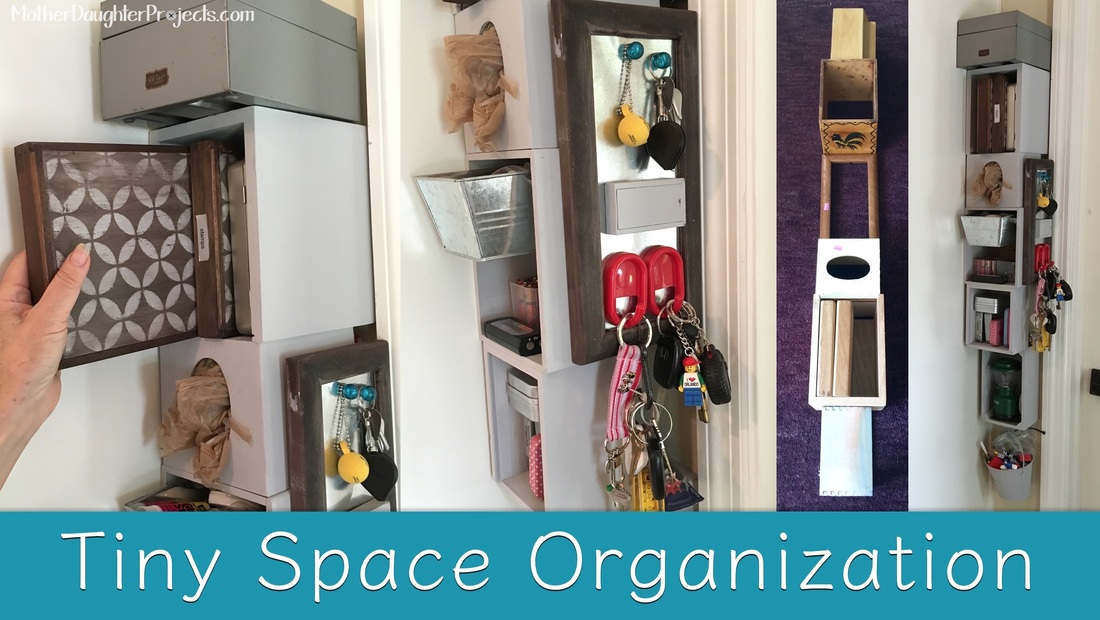
When my kitchen was remodeled there was a tiny 5.5” space left between the cabinets and door to the master bedroom. That little space was just crying out for some kind of embellishment!
Steph & I made this a while back: the Intentional Junk Drawer. Since then I’ve been wanting a type of intentional junk drawer for my own home as Steph kept the one we made. I have a collection of wood boxes from various yard sales that I thought would be perfect to create some vertical storage in the tiny 5.5” space. Once the boxes were sorted by size, I set out to work!
I had a pipe leak in my master bedroom, right off the bathroom. To get to the pipe the plumber had to cut into the wall. After he fixed the pipe he suggested I install an access panel in order to easily access the area in case of further leaks which was a real possibility due to the age of the house.
I could have patched the hole the plumber made, but it made sense to go ahead and install the panel on his recommendation. I found this access panel at homedepot.com and ordered it. Watch the video above to see how I installed it.
In the news lately there have been reports of people putting cameras on the outside of peepholes to see into your house/apartment/hotel room. I (Steph) started thinking about the peephole in my front door and possible ways of covering it when not in use.
After much thought, I came up with a DIY solution that is cute, functional, removable, and adds a little more security to my home. Mom helped bring the idea into reality and had most of the materials we used in her craft stash! Watch the video above to see it come together.
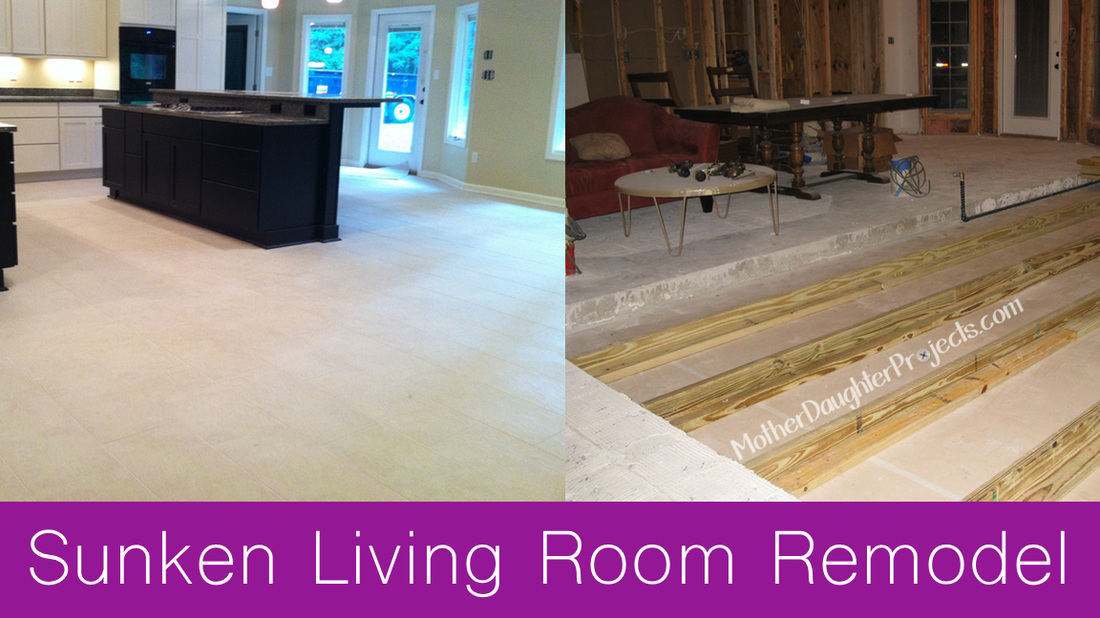
A recent question on Hometalk about filling in a sunken living room floor prompted me to write up my own experience with this. Filling in a sunken floor was definitely NOT a do-it-yourself project at my house. It was part of a 'pretty much' entire house remodel we did in 2012.
The reason my husband and I decided to remodel, and especially fill in the floor, was that we wanted to be able to “age-in-place” in our home. As we all know, aging sometimes comes with physical difficulties, poorer eyesight, etc, and we felt that a sunken living room was a “hip breaking” accident just waiting to happen!
Take a tour inside Steph's rustic guest bathroom.
 When Steph moved into her house, we knew we needed to redo the garage floor one day. It was half painted with carpet down the middle. We did some research on different products to use and found Rust-Oleum Rock Solid Metallic Silver Floor Coating Kit. Steph thought her mini cooper would look really cute parked on the floor so we decided to take on the project as shown in this video! 3/7/17 Update: Click here to see a 1 year later video of the floor. It might look wet but it's not at all! The product has a great glossy finish and is not slippery or hard to walk on. And cleaning it is a breeze!

In this video we use a homemade stain to create a weathered look for a bathroom mirror. This is the first step in remodeling Vicki's guest bathroom.
We both have those builder's grade row lights in our bathrooms—you know the ones with the bare bulbs that are ubiquitous in almost every home?! Steph was unable to find a new fixture she liked, so we came up with a plan to disguise the light. Much like you’d make a cornice in a window treatment, we decided to do the same for the light.
We tried to include the grandsons/nephews in the production of "Window Shade", but 4 year old Tyler had other ideas. He wanted to be behind the camera--here's what happened!

Steph needed a place to keep her keys, purse, shoes and more so we created a landing zone/mudroom in a hall closet at her house. We removed the doors and shelving from inside the closet and painted. The bench is a Craigslist find that consists of two sets of upper kitchen cabinets and we made a foam fabric covered cushion. It fits perfectly inside the closet!
The shelf was made with boards cut to the width of the closet supported by decorative brackets which were found at a yard sale. Added coat hooks, decorative decal, and other accessories completed the look. The green frame on the left was a Pinterest project to hold Steph's keys.
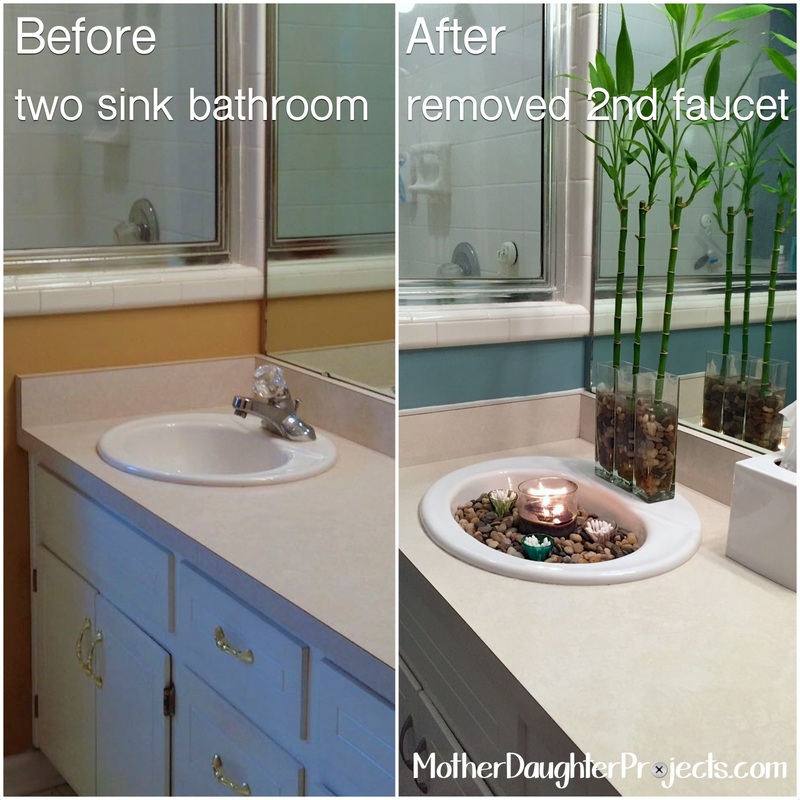
Steph did not need the second sink in her master bathroom but didn't want to take it out completely for resale value. She just removed the faucet and created a small zen area.
|

Mother Daughter Projects
|
