|
text by Vicki Sign up here to join our weekly email newsletter!
This rectangular silicone mold from TotalBoat Epoxy is perfect for creating themed charcuterie boards for the holidays or for special occasions.
The key to this version is a child's toy bubble blower! Read on to see how I used it to create a unique background pattern.
0 Comments
text by Vicki Sign up here to join our weekly email newsletter!
A visit to Disney Springs at Walt Disney World provided the inspiration for these picture frame Christmas trees!
Disney's are made of different varieties of molding, but I thought I could recreate the look with old picture frames. Plus, I had an ever growing stash of frames in my garage. Time to reimagine those frames!
text by Vicki Sign up here to join our weekly email newsletter!
This was a fun experiment to try to see if it was possible to embed battery powered lights into epoxy resin.
Spoiler: it totally worked! The lights still worked after being encased in epoxy. Read on to see how I did it.
text by Vicki Sign up here to join our weekly email newsletter!
Last spring, while I was experimenting with my new silicone charcuterie molds from TotalBoat, I tried a technique (that maybe I invented or discovered) that I had not seen before to see if it would work and it did!
I decided the technique would be perfect to create a fun, Halloween themed charcuterie board. So, now it's cool enough (relatively--it's still Florida after all in September!) in the garage to once again create some fun with epoxy. Here's how it went.
text by Vicki Sign up here to join our weekly email newsletter!
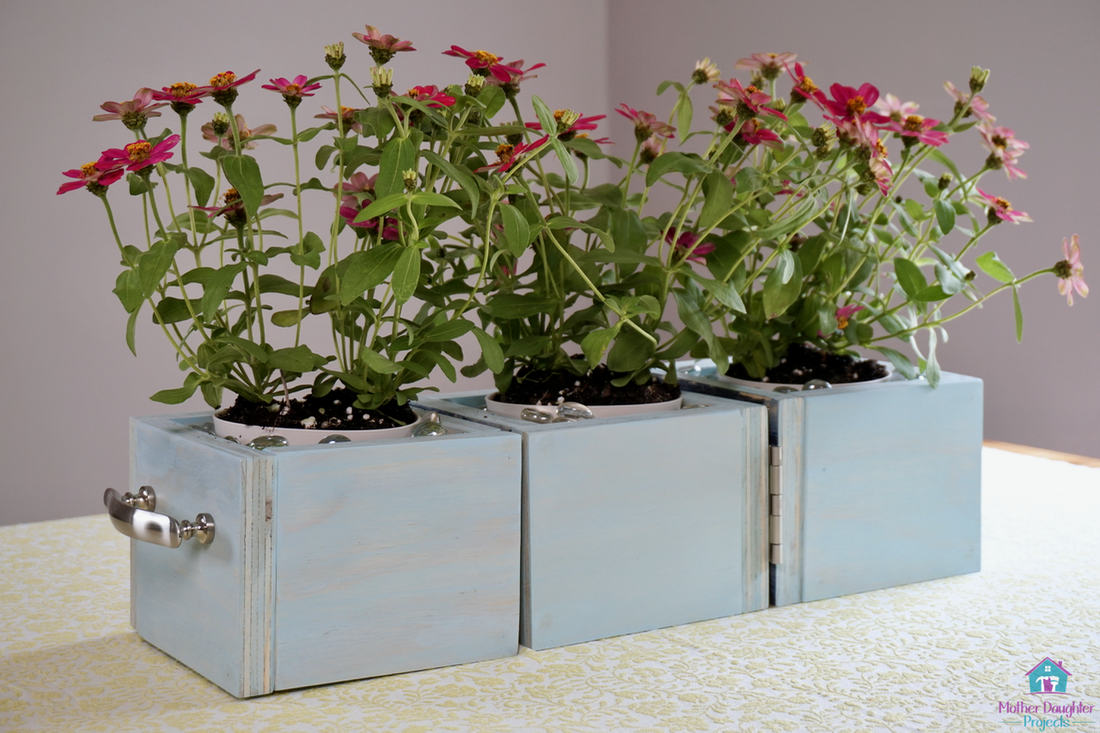
Here's a quick gift you can make for that friend with whom you share special memories. You can use any printed photo, but this one is sized for retro cool Polaroids!
Grab a small piece of lumber, the stain of your choice, and a few clips and you're ready to build. 
text by Vicki Sign up here to join our weekly email newsletter!
I've found I like the challenge of creating different alternative Christmas trees and this year is no exception. I started the challenge by looking for suitable materials that I already had on hand.
I found a bunch of mini wood crates that I had gotten at a conference that would prove to be the perfect starting point along with some leftover wood dowels (from last year's tree) and a well aged tree branch!
text by Vicki Sign up here to join our weekly email newsletter!
Fall and Halloween decorating is in full swing. We're all ready for a little change of season and a little fall decor both inside and outside of our homes. In partnership with the Home Depot, we created a DIY pumpkin topiary for fall that can be swapped out for a spooky Halloween tree complete with DIY ornaments!
Head to the Home Depot to see the full video on how to build the topiary. In this post, we'll go into more detail on how to deck out your Halloween tree.
text by Vicki Sign up here to join our weekly email newsletter!
This post is sponsored by The Home Depot.
Up to this point, we've always shared projects from start to finish, but not this one! We're showing the build here, but we are collaborating with our YouTube friend, Christina from Pretty Distressed, who will be sharing the finish.
Christina searched the internet and found a project from Pottery Barn's website to duplicate. It's a rustic Christmas tree that has been discontinued for many years. This is our interpretation of the design using readily available and inexpensive paint sticks. Take a look at the video to see how it all came together!
text by Vicki Sign up to get Mother Daughter Projects updates in your email!
This post is sponsored by Surebonder.
When Surebonder asked us if we would like to participate in challenge as a way of promoting their new cord-free detail hot glue gun, we couldn't say yes fast enough! We've worked with Surebonder on a number of occasions and use their products in a lot of our projects, so we knew this would be a good fit!
For the challenge, they sent us a curated box of "stuff" which we had to use at least seven of the items in some creative way. Below is the assortment of "stuff" we received! We decided to make the pallet wood the star of the show and developed an idea from that. 
text by Vicki Sign up here to join our weekly email newsletter!
This post is sponsored by Quikrete.
The humble supplies below came together into one of our favorite projects ever! When we spotted those flame light bulbs- we just knew we had to do something with them. At the time of purchase, we had no idea what to do with them, we just knew we had to use them!
With a little bit of engineering, styrofoam, melamine, toy bricks, and Quikrete mortar mix, we were able to cast the perfect faux fireplace! Take a look at how it came together.
text by Vicki Sign up to get Mother Daughter Projects updates in your email!
This post is sponsored by Surebonder.
It's rare, but sometimes a project idea comes together just as the idea was imagined. This little mini ladder "tree" was that kind of project!
I find a lot of inspiration from the products and materials we use. When tasked with the question, "How can I use this," the ideas just seem to flow. That was the case when we were contacted by Surebonder to try out their hot glue gun and adhesive products for this post. Actually, what really intrigued me while going through their catalogue of products on their website, were the various adhesives they offer. I, perhaps like many of you, thought glue sticks were kind of like "one size fits all." Well, when I discovered the Wood Stik product, it got me to thinking about making a woodworking project with nothing but glue, rather than nails and screws. One thing led to another and we decided to make a "nail free" mini version of our ladder, alternative Christmas tree. If you've ever wanted to take a step into working with wood, this is the perfect beginner project. Take a look at how our mini tree came together! You can also check out our project on the Surebonder blog here.
text by Vicki Sign up to get Mother Daughter Projects updates in your email!
This post is sponsored by The Home Depot.
Around this time of year, it's become a tradition to come up with an alternative Christmas tree idea. This year is no exception!
The inspiration for this year's tree is from a visit to Epcot at Walt Disney World. Steph took the boat ride in the Land Pavilion and saw their version of a ladder tree, which became the model for ours. Take a look at how it came together!
text by Vicki Sign up to get Mother Daughter Projects updates in your email!
This post is sponsored by Quikrete.
It's October and that means it's time to decorate for fall and Halloween. One of our favorite materials to use for outdoor Halloween decorating is concrete. It's easy to work with and holds up well to hot, rainy Florida weather. It's very DIY friendly.
You may remember in 2016, we created concrete pumpkins that could be used as a flower pot or candy or candle holders. That's an easy project for any beginner. Take a look at that video if you want to create your own pumpkin. Now on to this year's concrete project. If you're like us, you may celebrate Halloween away from your home. If you're not home, you can just leave a bowl of candy at the door, but there is the very high likelihood that someone will pick it up and dump the entire contents into their bag. Well, with this project, that will be a little difficult! We're making a concrete candy bowl that can double as October fall decor. Take a look. As always, watching the video is great place to start.
text by Vicki Sign up to get Mother Daughter Projects updates in your email!
This post is sponsored by our favorite, The Home Depot!
There is nothing more frustrating when crafting or making than knowing you have what you need, but you can’t find it! I read a quote once that stated “if you can’t find it, you don’t own it!” I think of that often when I can’t find something and have to buy again in order to start or finish a project.
Although we have lots of craft/maker supplies for Mother Daughter Projects stored at Steph’s house, they were becoming more and more inaccessible due to lack of organized storage. Over Christmas Steph decided she had had enough of the mess and started to digitally put together an idea to install an organizational system into the closet in her Lego room. The closet we are working with is 86" wide x 96" tall x 23" deep. Seeing that everything we wanted to use was from The Home Depot, we reached out to them to see if they wanted to partner with us on the project. We felt it had universal appeal to others like us who wanted to buy and install pre-made components to get the job done fast! We are calling this a semi-DIY because we are not actually building anything. With the exception of cutting a few pieces of closet rod, all the other components are ready to be installed and come with all their parts to get the install done. Please watch the video above to see how it came together, and get more details below! text by Vicki Sign up to get Mother Daughter Projects updates in your email! Recently, with Steph’s help and the help of a few volunteers, we planned and hosted a craft night for women at my church. A search of Pinterest and a picture on Facebook provided the inspiration for our Valentine’s Day craft. I’ll provide some tips at the end of the post for planning a craft night for a group.
text by Vicki Sign up to get Mother Daughter Projects updates in your email! The A-frame 2X4 Christmas tree we made for 2017 was designed to come apart and fold for easy storage. With the exception of the concrete base, the tree came apart and easily stored as expected. Because of the weight and size of the base, we knew we didn’t want to try to store it, but wanted a way to use it throughout the year making storage unnecessary.
We designed a PVC (plumbing pipe) stand that utilizes the base to serve as a garden flag holder! People, at least in the south, enjoy displaying and changing out garden flags to match the season. Although the base is heavy, it’s not so heavy that it can’t be moved around to where you want it. You could even pop it into the car and reassemble it at your next tailgate and hang your team colors from it!
text by Vicki Sign up to get Mother Daughter Projects updates in your email!
This post is sponsored by The Home Depot as a part of The Home Depot’s ProSpective Campaign. THD provided the Diablo Hole Saw used in this post.
We've designed and created alternative Christmas trees for the last couple of years as we like the look and the creative challenge. We set out to create something new for Steph's house. I don't remember if Steph had an idea, but if she did, I ignored it and lobbied for MY idea.
A few years ago I saw a basic wood tree in a mall window display. It had shelves for merchandise but it was basically a tall skinny wood triangle. We decided to create our own version of the display tree. Ours would have no shelves and would be supported by a concrete base. I really liked the concrete bases we made for Steph's nightstand and thought it would be a great idea to hold the tree up. Also, we designed the tree so that it could easily be taken apart for storage. Take a look at how it all came together!
text by Vicki Sign up to get Mother Daughter Projects updates in your email!
This post is sponsored by The Home Depot as a part of The Home Depot’s ProSpective Campaign.
Right after The Home Depot's gift center went up, we got a tour from our local store manager. We enjoyed seeing all the tools and accessories for the holiday season, and also really enjoyed getting to spend time with the manager. He showed us around the gift center, opened a couple of products for us to test out and shared a little history about The Home Depot and his journey with the company. It was obvious he cares about the company and most especially, his Home Depot colleagues!
When you head into your local Home Depot you'll find the gift center near the front entrance--it's not hard to spot. There you will find tons of tool deals and accessories. Check out the front aisles as you'll find some fun stuff there as well.
text by Vicki Sign up to get Mother Daughter Projects updates in your email!
It's no secret that we like to work with concrete! It's such a forgiving, creative material. I was doing a little concrete project Pinterest research and came across a concrete garden orb. I really liked the look, but I thought the idea could be adapted to make a creepy mummy decoration for Halloween. Also, I had a huge supply of soft, cotton cording/piping from a yard sale that I thought would be the perfect material to use.
text by Vicki Sign up to get Mother Daughter Projects updates in your email!
Recently, we were asked by Kreg to create a sponsored Mother’s Day project for BuildSomething.com. Being that we are Mother Daughter Projects, what better team to ask than us?! We have purchased and used a number of Kreg products over the years, and jumped at the chance to add a project to Build Something!
Check out the tutorial for how to transfer pictures to wood below!
text by Vicki Sign up to get Mother Daughter Projects updates in your email!
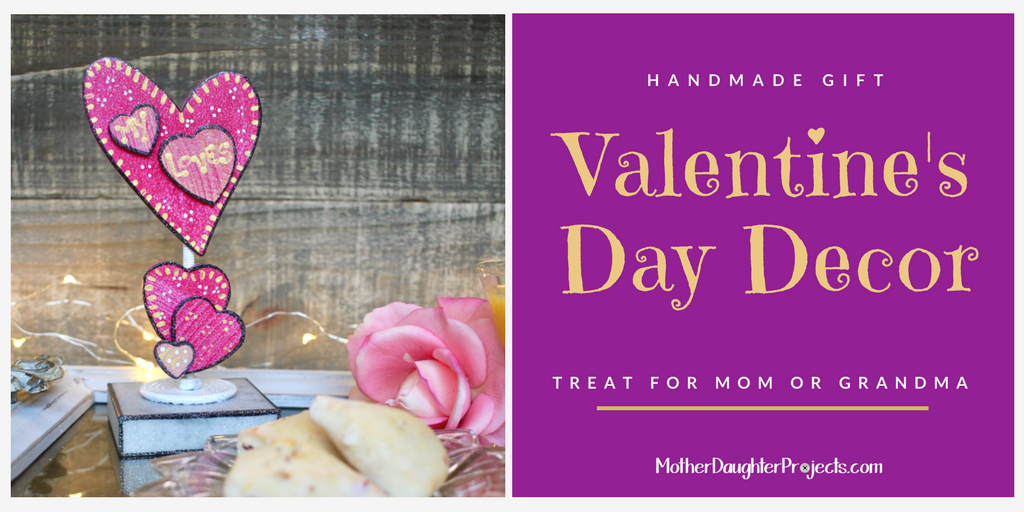
We received a Valentine's Day DIY Project Kit of Testors products today and couldn't wait to get started! Since I'm the crafter of the team, I shared a few ideas with Steph, and we agreed on a decor piece.
We were tasked with using a selection of the products in the box to decorate the included wood hearts. Along with the wood hearts, we used parts from an old trophy as the base of the project. We decided to make a decor piece that could be used as a special addition to a Valentine's Day breakfast for a mom or grandma. In our piece, "My Loves" refers to my three grandchildren which are represented by the three hearts below the larger heart.  We are participating in a Handmade Holiday Gift Series with fellow bloggers. As usual, when faced with a challenge, we each had our own ideas of what to do. We barely considered Vicki's idea because Steph's idea was perfect!
Our gift idea is a take off of all those Pinterest worthy "mix in a mason jar" ideas. We decided instead of a food mix we'd make up a DIY concrete kit in a bag! We have enjoyed learning how to use concrete this year, but realized there is not an easy, simple way to experience using concrete without having to buy a huge bag of concrete. Putting together a concrete kit, with everything your gift recipient will need to make three candleholders, allows you to give the gift of creativity to all your DIY friends.
We thought we’d have a little fun with a Christmas countdown, DIY style. In the next 24 days, we will “unwrap” a gift a day of tools and products that we think are “must haves” for the DIYer. Join us and share your “must haves” in the comments!
To see a video of each product in action, make sure to follow us on Instagram. 
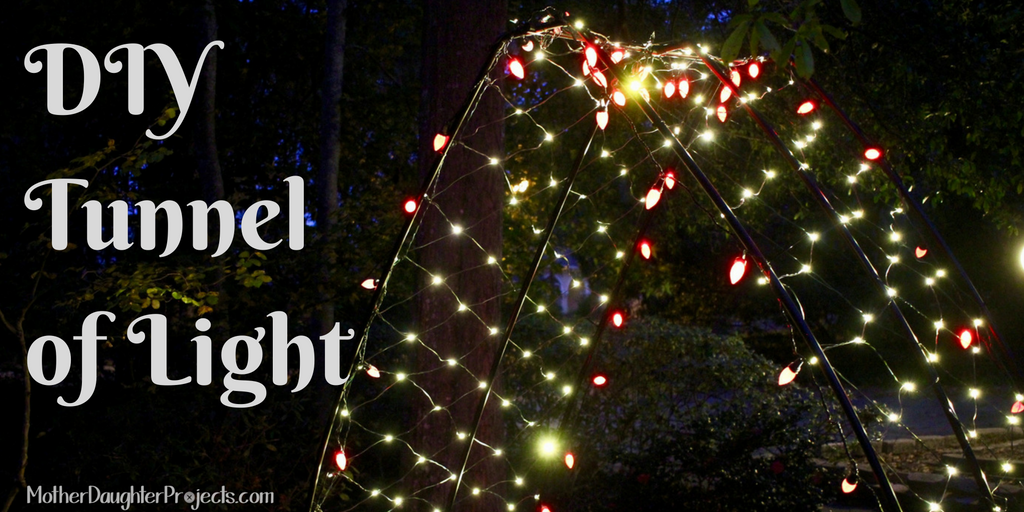
For the past few years, I’ve (Vicki) strung lights in the tree above the sidewalk to my front door. The branches are now too tall to comfortable reach so I needed a new way to have lights over the sidewalk.
We decided to use PVC pipe to construct a structure on which to secure lights. We first used PVC pipe when we made a “tent” for grandson Tyler’s bunk bed. That’s where we learned it was pretty bendy in the smaller diameters so we thought it would be the perfect material to use. It must be noted that our final design was our second try at a PVC arch. That’s the cool thing about designing a DIY project. Sometimes it works out in the original design, sometimes it's necessary to develop a plan B! In designing the arch, it had to meet a couple of criteria: materials must be readily available and it must be collapsible for storage, so parts could not be permanently glued.
text by Vicki Sign up to get Mother Daughter Projects updates in your email!
When it comes to December decorating, we like simple and quick! This project meets those two requirements. In this DIY we are making a star with string lights using screws driven into a fence in which the lights are wrapped into a star shape. We are using App Lights from Home Depot, but any lights will work. If you use App Lights, this is a decoration can stay up year round as you can change the color to match the season or holiday.
|

Mother Daughter Projects
|