|
text by Vicki Sign up here to join our weekly email newsletter!
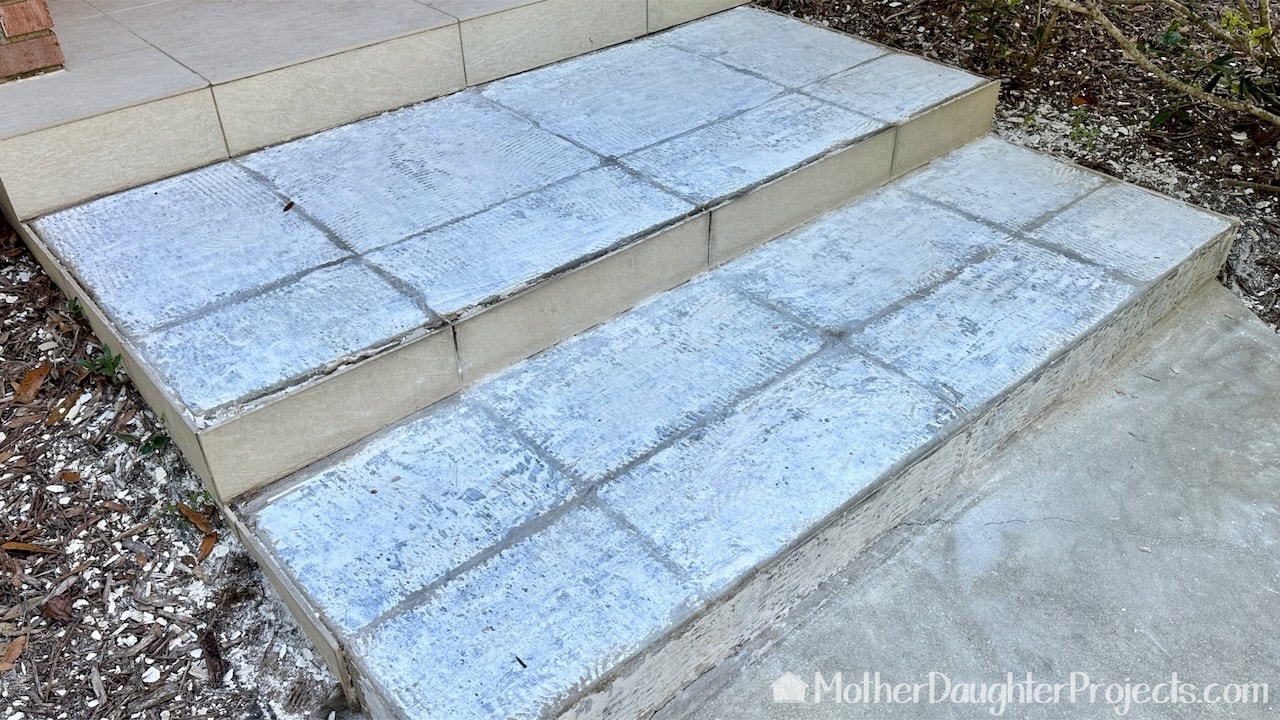
This is the last part of a four-part series on the retiling of the outdoor steps at Vicki's house. To recap, the steps are 12 years, but we discovered several tiles were loose which needed immediate attention for safety reasons. Ultimately, we found that all the tiles on the first step and most of the second were loose.
To fix them, we chiseled off the old mortar, cleaned the old tiles, cut new tiles, laid them on fresh mortar, and in this post, we do the final step: grout, sealing, and clean-up.
0 Comments
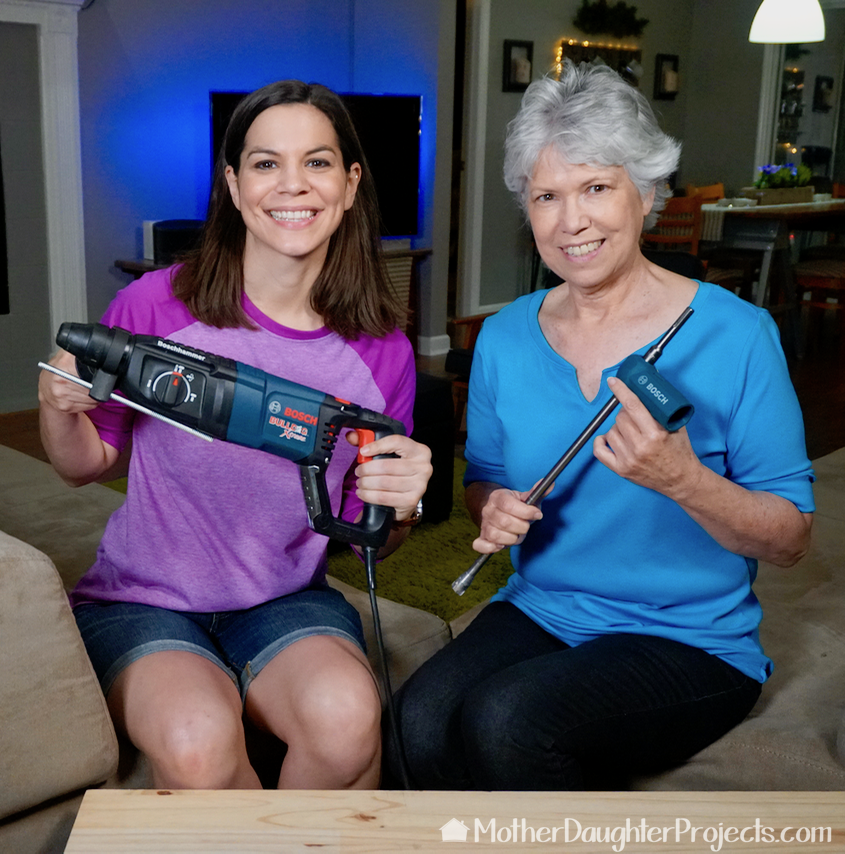
text by Vicki Sign up here to join our weekly email newsletter!
In our last post, we shared an overview of the entire process of removing the old front door step tiles though the reinstallation of the tiles.
In this video, we take a closer look at how we removed all the mortar, cleaned up the tiles, and then reinstalled them. Products:
Tools:
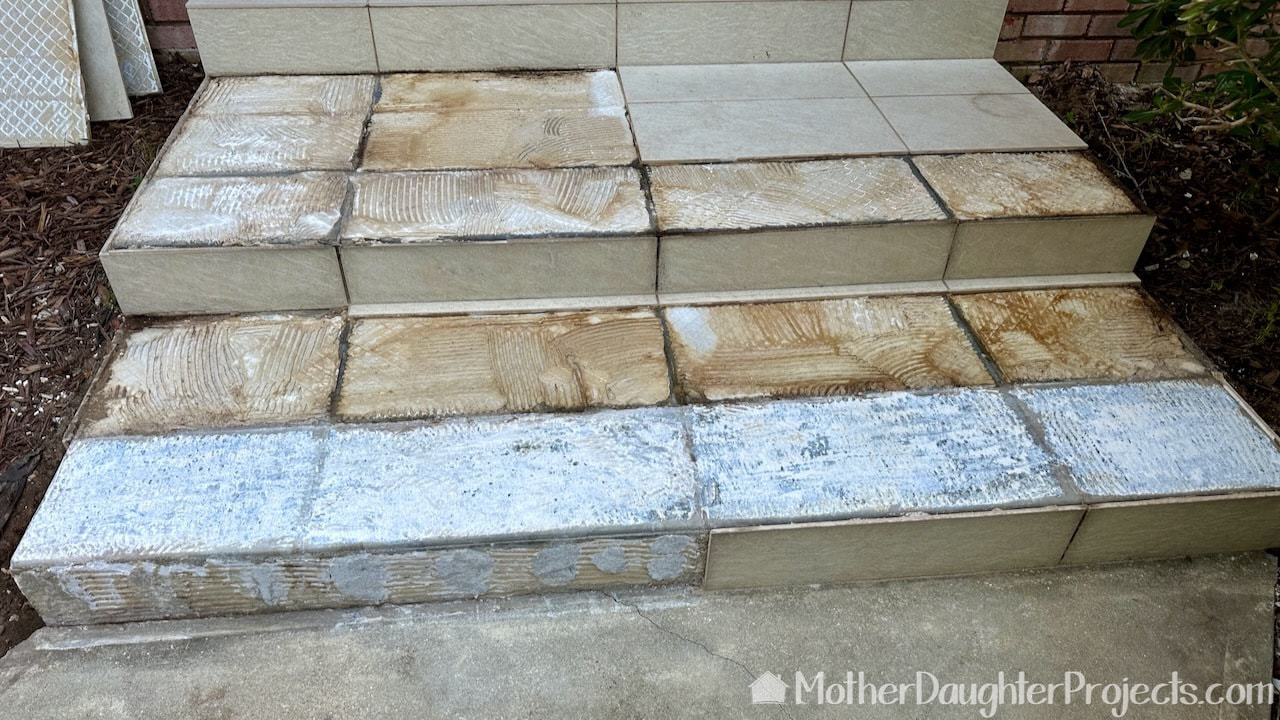
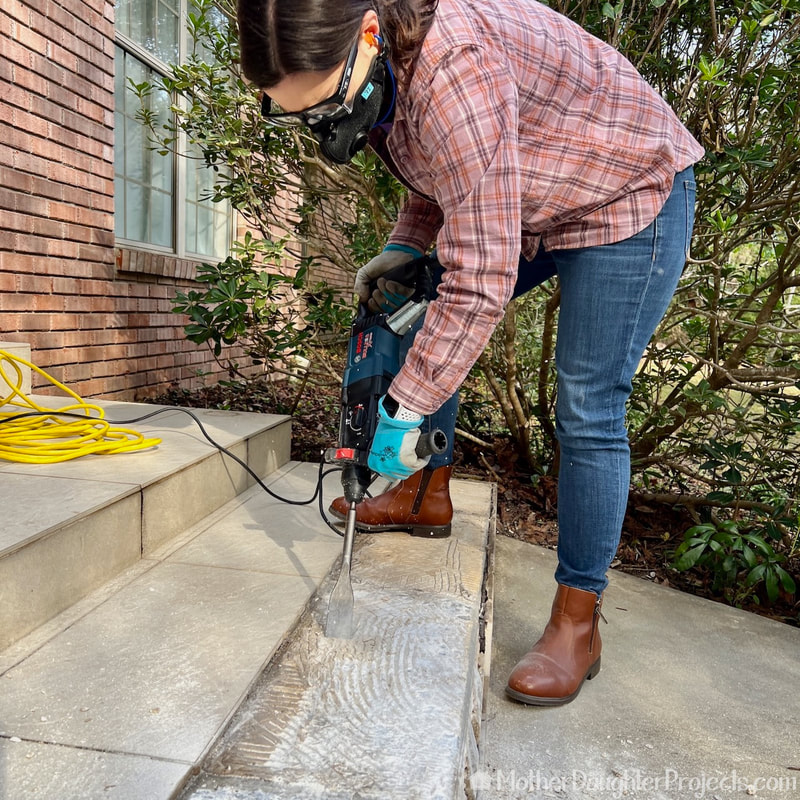
In all, we removed all the tiles on the first and second steps. We also removed the four vertical tiles on the first step. The verticals on the second step were holding tight so we did not remove those.
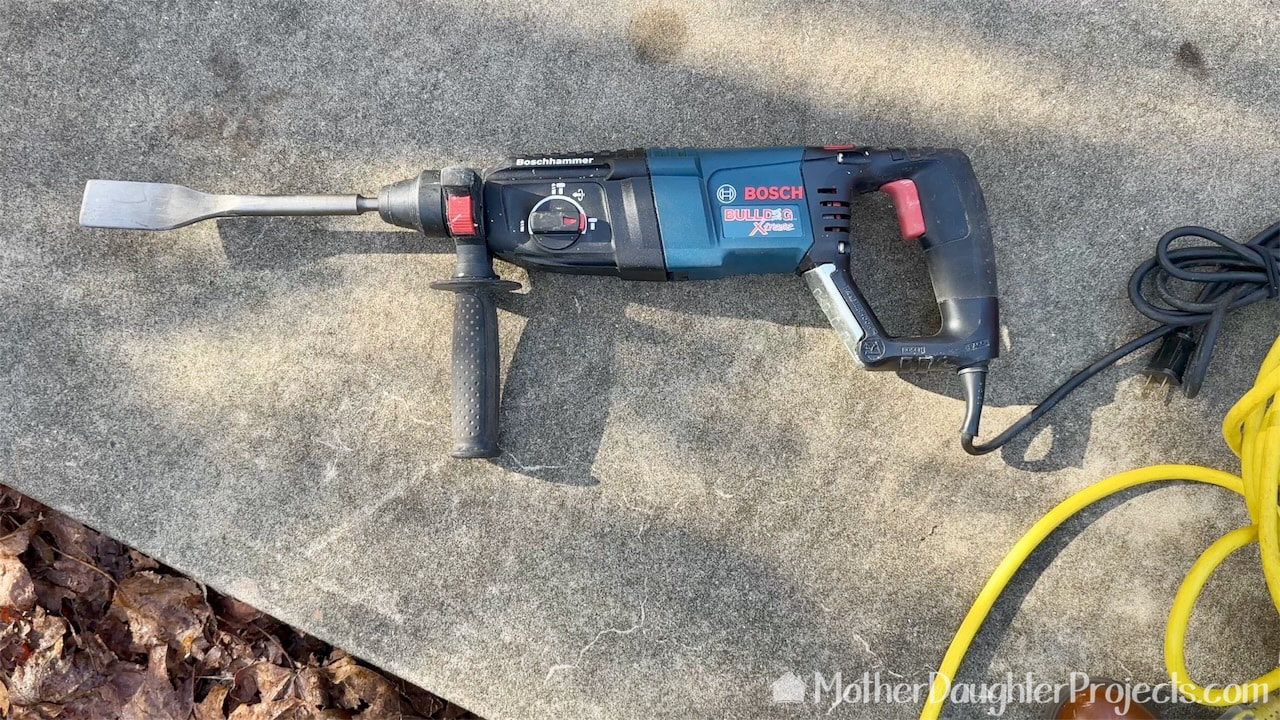
We are using a Bosch rotary hammer drill with a chisel blade to remove the mortar. We own this tool, but rentals may be available at your local tool rental store.
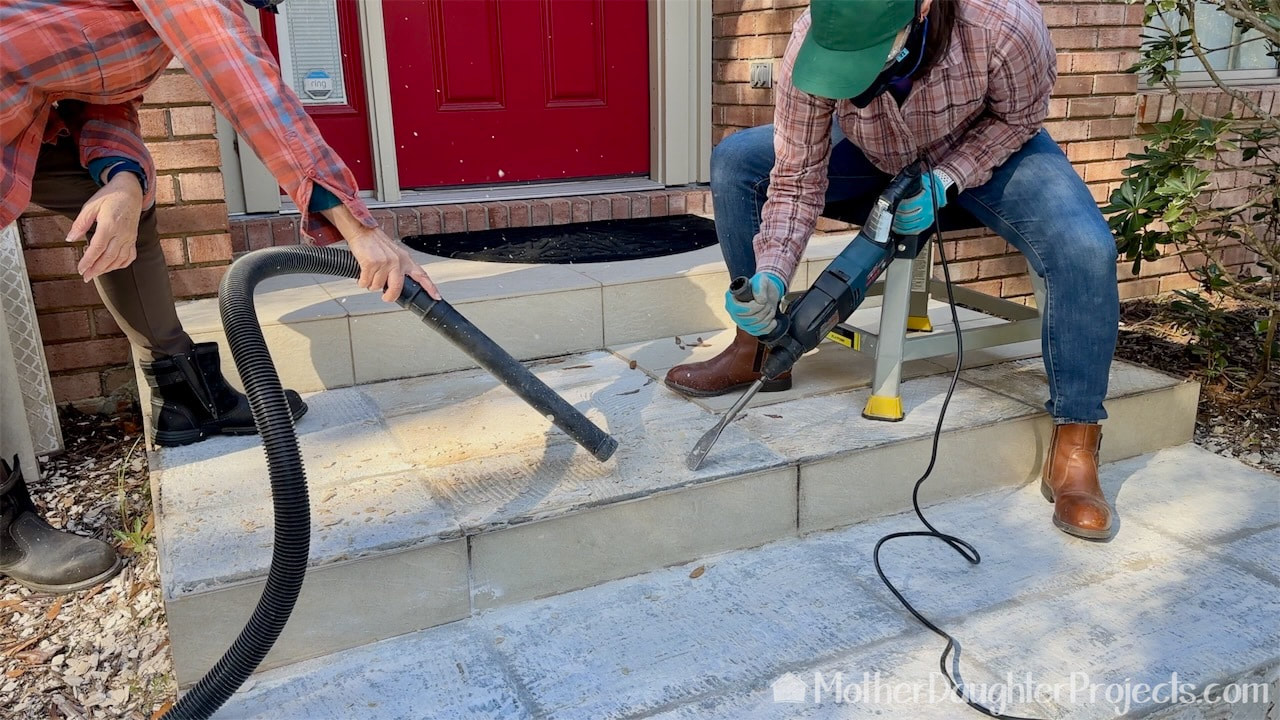
It took a bit of trial and error to come up with a comfortable way to use the tool. Steph actually used it upside down while sitting on a short stool. She took frequent breaks as it is a fatiguing tool to use. It's effective thought!
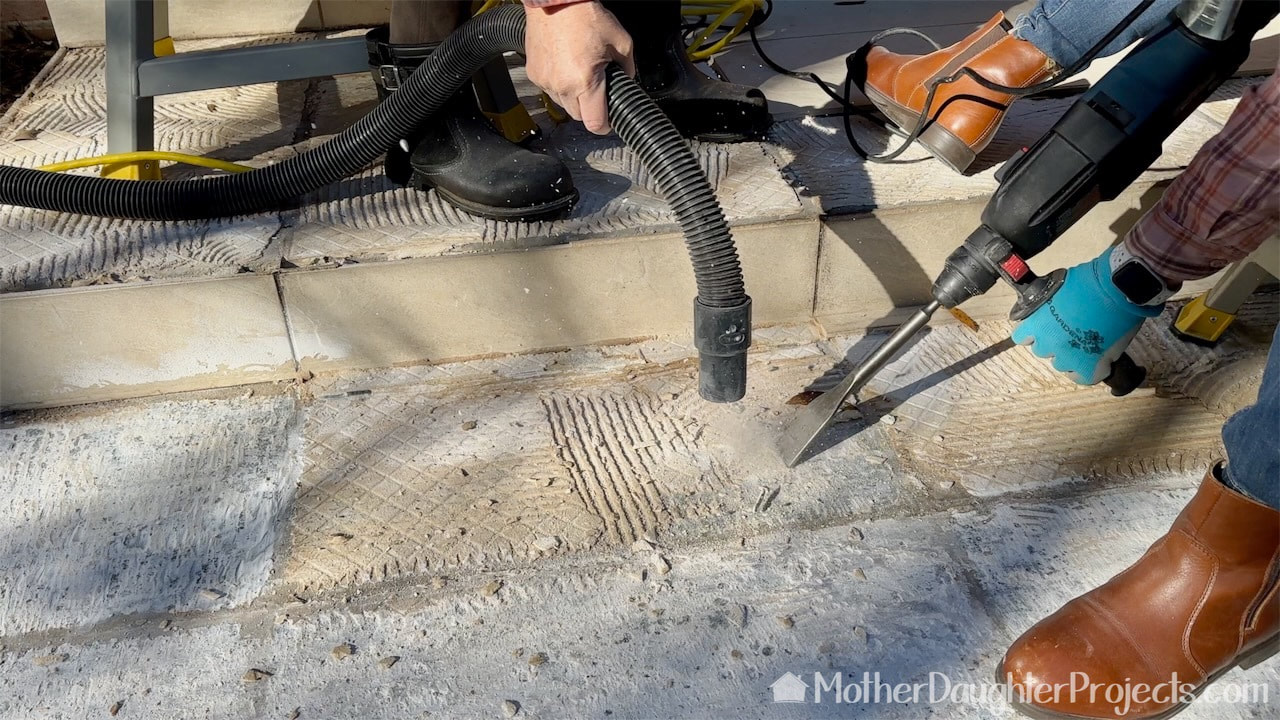
We certainly could not control all the flying debris, but we were able to capture much of the dust that the removal produced. We are both wearing protective gear while we work to protect eyes, ears, and lungs. We are wearing respiratory masks.
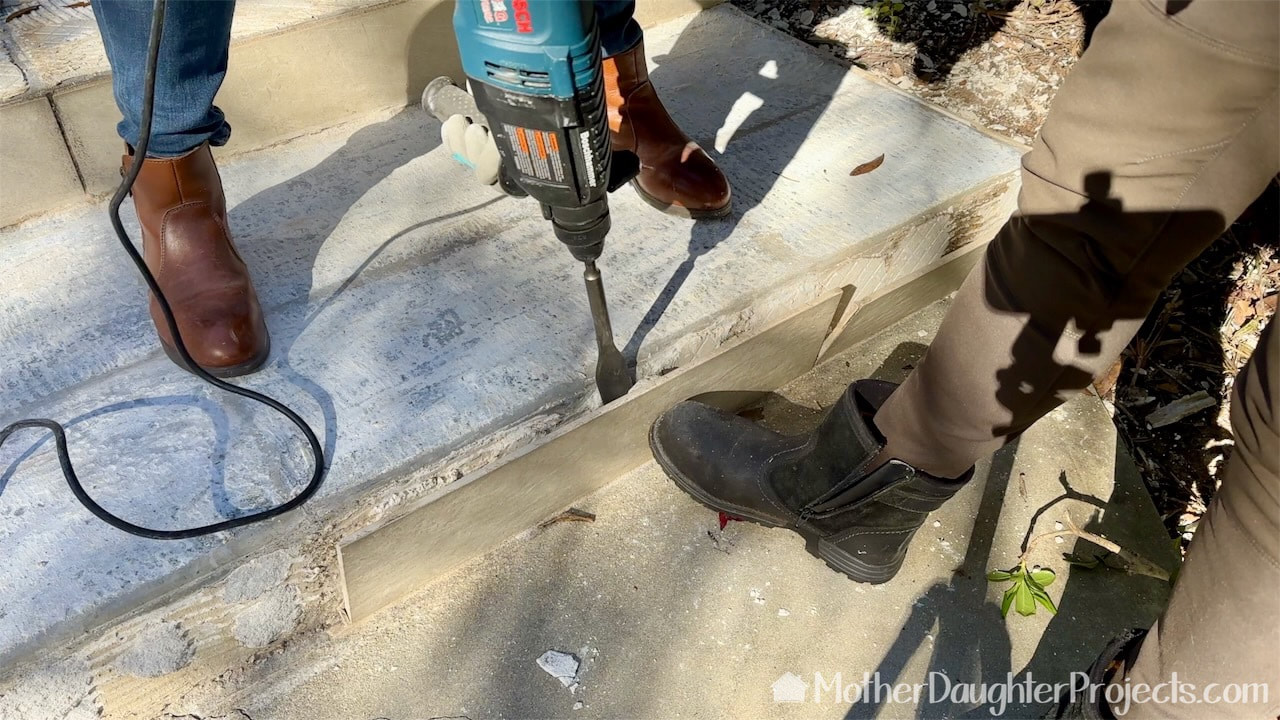
Any tiles that were actually stuck in place, we gently removed with the Bosch. We wanted to reuse as many tiles as possible.
Removing the old mortar is the hardest and most fatiguing part of this process. Pace yourself!
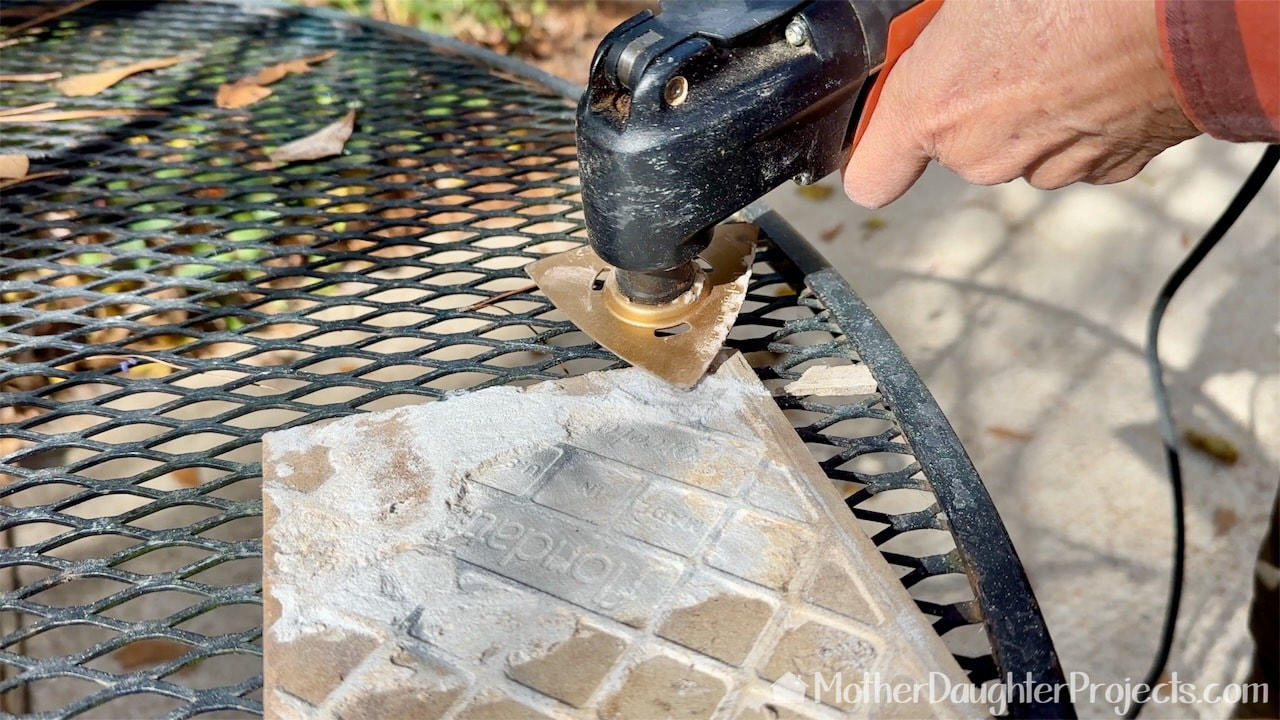
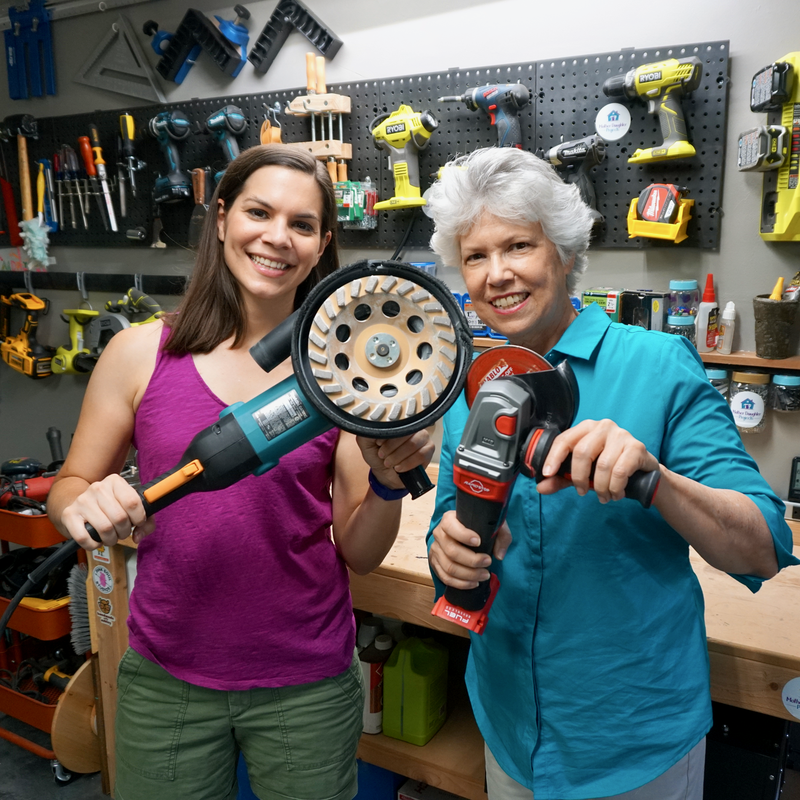
All of the mortar on the old tiles had to be removed so we could use them again. I used a variety of tools to clean this including a Fein multi-master with carbide rasp. It worked really well.
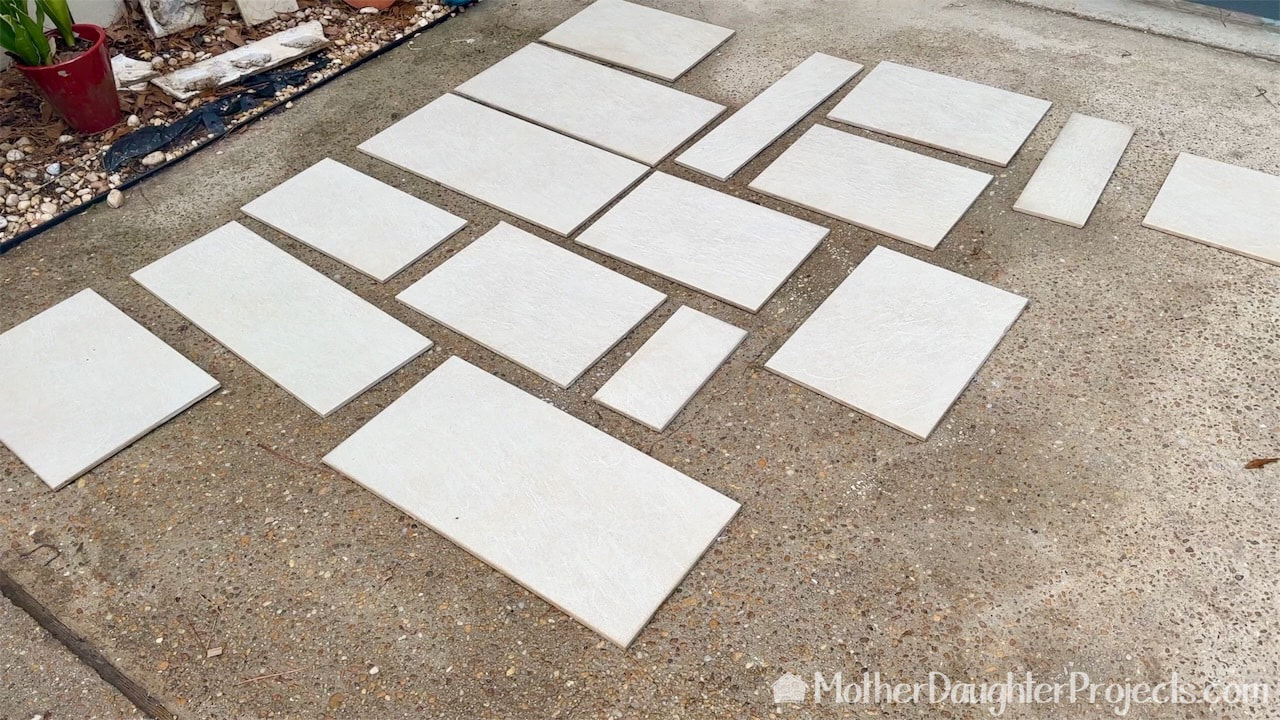
All of the original tiles and a few new ones we needed to cut, were laid out on the driveway to be cleaned. Use Mold Armor Rapid Clean remediation to clean the outdoor tiles of algae, mold, and dirt.
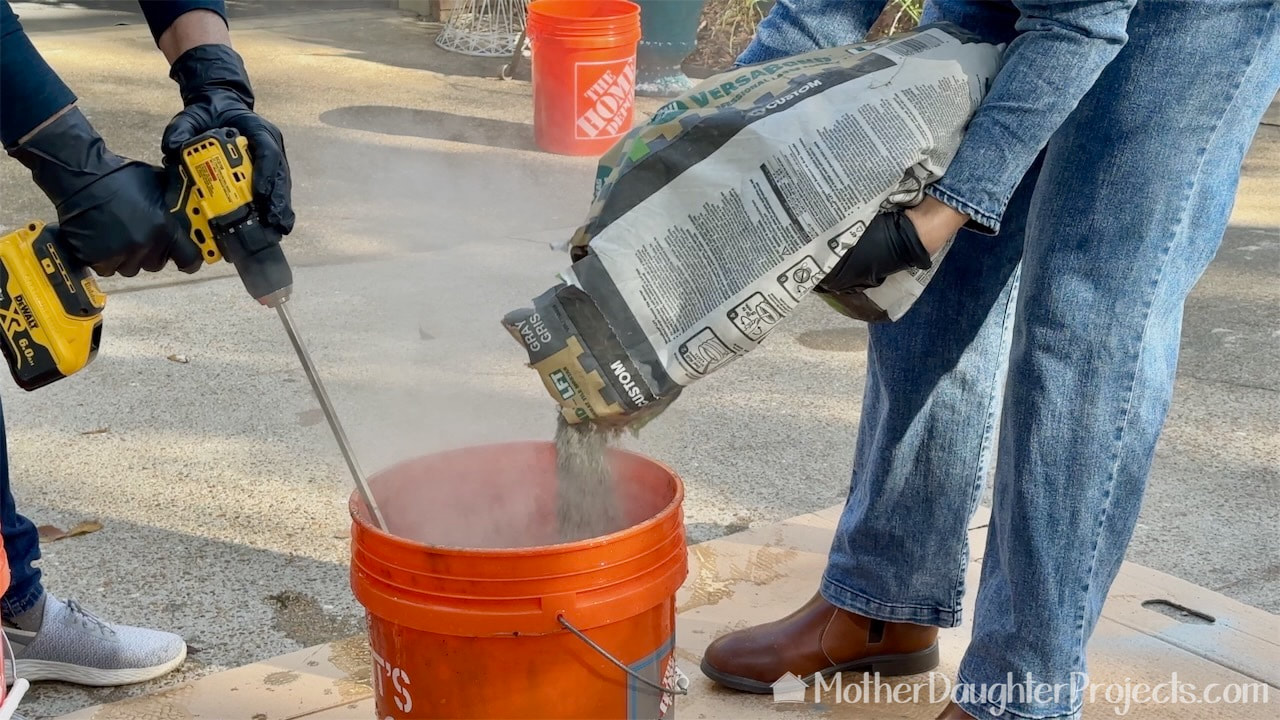
We mixed up the mortar following the instructions on the bag. We added way too much water initially so we had to add more powder. Start with a little water and slowly add to it to better control the consistency. The mixer attachment to the drill was extremely helpful. Again, use appropriate protect equipment so you're not breathing in the mortar dust.
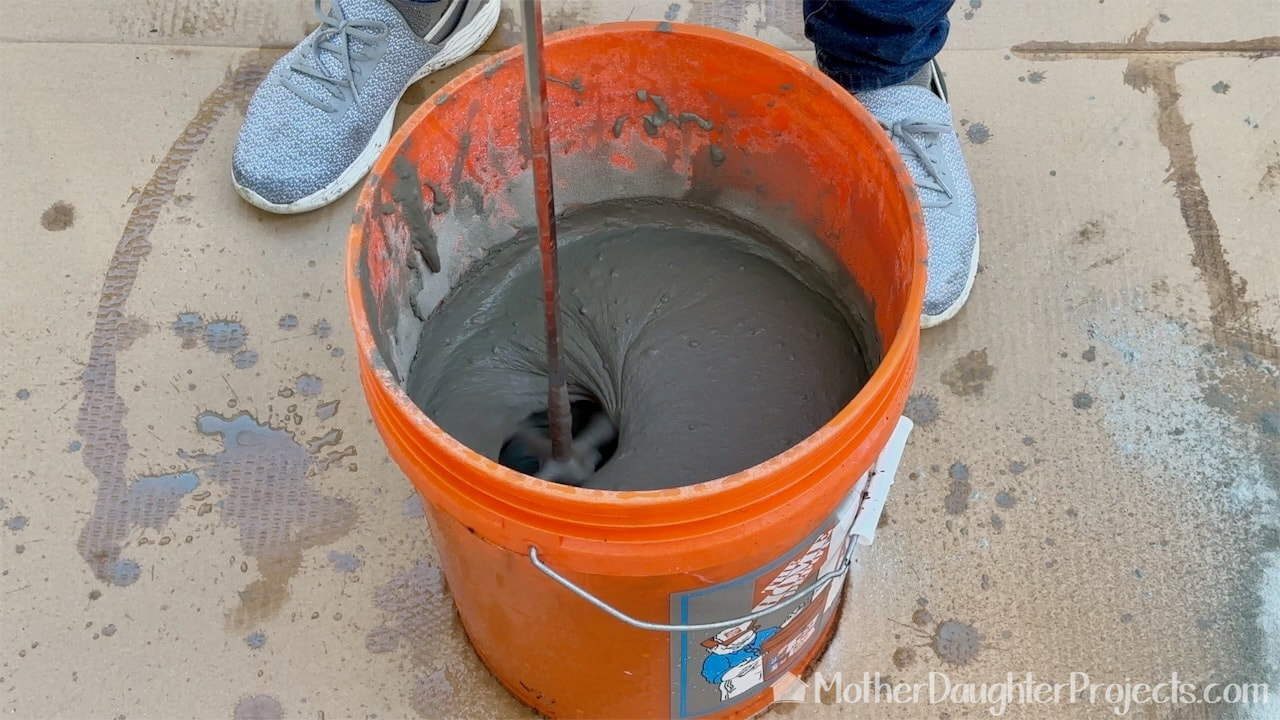
We mixed according to the instructions creating a nice smooth consistency.
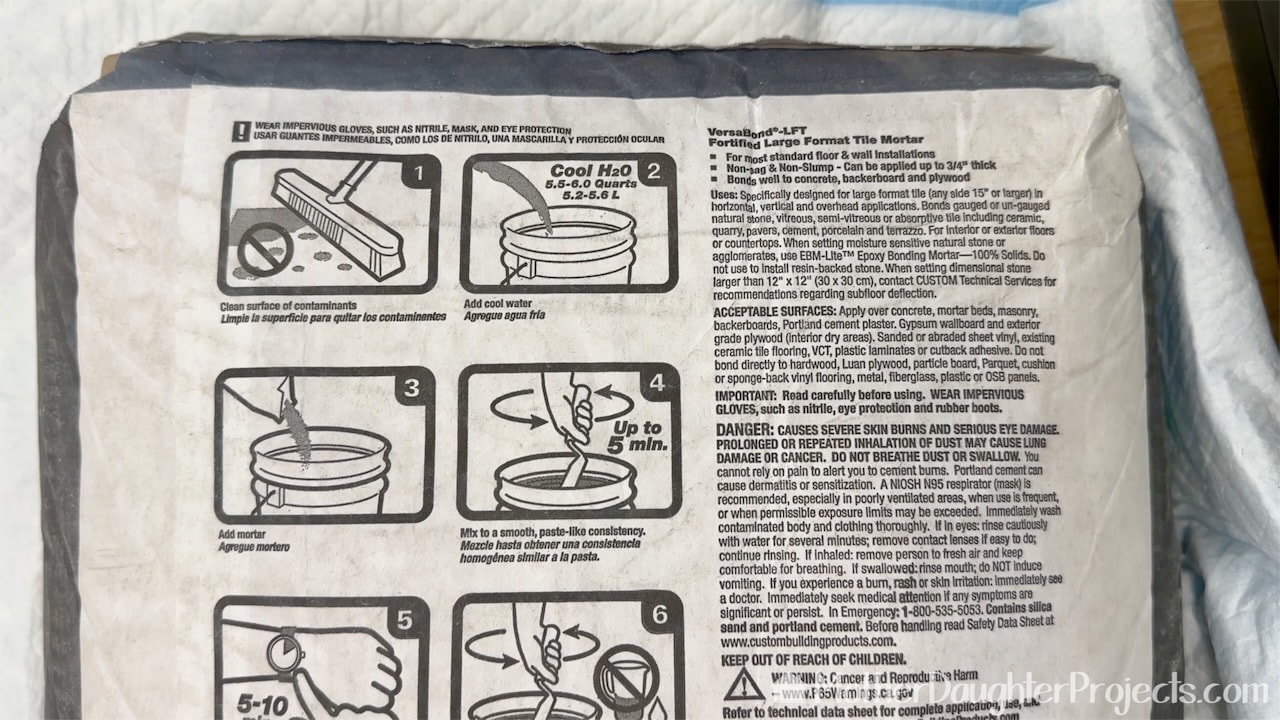
Hint: before opening the bag, take a picture of the instructions so you can easily refer to them.
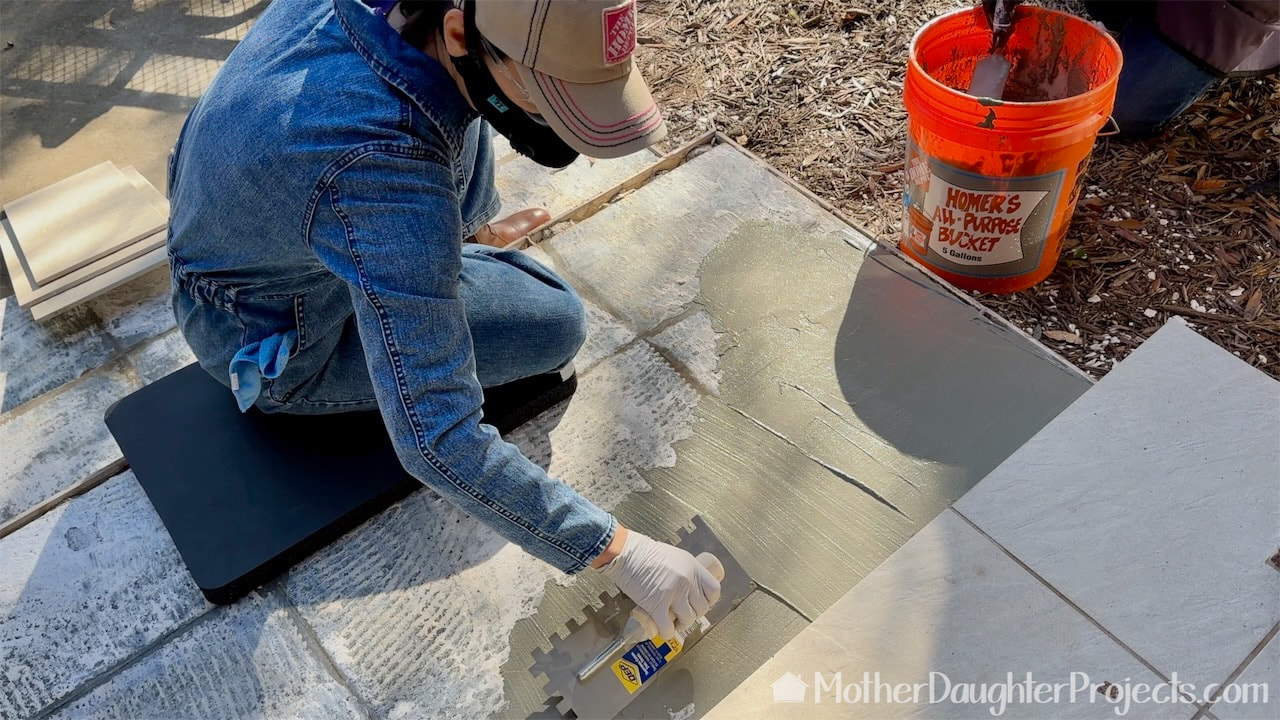
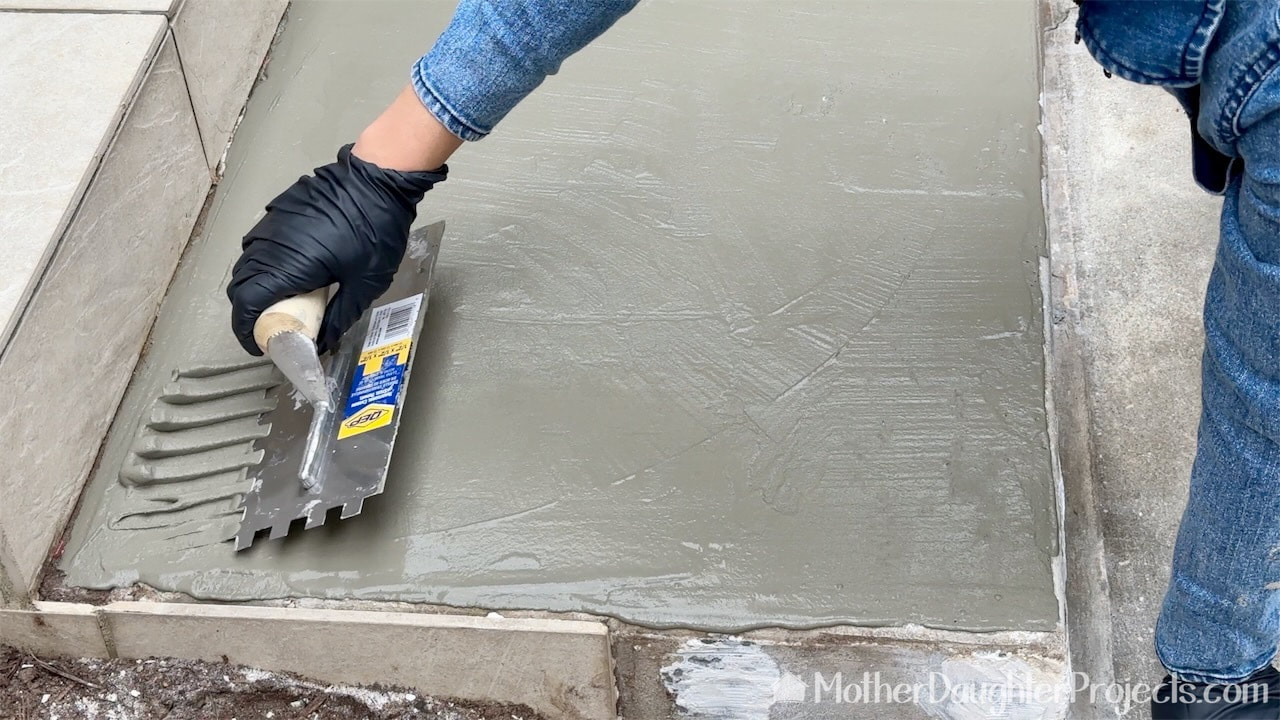
The mortar is spread in a skim coat with a notched trowel. This size was one suggested for the large tile we are installing.
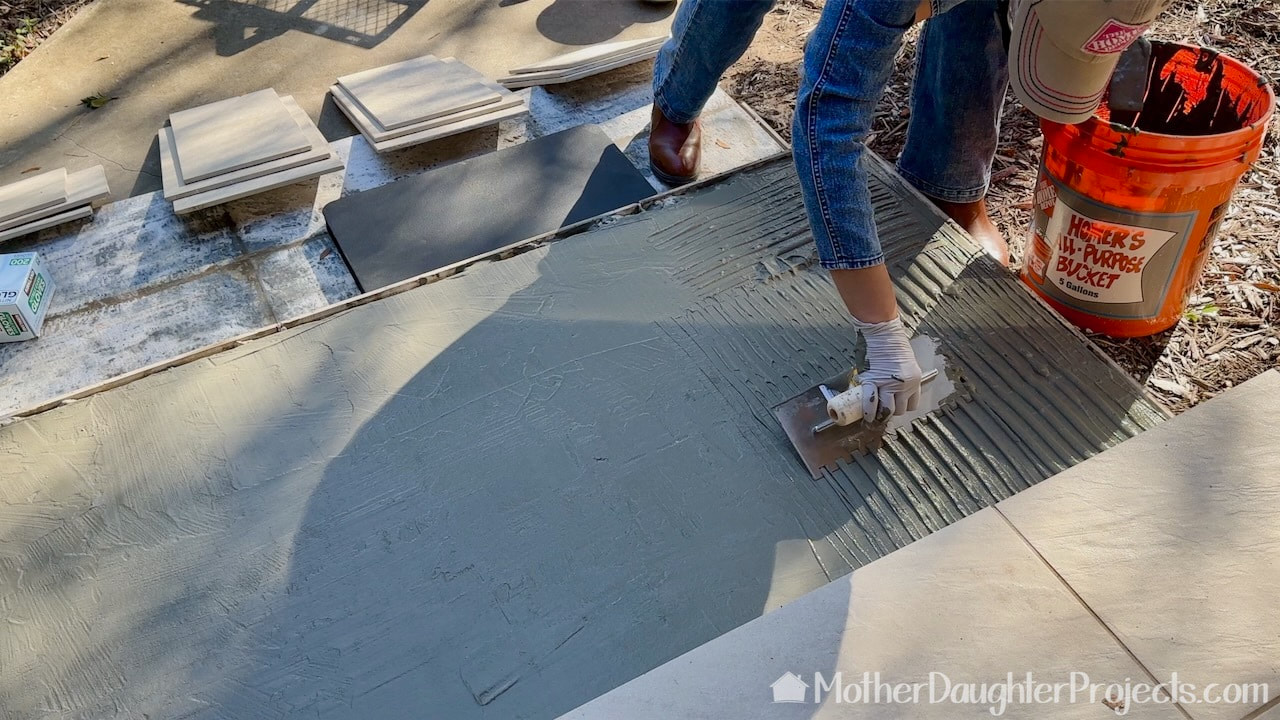
The mortar is then notched
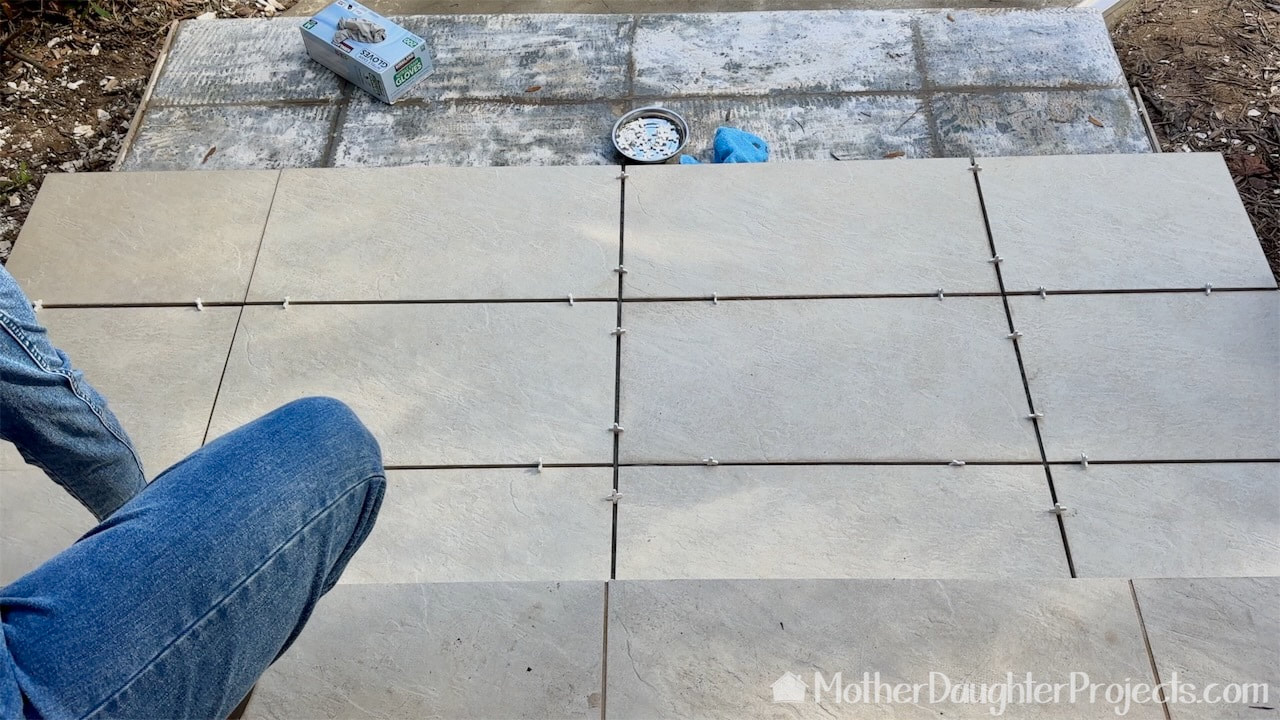
We set the tiles in place using plastic spacers.
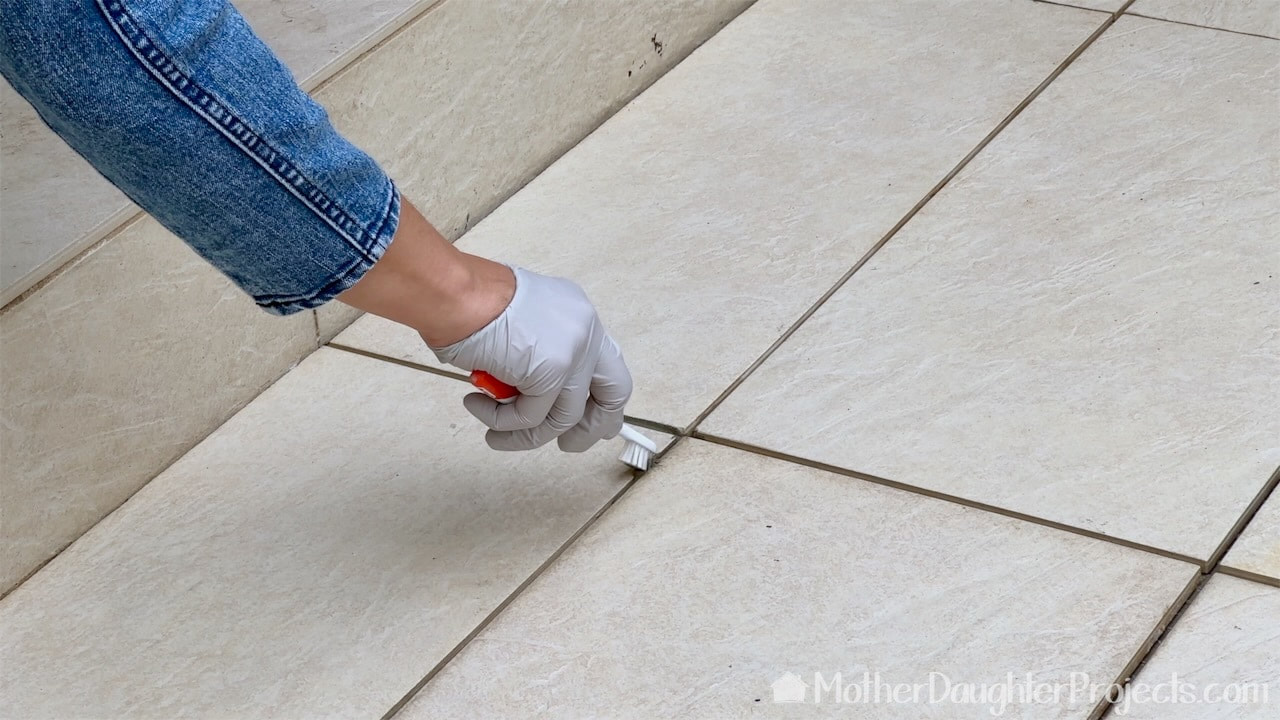
We used a toothbrush to help clean up between the tiles prior to adding the grout. We wiped the face of the tiles clean of mortar with a damp microfiber cloth.
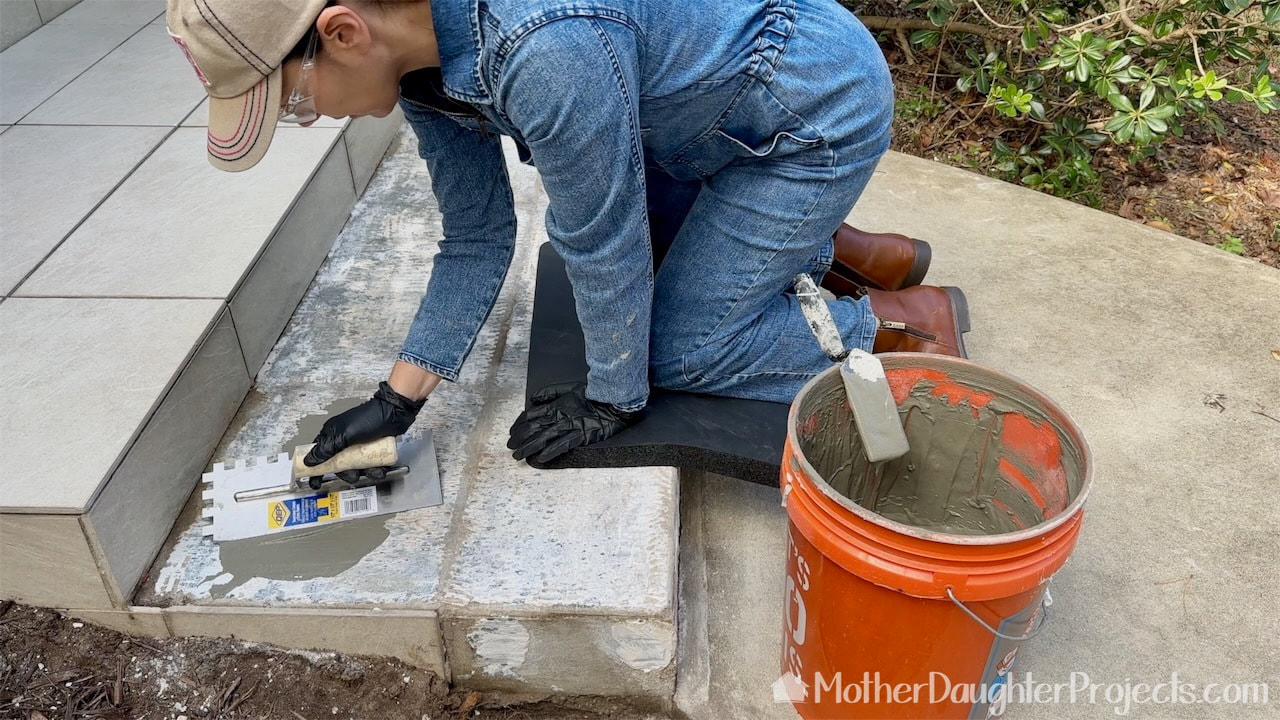
We repeated the entire process on the second step. A kneeling pad like this one from Husky helps to save your knees.
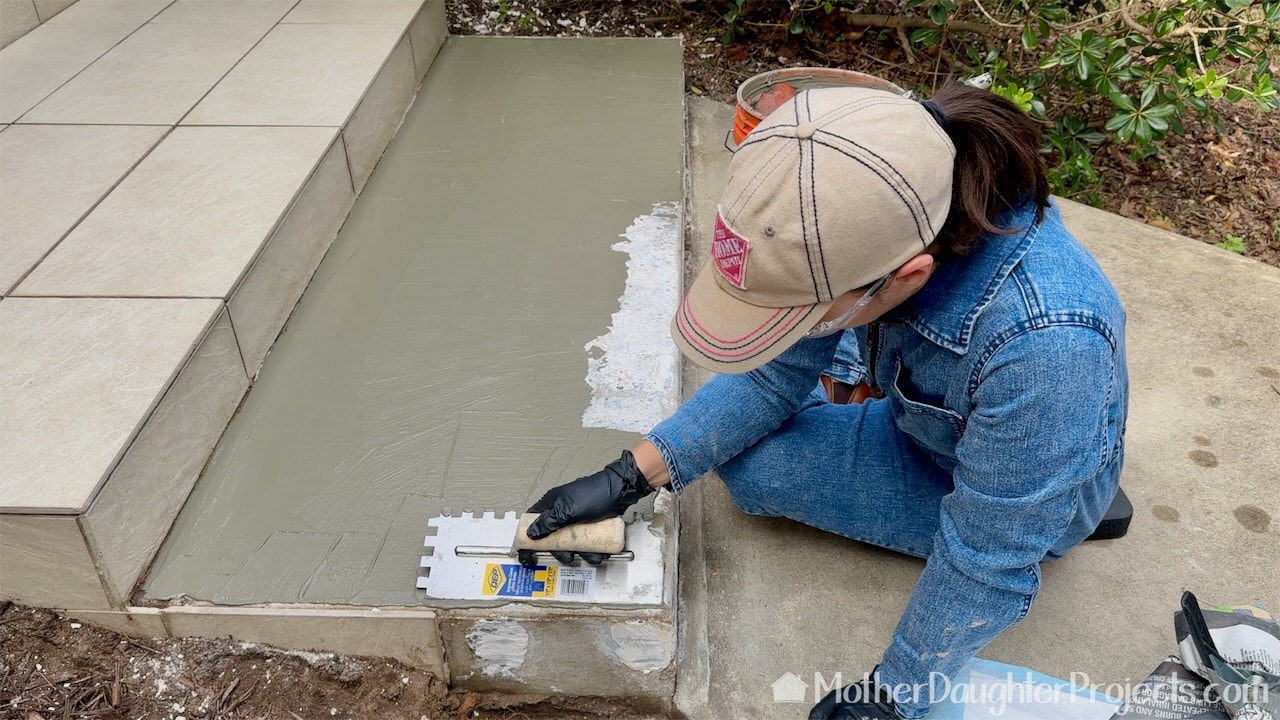
Finishing up the skim coat on the first step.
Trying to hold the trowel at a 45 degree angle for the notching. It was awkward but Steph got better at it as the project progressed.
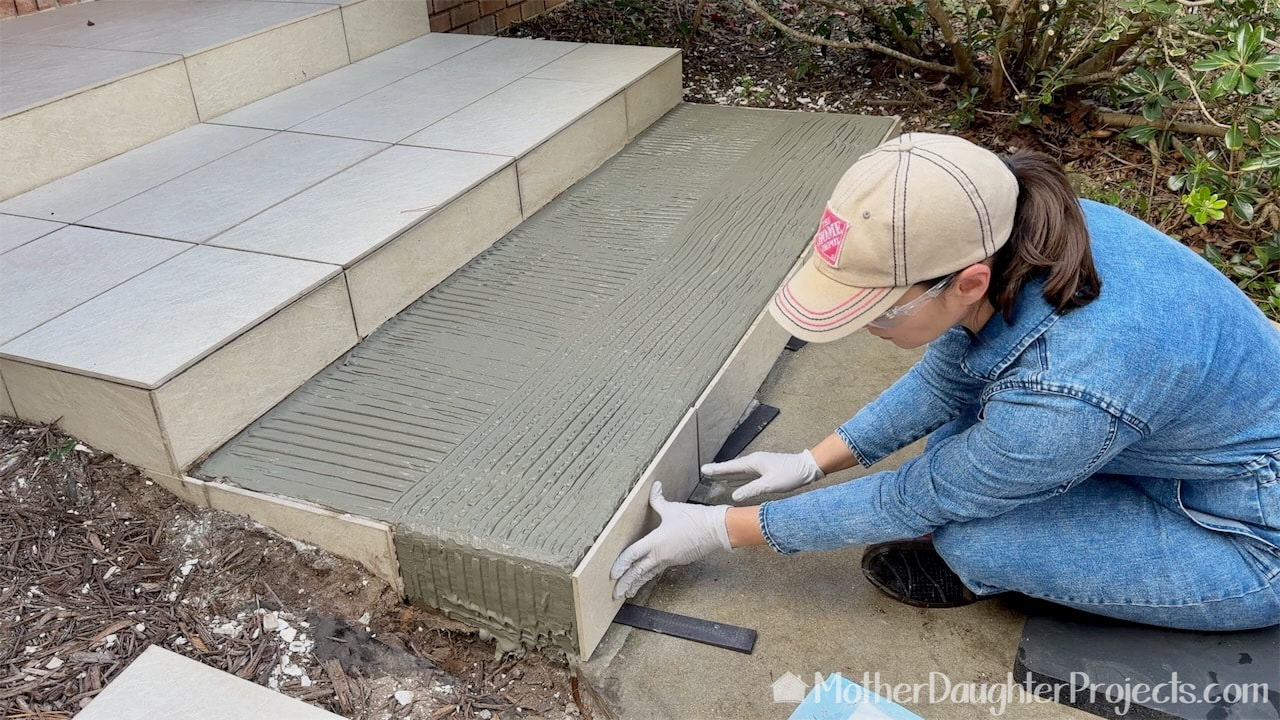
The vertical tiles were tricky to keep in place. We used plastic shims for spacing and heavy objects to keep the tiles against the concrete step.
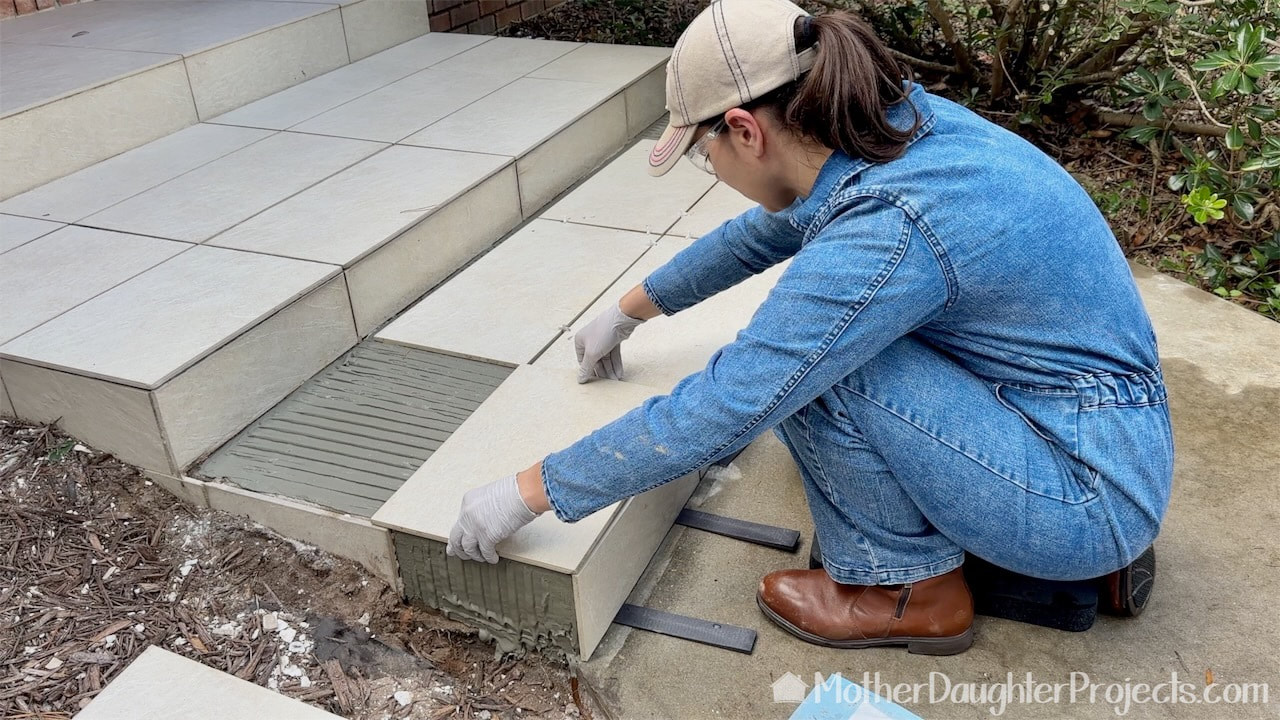
Putting the tiles into place.

Checking to see if the tiles are level to each other.
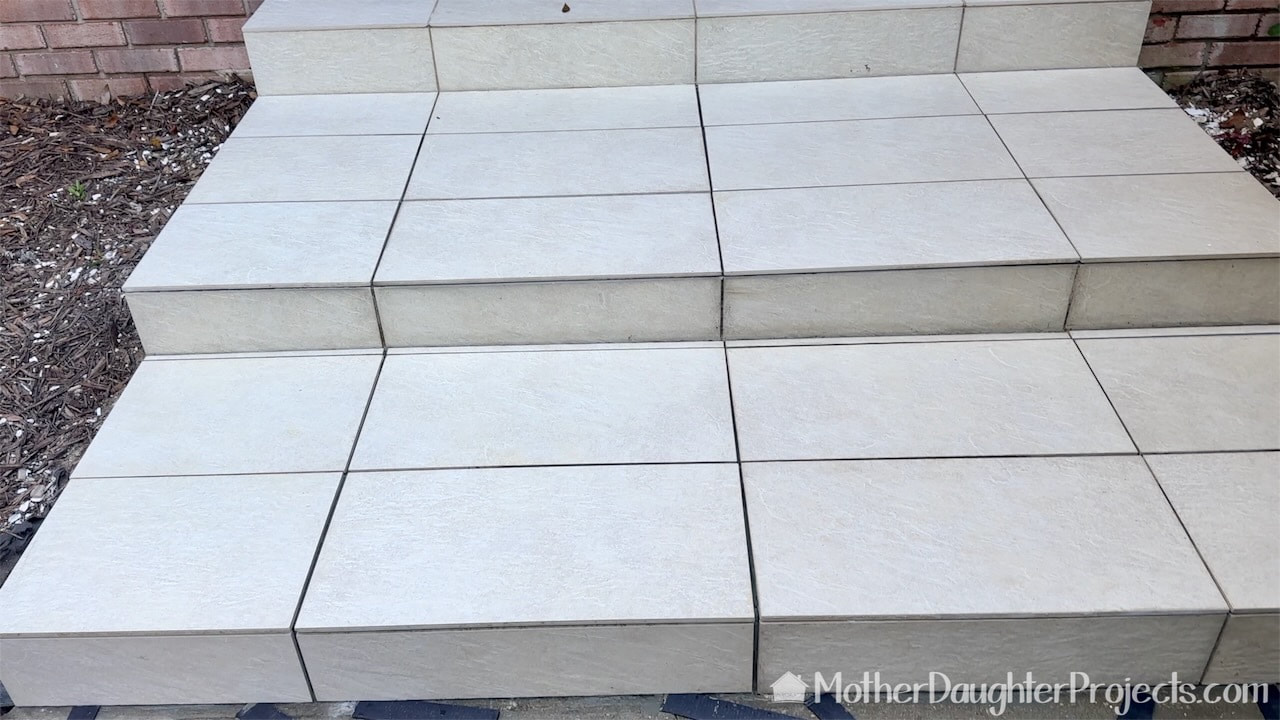
All finished and ready to grout which we did 24 hours later.
Whew! The mortar removal and tile clean up were very labor intensive, but the actual tiling process was fairly quick and very satisfying to see it all come together.
Please note: This is not a sponsored post. We are not professionals, and we don't claim to be. This is what we found worked for our project. Yours may need a little different approach. Safety first! Affiliate links are being used on this page. Purchasing via these links help support MDP. Related Projects
text by Vicki Sign up here to join our weekly email newsletter!
Not going to lie, this project was hard!
What started with "oh, we can stick down three loose tiles" turned into a major undertaking. Once we started to survey the front steps and discovered it was way more than three tiles, we definitely were concerned we were undertaking something beyond our abilities. With a lot of help from an associate in the tile department of the Home Depot who gave us spot-on advice, and with his encouragement, we set out to undertake our very first tiling project... Here's how it went!
text by Vicki Sign up here to join our weekly email newsletter!
In this video, we are going to show you how we utilized some parts from previous projects, wood from the scrap pile and a few purchased materials to create a mobile storage unit.
Steph has a growing collection of outdoor gear for hiking, camping, and kayaking. She had been using a variety of totes and an old plastic shelving unit to store these things in the garage. This old stuff was not working so she designed a unit that would hold all her stuff and would be movable.
text by Steph Sign up here to join our weekly email newsletter!
We made a sort of impulse purchase at The Home Depot of a Artika pendant light. I've been wanting to remove a ceiling fan/light from a space that doesn't really need a fan but it does need a light and this fixture looked like it would be great for the space.
We've actually installed quite a few Artika lighting fixtures. The instructions are clear and straight-forward making them relatively easy to install.
text by Vicki Sign up here to join our weekly email newsletter!
Steph didn't love the traditional ceiling fan at her house and was ready for a change.
We and by we, I mean Steph, has installed a number of enclosed blade ceiling fans with integrated LED lighting. It's a fan but there are no large blades extending from the fixuture. We really like the streamline look. Steph had been looking for a replacement ceiling fan and when she saw this Artika brand one on the Costco website, she ordered it. We've installed a lot of Artika lighting and really like the modern, bright look of their fixtures. Take a look at how we installed this Artika Edwin LED Ceiling Fan Chandelier!
text by Vicki Sign up here to join our weekly email newsletter!
We were send this circle jig by the woodworking store Woodcraft. We were excited to give it a try because we have never had a great way to make a perfect circle.
We also had the perfect project in mind that needed multiple circles. We did need a few extra items to go with the jig, but once we got that we were ready to go!
text by Vicki Sign up here to join our weekly email newsletter!
This fall, I've been doing a lot of projects on the concrete patio in my back yard. The makeover was sparked from the removal of all loose articles when there was the threat of a hurricane last August.
Before I put everything back, I realized the concrete was dirty so I decided to clean it, which led to painting it as the concrete was in poor condition, which also led me to realized the wood expansion joints were in bad shape. One end of which had entirely disappeared! So, we ordered a new vinyl expansion joint product and set out one morning to quickly take out the old ones and replace with the new vinyl. BUT....It was not quick....
text by Vicki Sign up here to join our weekly email newsletter!
The back patio at my house (Vicki) has been undergoing a refresh. Part of the refresh was moving the hardshell kayak which left the perfect place for a deck box.
The reason for the box was to store the kayak wheels and paddle. The squirrels have been nibbling on the paddle so we wanted to put it out of their reach. Plus, who doesn't need more storage for outside stuff or other stuff that needs a home?!
text by Vicki Sign up here to join our weekly email newsletter!
If you have a dog and it doesn't have free access to the outside, you find yourself making numerous trips during the day to open the door to let it out.
When Steph had one dog, it wasn't that big a deal, but when Tosh arrived it became a bigger deal. That's when she got a magnetic screen door to put over the sliding glass door opening so she could leave the porch door open so the dogs could come and go as they pleased. This worked really well until a big wind blew up unexpectedly and damaged the open porch door. Steph needed a way to provide access to the outside without continuing to add stress to the porch door and that's when she realized we should insert a screen door into the existing porch door. It certainly was one of those "duh" moments! Here's how we did it.
text by Vicki Sign up here to join our weekly email newsletter!
It's been a while since we've changed out faucets and in that time, changes to sink stoppers have occurred!
Most likely, you have the standard sink stopper mechanism. You reach round the back of the faucet to pull up the rod that opens and closes the actual sink stopper. On this faucet install, we were introduced to new and improved sink stopper technology! Well, time will tell whether this is improved technology!
text by Vicki Sign up here to join our weekly email newsletter!
Steph is becoming quite the expert when it comes to installing faucets! She says it's quite straight forward with the only real problem is trying to get comfortable in a very tight working space.
Come along as she shares how she installed a new faucet in the guest bath makeover at my house.
text by Vicki Sign up here to join our weekly email newsletter!
As you can tell from the "before" picture, this little half bath was in need of a refresh!
Take a look at the budget makeover of this guest bath or maybe if you're fancy, you call it a powder room!
text by Vicki Sign up here to join our weekly email newsletter!
Once we learned how easy it is to fake a live edge, we were hooked. We've been looking for another project where we could use the technique and found one in this half bath makeover.
We will be adding three "live" edge shelves to this bathroom. Here's how we did it.
text by Vicki Sign up here to join our weekly email newsletter!
Using picture frame ledges is an easy way to arrange and display artwork in your home or office. You can rearrange anytime and never have to put another hole in your wall!
These are easy to build requiring few tools and with no waste. Skip the Gallery Wall and make these instead!
text by Vicki Sign up here to join our weekly email newsletter!
Inspiration for DIY projects can come from almost anywhere! This project inspiration was from a quick clip from the movie, Princess Diaries 2.
While watching this movie with my grandchildren, the middle child spotted a cat on a hammock and wanted us to build one for their cat, Axel. (They also now have new kitty, Bella.) To us it looked like a PVC project so we told him we'd try to recreate it for him. This is how we did it. text by Vicki Sign up here to join our weekly email newsletter! What better than a DIY project for your pet? Well, 10 of them to choose from! Take a look at some of the pet projects we've done over the years.
text by Vicki Sign up here to join our weekly email newsletter!
Tosh, the greyhound, has LOTS of toys because greyhounds playing with toys is super cute!
But unlike most dogs, Tosh does NOT tear up or destroy her toys. So because the humans keep buying cute toys, the toy situation has gotten out of control. Time for some new storage to accommodate her growing collection. And, because of the design of this storage, her collection continues to rotate as she plays with them. No boredom for the grey! 
text by Vicki Sign up here to join our weekly email newsletter!
This is a sponsored project by Sunjoy.
This is the perfect time of year to be thinking about your spring into summer outdoor living space.
By partnering with Sunjoy, maker of outdoor structures, Steph and I were able to transform her backyard into a personal retreat with a soft-top gazebo as the centerpiece. While scrolling through the Sunjoy website to determine which gazebo to choose, we were immediately drawn to this one. As we live in Florida, I think you can figure out why! (Mosquito netting!) text by Vicki Sign up here to join our weekly email newsletter! Storage seems to be an ongoing struggle for many people. Just how do you store all the stuff that you need or want to keep? By DIYing storage you can create exactly what you need, for the stuff you need to store.
Here are five unexpected DIY solutions to try out! text by Vicki Sign up here to join our weekly email newsletter! One thing you can always count on as a homeowner is always searching for better and more efficient storage! We are no exception.
Here are a variety of storage options for garages; especially if your garage is also your workshop like ours. text by Vicki Sign up here to join our weekly email newsletter! The unofficial title for this post should be "no more metal wire shelving!"
Each one of these closet makeover started with the same wire shelving. We've lived with this type of closet shelving to know we really don't like it at all. You've probably come to the same conclusion if you have it in your closets as well. For each of these closets, we removed the wire shelving and customized the space in a variety of ways to meet specific needs in our homes.
text by Vicki Sign up here to join our weekly email newsletter!
Steph purchased these West Elm bar stools three years ago and quickly discovered the foot rest were uncomfortable! She came up with a solution that worked quite well.
After daily use for three plus years, the insulation she used for cushioning had started to degrade and compress. They were no longer soft, so it's time for a refresh.
text by Steph Sign up here to join our weekly email newsletter!
We bought a Cricut Maker cutting machine a few years ago, and have really loved creating with it. I have found many use for it especially as a way to make professional looking stick-on labels for storage and organization for my garage and home.
I just did some cleaning in my garage and needed to label some bins, so I thought this was the perfect time to share how I make labels using a sharpie on the Cricut Maker! 
text by Vicki Sign up here to join our weekly email newsletter!
Thank you to Wall Control for providing the product in this project!
Steph and I have installed a lot of Wall Control metal pegboard over the years. With the exception of the replacement plastic pegboard at Steph's house, we've always started on empty walls. This time is different!
Steph's friend, Daniel, installed old school wood pegboard in his garage when he moved into his house a few years ago. Over time, due to the Florida heat and humidity, that pegboard had started to deteriorate. The wood had expanded and contracted making the pegs not fit correctly. It was time for an upgrade! With Wall Control's partnership, Steph and Daniel, upgraded Daniel's garage from the wood pegboard to metal. |

Mother Daughter Projects
|