|
text by Vicki Sign up here to join our weekly email newsletter!
We are big fans of Nanoleaf lighting, so when I saw these Nanoleaf Shapes on sale at my local Costco, I immediately texted a picture to Steph.
It was no surprise to me that she wanted them! I purchased two sets and took them home to install, well took them to her house. While looking at the Costco website, we found that they sell a variety of the Nanoleaf brand lighting although only the Shapes version was currently on sale. I'll be checking regularly to see if any others go on sale in the future.
0 Comments
text by Vicki Sign up here to join our weekly email newsletter!
There is an awkward space above the bar at Steph's house. We've addressed the weird openings above it, but not the awkward wall space itself. We are taking care of that in this post.
The awkward space will now be a focal point in the room with the addition of a Nanoleaf panels. Don't know that those are, read on!
text by Vicki Sign up here to join our weekly email newsletter!
Many homeowners are not aware, but smoke detectors have an expiration date. Smoke detector companies state that they are good for ten years starting with the manufacturing date, NOT the install date.
With that fact in mind, you can see that Steph was loooooooong overdue to replace the smoke detectors at her house. She's been in her house nine years, but who knows when the detectors were changed out before that. Because of the difficulty and frustration I've had with the wired detectors at my house, she wanted something a little more high tech and more frustration free. Those at my house beep when the backup batteries need changing, but it's trial and error to find out when one is problematic. Uggg! After much research, she settled on the smart smoke detector Google Nest Protect. Here's how the install went.
Were you one of the millions that purchased an Amazon Fire TV Stick on Prime Day? We confess, we did! The Fire TV Stick is hardware that plugs into an existing HDMI port on your TV. With this device you can watch Netflix, Prime Video, YouTube and more!
In each of our homes, we have many Alexa enabled (Amazon) devices so it made sense to give the Fire TV Stick and Alexa Voice Remote a try.
text by Vicki Sign up here to join our weekly email newsletter!
* Note: this is not a sponsored post. We found this cool smart home camera and wanted to share with you!
We've been way overdue posting a smart home product! We hadn't planned on reviewing anything, but as it turned out, we found an inexpensive camera at The Home Depot that we found intriguing.
We have a number of different smart home cameras in each of our homes. They have lots of features and a price tag to match. We bought this Wyze Cam so we could see how it stacked up against the others we already have. Basically with this camera, you plug it in, set up the app, and you're in business in a couple of minutes. You can put it where you need it and change the location as it is not permanently mounted. It has a magnetic base so it can go on your metal pegboard, refrigerator, or other steel surface. Below are three ways you could use this camera in your home.
text by Vicki Sign up here to join our weekly email newsletter!
This post is sponsored by The Home Depot. 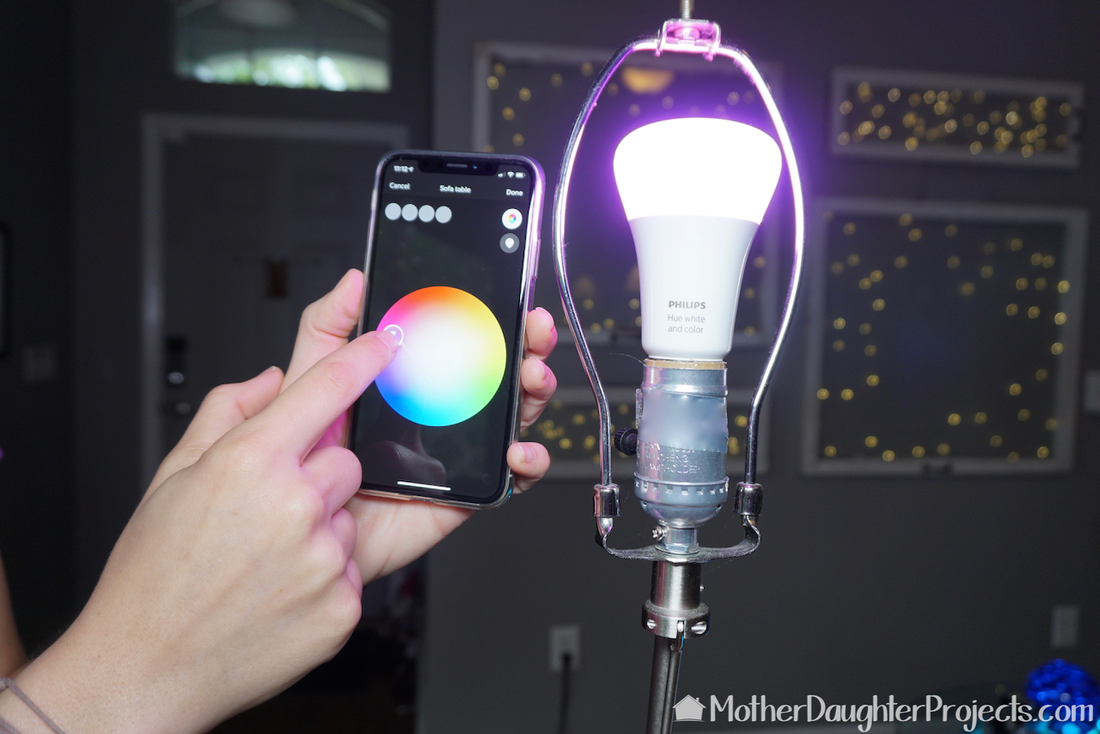
We have installed many smart home products in our homes over the years. Each one providing its own unique services, conveniences, and potential money saving features. If you have never ventured into the smart home product world, it might seem intimidating. There are so many brands and products to choose from, as well as terminology that may be foreign to you! Things like Apple HomeKit, Smart Hub, or ZigBee!
If you’re looking to take the leap (and we hope you are), the Philips Hue Starter Kit is the perfect product to begin your journey! In fact, back in 2013, this was the first smart home product Steph bought for her new home.
text by Vicki Sign up to get Mother Daughter Projects updates in your email!
This post is sponsored by The Home Depot.
In the bloopers at the end of this video, you hear me say "super simple!" That was in response to what we learned about installing this Ring Stick Up Cam! I think we have installed all version of Ring cameras now, and this one was as quick and simple as the others.
text by Vicki Sign up to get Mother Daughter Projects updates in your email!
This post is sponsored by The Home Depot.
Today, arriving home after dark, I was met with the welcoming lights from my newly installed smart garage door opener! Needless to say, since the lights in my old garage door opener have not been working in years, it was nice (and safer) not to have to stumble my way through a dark garage.
Back in 2001, Steph and I installed an opener. The install took a good three days, as we hit problem after problem. We were a little hesitant about tackling the install on the new Genie opener, considering our history. But after getting started, we couldn't have been more pleased with the ease of installation! The online video and written instructions walked us seamlessly through the installation process. What problems we did encounter, were easily solved. Genie has made the installation of garage door openers a very DIY friendly process. As long as you have the right tools, a bit of patience, a clear understanding of the process, and a buddy to help- this is a project is for you!
text by Vicki Sign up to get Mother Daughter Projects updates in your email!
This post is sponsored by The Home Depot. 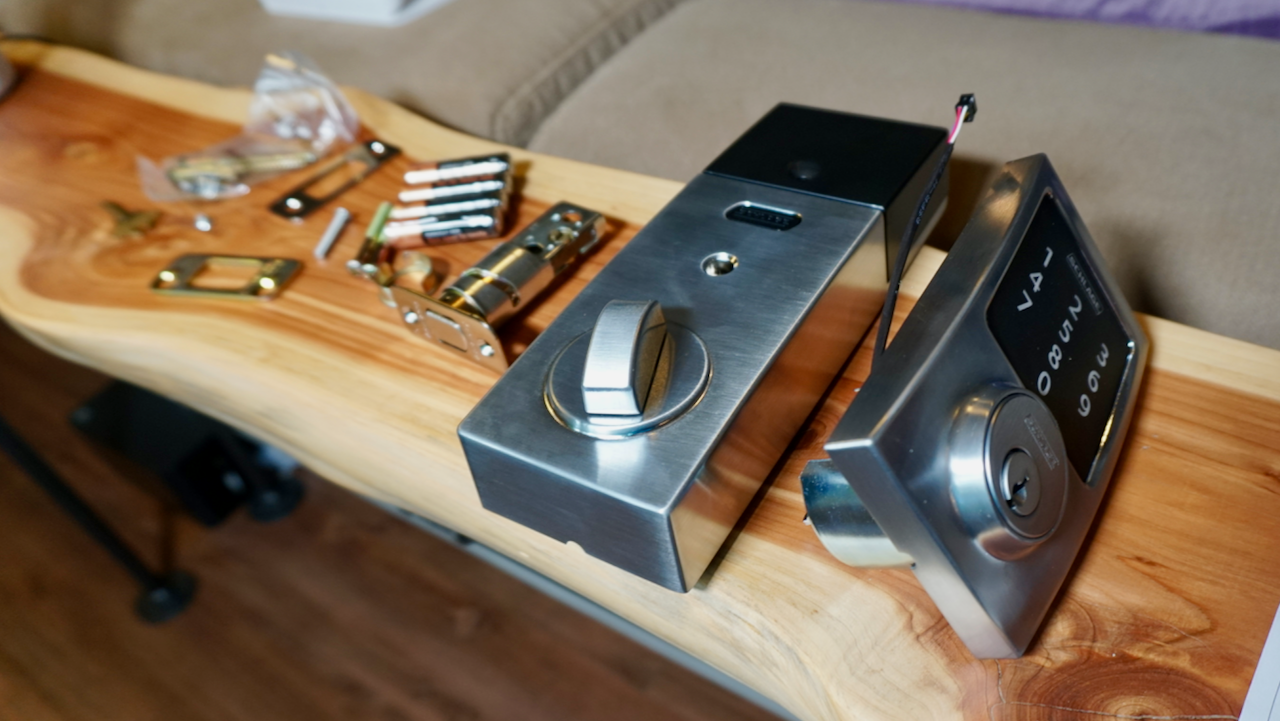
About a year ago, we installed the Schlage Sense lock at my house. We had a very easy time with the install and smart features' setup. As part of The Home Depot #smarthome campaign, we had a chance to try out the Schlage Connect Lock. Schlage makes three smart locks, and here you can click to see the differences.
With the Schlage Connect, you need an additional hub for the smart features to work. If you already have one of the compatible hubs in your home, which you can see here, then this might be a great lock for you. Check out below as we show you the lock install at Steph's house.
text by Vicki Sign up to get Mother Daughter Projects updates in your email!
This post is sponsored by The Home Depot.
My very first smart home product was the Philips Hue Go, that I use as a nightlight as well as an alarm clock. I've added several Hue bulbs since then and enjoy the app enabled features, to be able turn the bulbs off and on automatically. I was thrilled to see this Hue Pendant lights on the Philips website.
As part of the Home Depot #smarthome campaign, we are able to request additional items to install and review. I knew when I saw this pendant light that it had to be installed at my home! I love the clean lines and the mid-century look of it, and knew it would be perfect above my 1967 Norwegian teak mid-century table. 
text by Steph Sign up to get Mother Daughter Projects updates in your email!
This post is sponsored by The Home Depot.
This year, we are part of The Home Depot #smarthome campaign, which means we get sent the latest smart home products to try out and share with you!
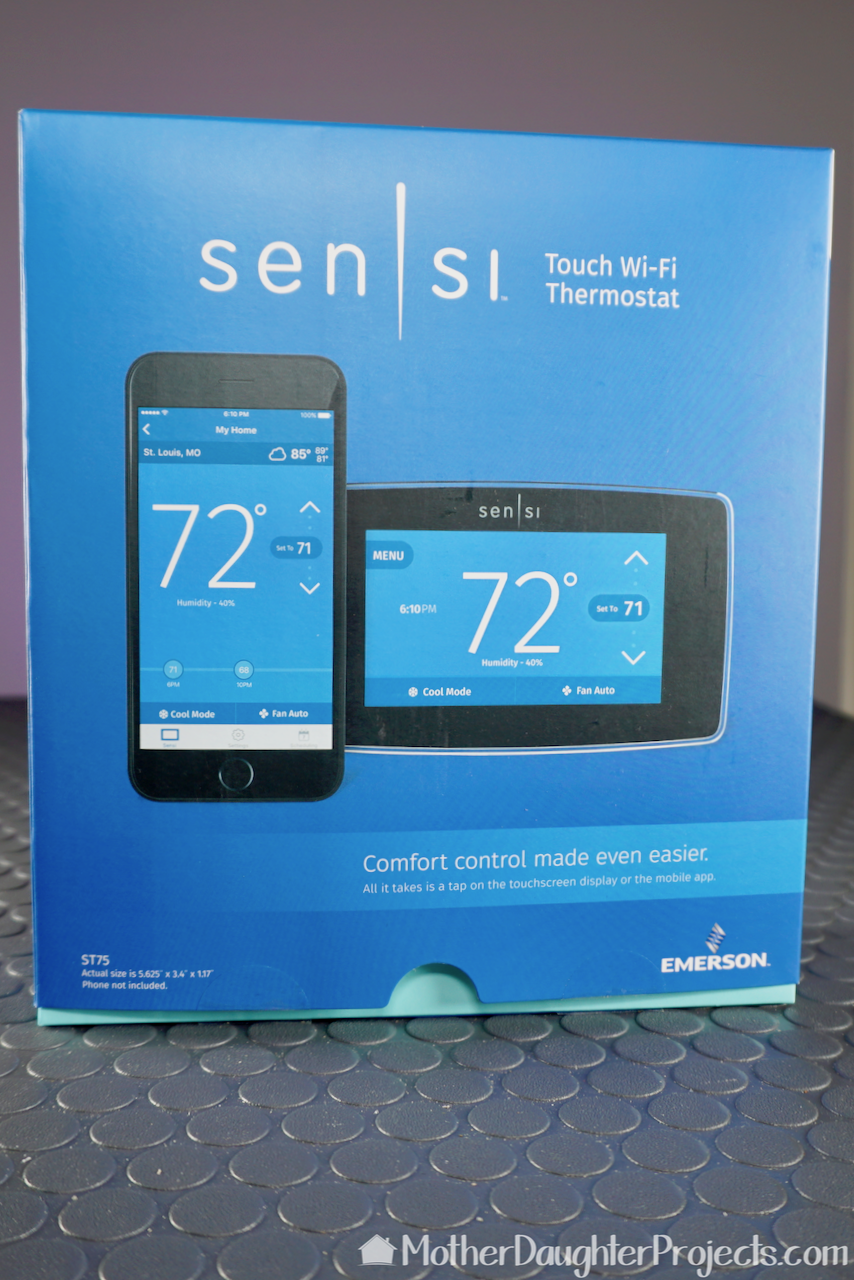
When we received the Emerson Sensi Touch Wi-Fi Thermostat, we debated where to install it, as we both have smart thermostats already installed in our homes. I decided to try it at my house, as my Nest thermostat is 5 years old, and I wanted to see what this new technology had to offer.
text by Vicki Sign up to get Mother Daughter Projects updates in your email!
This post is sponsored by The Home Depot.
We've now installed about half a dozen Ring brand smart home products at my house and Steph's house, although she has way more than I do (I feel like we need to remedy that situation)!
Ring has a variety of outdoor security devices to meet the needs of many homeowners and renters. There are models that are hardwired, some are battery operated, others plug-in, and some actually run on solar power! In this tutorial, we are replacing an existing floor light fixture with a wired Ring Floodlight cam. Click on the video to see the entire installation process.
text by Vicki Sign up to get Mother Daughter Projects updates in your email!
This post is sponsored by The Home Depot.
We've installed, and used, a variety of smart home products recently, but none as new to the market as the Ring Alarm Wireless Home Security Kit. This is a brand new offering from Ring, the makers of the widely used Ring Doorbell! If you like the Ring Doorbell, you will be excited to learn about this new DIY friendly security system.
text by Vicki Sign up to get Mother Daughter Projects updates in your email!
This post is sponsored by The Home Depot.
There's something magical in my garage! All I have to do is say "Alexa, garage on" and all the fans and lights just turn on! It's magic, I say, magical!
Really, its just smart home technology at its best! With only two different Leviton smart home products, we've been able to automate four fans, and 8 lights in the garage. These of course can be individually turned on, but Alexa gets the job done fast and the garage starts to cool off almost before we've closed the door. Read on to see how we used them, and then think about what you might want to automate in your home.
text by Vicki Sign up to get Mother Daughter Projects updates in your email!
This post is sponsored by The Home Depot.
When it comes to upcycle or repurposing projects, this drum table lamp was a pretty straight forward transformation. You only need a couple of power tools for this project. A jig saw, which is one of the least intimidating and inexpensive saws out there, as well as a drill and a hole saw bit.
You may have seen our previous drum upcycle. It was a small tom made into a table/lamp. We liked that one so much that when we saw this drum on the curb on trash day, we knew we had to rescue it! The drum we used is a floor tom, which means it already has legs. Because of this we didn't have to build something for it to stand on. That step alone eliminated a lot of work and need for additional power tools.
text by Vicki Sign up to get Mother Daughter Projects updates in your email!
This post is sponsored by The Home Depot.
We have had a small drum in Steph's garage for quite some time. We bought it at a thrift store a while back for $5. It never made it to the top of the to-do list for use in a project until now!
As part of the #smarthome campaign with The Home Depot, we received two types of WiZ smart light bulbs to review. We didn't just want to review them for you, but wanted to use them in a project. What better use than to put them into some kind of lighting fixture! That's where the drum comes in. We decided to make a little lamp/end table with one of the new bulbs. We have been using the lighted log end table for some time and love the way light is incorporated into that table, and wanted to do the same with our little drum.
text by Vicki Sign up to get Mother Daughter Projects updates in your email!
This post is sponsored by The Home Depot.
We are continuing to bring you reviews of smart home products as part of The Home Depot SmartHome Campaign. Today's post is all about smart light switches.
We got to try out two different switches by Leviton. You may not know the name Leviton, but you may have their products in your home and not know it! When we had electrical work done in the garage earlier this year, the electricians used all Leviton products. It's a company that's been around for a long time and they know their stuff! They have now entered the smart home market with a variety of products including these two switches.
text by Vicki Sign up to get Mother Daughter Projects updates in your email!
We want to thank The Home Depot for sponsoring this post!
Earlier this year, we made over an underused closet at Steph's house into a highly organized and functional craft storage space. The last step in the makeover was to add lighting. We decided Philips Hue lightstrips. With these we could get the bright light we wanted, as well as the ability to control them remotely or to set them up to turn on with motion.
Both Steph and I have been using Phillip Hue lighting for many years now and have been impressed with the simple setup and long term ease of use. These lightstrips are no exception--they're easy to install and require no attention once they are setup to active with motion.
text by Vicki Sign up to get Mother Daughter Projects updates in your email!
We want to thank The Home Depot for sponsoring this post!
The install for this Ring wired security camera is as simple as plug in and go! There's a little more to it than that, but not much more. The most difficult part of the install was deciding where to place it. Watch the end of the video to see who's placement wisdom won out!
This is the second Ring product we've installed. We've been using it for a few weeks now and couldn't be more pleased with its features and ease of use.
text by Vicki Sign up to get Mother Daughter Projects updates in your email!
This post is sponsored by The Home Depot.
Smart home technology has been a part of Steph's home pretty much since she became a homeowner in 2013. For example, Phillips Hue light bulbs went in almost as soon as she closed on the house! So, partnering with The Home Depot on their Smart Home campaign is a natural fit. Over the next year, we will be reviewing and installing a variety of smart home devices.
Up first is the Ring Video Doorbell Pro. The Ring comes with almost everything you need for installation. We only needed to provide a drill and a small bit. It comes with a screwdriver as well as a drill bit for drilling anchor holes if needed. The front of my house faces east so it gets a lot of direct sunlight. The door had faded to the point that it needed new paint so we decided to give it a new coat of paint.
Once the door was finished it was apparent that the lock and handset were looking a little dull and worn. We discussed several options and decided that we should look into installing a smart lock. We talked with The Home Depot and they offered to send us a lock and handset to try out in the brand and style we wanted! My husband uses the front door 99% of the time. He usually has his hands full making it hard to use the key without having to set things down. With the smart lock, all he has to do is tap the code into the screen (or use his iPhone) and the door opens. Easy Peasy! The install was a breeze and went without a hitch. Take a look at the process.  text by Vicki Sign up to get Mother Daughter Projects updates in your email!  There is nothing more annoying than decorating with Christmas lights and then having to plug them in to turn them on! I’ve had an outlet switch for years that I keep just to control the lights on my tree. All the lights are plugged in end to end and then the last one is plugged into the switch which is plugged into the outlet. I can toggle it on and off to control the lights.
That’s a very low tech way to control the lights but these days there are so many ways to control those lights. There are so many options from low to high tech! Take a look at some of the ways to control your holiday lighting.
text by Vicki Sign up to get Mother Daughter Projects updates in your email!
This post is sponsored by The Home Depot as a part of The Home Depot’s ProSpective Campaign. THD provided the Diablo Hole Saw used in this post.
We've designed and created alternative Christmas trees for the last couple of years as we like the look and the creative challenge. We set out to create something new for Steph's house. I don't remember if Steph had an idea, but if she did, I ignored it and lobbied for MY idea.
A few years ago I saw a basic wood tree in a mall window display. It had shelves for merchandise but it was basically a tall skinny wood triangle. We decided to create our own version of the display tree. Ours would have no shelves and would be supported by a concrete base. I really liked the concrete bases we made for Steph's nightstand and thought it would be a great idea to hold the tree up. Also, we designed the tree so that it could easily be taken apart for storage. Take a look at how it all came together!
text by Vicki Sign up to get Mother Daughter Projects updates in your email!
After the completion of our first EL Wire project we were hooked on the unique lights and wanted to use them in additional projects. When Apple announced their new phones would have wireless charging capabilities, we knew we had found our newest project! We could combine this new technology into a table with EL Wire lighting.
We decided to make two end tables for Steph’s bedroom, one with the charger and one with the EL Wire only. Take a look at how it all came together.
text by Vicki Sign up to get Mother Daughter Projects updates in your email!
This post is sponsored by The Home Depot as a part of The Home Depot’s ProSpective Campaign.
We have pretty good lighting in the garage- with the exception of one dark corner. Bright light is essential in a workshop for safety and accuracy when working. We needed a solution to this corner and the Milwaukee LED Site Light seemed the perfect solution!
The light is app enabled which means it can be controlled remotely via a phone which is convenient since we hung it from the ceiling. With the One-Key app we can turn it off and on without having to touch it. |

Mother Daughter Projects
|